

Try it!
The power of a relational database lies in combining data across tables. To do that, you first need to establish relationships between your tables. Then, put Access to work to combine data in queries, forms, and reports.
To see all existing relationships defined for a database, open an Access template, go to the Database Tools tab, and select Relationships.
Note: If you open a blank database or haven’t defined any table relationships, Access prompts you to add a table or query. Before you can add a relationship, you need at least two tables. Ideally, you build all of your tables first. To learn more, see Create relationships with the Lookup Wizard and Create relationships with the Relationships Pane.
Understanding the Relationships view
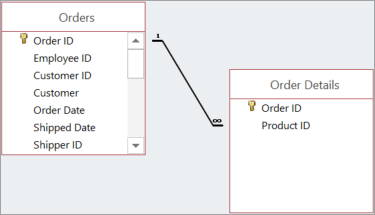
The lines in the Relationships view indicate connections between the tables. In the following image, the table on the left is the parent table. The table on the right is the child table. The line between them connects the fields (in this case, Order ID and Product ID) used to match data.
Lines and symbols show you how your tables are related:
-
A thick connecting line means you’re enforcing referential data integrity. That’s good. It keeps your data synced.
-
In our illustration, the number 1 indicates that there can be only one matching record in that table. In the Orders table shown here, only one record matches each order.
-
The ∞ symbol indicates that many records can include the same ID. In the Order Details table shown here, an order (indicated by its order ID) may appear more than once, because the same order may include multiple products.
Types of relationships between tables
There are three types of relationships between tables:
-
One-to-one. When each item in each table only appears once. For example, each employee can have only one company car to use. For more information, see Create one-to-one relationships.
-
One-to-many. When one item in one table can have a relationship to multiple items in another table. For example, each purchase order can include multiple products.
-
Many-to-many. When one or more items in one table can have a relationship to one or more items in another table. For example, each order can have multiple products, and each product can appear on many orders. To find out more, see Create many-to-many relationships.
One-to-many relationships
One of the most common relationships between tables in well-designed databases is the one-to-many relationship.
Relationships between tables normally rely on the primary key in one of the tables. Recall that the primary key is a unique identifier (often numeric) for each record. To show that the information in two different tables is related, you usually create a relationship using the primary key from one of the tables.
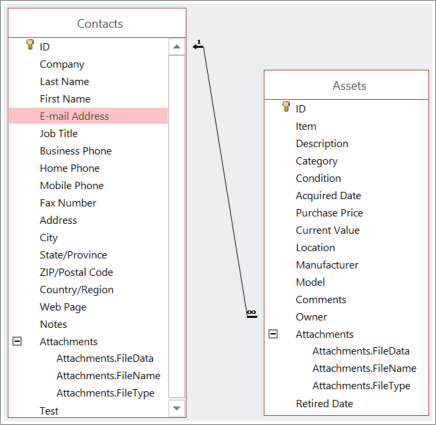
In the relationship shown here, for example, each person in the Contacts table has an ID, which is the primary key (indicated by the key symbol next to it). That ID also appears in the Owner field in the Assets table. To email the person associated with an asset, get the value from the Email Address field. To do so, look for the value in the Owner field of the Asset table and then search for that ID in the Contacts table. The number 1 at one end of the connecting line and the ∞ symbol at the other end indicate that this is a one-to-many relationship, so one contact might be associated with many assets.
Edit a relationship
If you are modifying an existing database or if you created your database from a template, you can edit the existing relationships to meet your needs.
Note: If the tables you want to work with are in use, you must first close them, along with any open objects that use them.
-
Select Database Tools > Relationships.
-
Select the line connecting two related tables.
Tip: If you don’t see the relationship you want, on the Design tab, in the Relationships group, select All Relationships.
-
On the Design tab, select Edit Relationships.
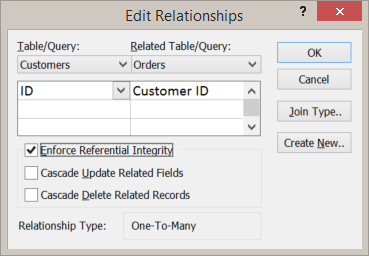
Table/Query is the parent table on the left (in this example, Customers).
Related Table/Query is the child table (in this example, Orders).
Even if the tables don’t appear in this order in the Relationships view, their placement in the dialog box indicates the direction of the line connecting them and the relationship. That’s important if, for example, it’s a one-to-many relationship, because it indicates that the table on the left is the one (the parent table) and the table on the right is the many (the child table).
-
To change the fields that connect the tables, select a different field below each table shown. In this example, the ID field in the Customers table connects to the Customer ID field in the Orders table.
-
Change the way Access synchronizes your data between tables.
Enforce Referential Integrity
To prevent invalid data and to keep references in sync across table relationships, select this.
For example, suppose you have a one-to-one relationship between the Employees and Employee Benefits tables. If an employee leaves the company and you remove them from your Employees table, the related employee record in the Employee Benefits table is removed, too.
Sometimes enforcing referential integrity doesn’t make sense. For example, suppose you have a one-to-many relationship between Shippers and Orders. You delete a shipper, and that shipper maps to orders in the Orders table. Those orders become orphans, meaning that they still contain a Shipper ID, but the ID is no longer valid because the record that it references no longer exists.
Cascade Update Related Fields
To make sure that data in related fields is updated in all the related tables, select this.
For example, suppose you simply want to change the ID of a shipper. Setting this option ensures that the Shipper ID is updated—not just in the Shipper table but also in any other tables connected to it that also include that Shipper ID, such as the Orders table.
Cascade Delete Related Records
The decision to select this depends on whether you need to retain records in some tables even though they might be deleted from other tables.
For example, suppose you delete a shipper. If this option is selected, Access deletes all records in all tables that reference that Shipper ID, including all orders (in the Orders table) shipped by that shipper. You only select this option if you are sure you want your order history deleted.
-
To change the relationship between the tables from an inner join to an outer join, select the Join Type button. For more information, see Create queries with outer joins.
Delete a table relationship
Note: If the tables you want to work with are in use, you must first close them, along with any open objects that use them.
To remove a table relationship:
-
Select Database Tools > Relationships.
-
Select the line connecting the two related tables.
Tip: If you don’t see the relationship you want, on the Design tab, in the Relationships group, select All Relationships.
-
Select the Delete key. If you’re prompted to verify that you want to delete the relationship, select Yes.
Note: When you remove a relationship, you also remove referential integrity support for that relationship, if any. As a result, Access will no longer prevent changes that result in orphan records on the many side of a one-to-many relationship.
Want more?


Need more help?
Want more options?
Explore subscription benefits, browse training courses, learn how to secure your device, and more.


Communities help you ask and answer questions, give feedback, and hear from experts with rich knowledge.


