
Project automatically wraps text in the Task Name column, but you can turn text wrapping on in other columns as well. This helps change the row height in your project.
-
Display a view that has a table (except the Team Planner).
-
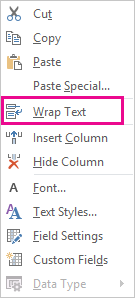
Right-click the heading of the column you want to wrap, and click Wrap Text.
Project wraps text in all cells of the column if it is longer than the column width and has at least one space. It doesn’t recognize manual line breaks.
-
To turn text wrapping off, right-click the column heading and click Wrap Text again.
Note: Text that's already wrapped stays wrapped until you decrease the adjusted row height. Any new text you type won't wrap—you'll need to click Wrap Text again to turn it back on.
Adjust the column height to wrap text
A quick way to wrap text that isn't wrapped or completely visible in a cell is to increase the row height to enlarge the cell.
-
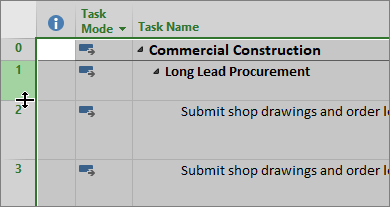
In any sheet view, drag the bottom of the row heading (the leftmost cell) down until the text wraps onto the next line.

Tip: You can adjust the row height for multiple rows at the same time. Just select the rows, and then drag the bottom of the row heading of the last row in the selection to the height you want.
-
To unwrap text, drag the bottom border of the row heading up until the text is on one line again.
Adjust all rows to the same height
Here's a quick way to adjust all rows to the same height. You can use this when you no longer want the text to be wrapped to multiple lines.
-
Right-click the header of the column you no longer want the text to be wrapped for, and choose Wrap Text.
-
Select the box in the top left corner of the view to select the entire view.

-
Hover over a row header divider line. When you get the resize cursor, drag up or down to resize the row. When you are done dragging the line, all rows will be resized to the size you chose.
More information
-
Learn more about working with text in Project.
-
If the wrapped text in your columns doesn't show as wrapped when you print your project, try downloading this hotfix.


