
When you're showing a presentation, you can turn your mouse into a laser pointer to draw attention to something on a slide.
Turn on the laser pointer
-
Do one of the following:
-
To use the laser pointer in Slide Show view: On the Slide Show tab, click either From Beginning or From Current Slide to start your slide show.

-
To use the laser pointer in Reading view: On the View tab, click Reading View.

-
-
Press and hold the Ctrl key, and then click and drag the left mouse button to point to the contents on the slide that you want to draw attention to.
Tip: If you want your audience to see the laser pointer but not your mouse pointer, be sure to press and hold Ctrl before you move your mouse to keep the mouse pointer hidden.
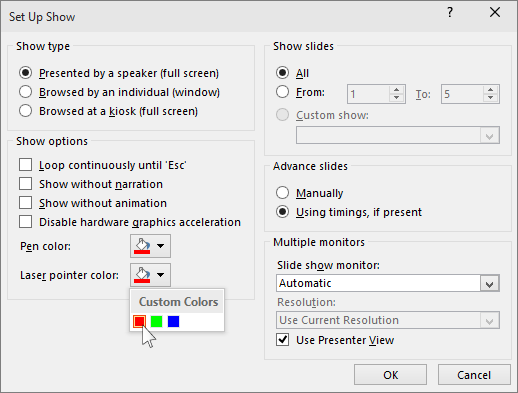
By default, the color of the pointer is red, but green and blue are also available. To change the color of the laser pointer, do the following:
-
On the Slide Show tab, in the Set Up group, click Set Up Slide Show.
-
In the Set Up Show dialog box, under Show options, select the color that you want from the Laser pointer color list, and then click OK.
(For complete details about recording and timing your slide shows, see Record a slide show with narration and slide timings.)
To record your laser pointer movements to enhance a web-based or self-running slide show, do the following:
-
On the Slide Show tab, in the Set Up group, point to the arrow next to Record Slide Show

Click either Start Recording from Beginning or Start Recording from Current Slide, depending on where you want to start to record your slide show.
-
In the Record Slide Show dialog box, select the Narrations and laser pointer check box.
-
Click Start Recording.
Tip: To pause the narration, in the Recording box, click Pause. To resume, click Resume Recording.
-
Press and hold Ctrl, and then click and drag the left mouse button to point to the contents on the slide that you want to draw attention to.
-
To move to the next slide, release Ctrl, and then click the left mouse button.
-
To end your slide show recording, right-click the slide, and then click End Show.
The recorded slide show timings are automatically saved and the slide show appears in Slide Sorter view with timings under each slide.
-
To view the pointer movements and timings you just recorded, on the Slide Show tab, in the Start Slide Show group, click either From Beginning or From Current Slide.
To re-do your pointer movements or slide timings, just repeat these steps.
The pointer is set to Automatic, which means it is hidden automatically after three seconds of inactivity. The pointer appears again when you move the mouse.
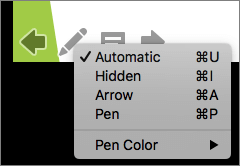
During the slide show, in the lower-right corner of the slide, select 
|
To |
Select |
|---|---|
|
Show the pointer automatically |
Automatic |
|
Always hide the pointer |
Hidden |
|
Always show the pointer |
Arrow |
|
Write on the slides |
Pen |
|
Select ink color for pen |
Pen Color |
Tip: To switch between the pointer and pen, press 
Turn on the laser pointer
-
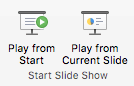
On the Slide Show tab, click either Play from Start or Play from Current Slide to start your slide show.
-
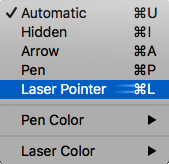
In Slide Show view, four helper buttons appear at the lower left corner of your slide. The second one determines how the mouse pointer appears to viewers:

Click that Pen button, and then choose Laser Pointer from the pop-up menu:
-
Press the Option key, and then click and drag the left mouse button to point to the contents on the slide that you want to draw attention to.
Change the color of your laser pointer
By default, the color of the pointer is red, but green and blue are also available. To change the color of the laser pointer, do the following:
-
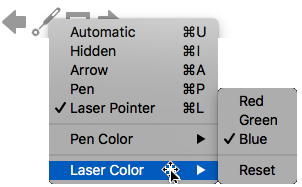
In Slide Show mode, click the Laser Pointer icon at the lower left portion of the slide:

-
On the pop-up menu, point to Laser Color, and then select the color you want.
The pointer is set to Automatic, which means it is hidden automatically after three seconds of inactivity. The pointer appears again when you move the mouse.
During the slide show, in the lower-right corner of the slide, select
|
To |
Select |
|---|---|
|
Show the pointer automatically |
Automatic |
|
Always hide the pointer |
Hidden |
|
Always show the pointer |
Arrow |
|
Write on the slides |
Pen |
|
Select ink color for pen |
Pen Color |
Tip: To switch between the pointer and pen, press


