
Use the Navigation Options dialog box to show or hide groups of database objects that appear in the Navigation Pane, manage custom categories and groups, set display options, and open database objects in the Navigation Pane with single or double mouse clicks.
Select a category on the left to show assigned groups on the right.
For background information, see Use the Navigation Pane and Customize the Navigation Pane.
Grouping Options
Use these options to show or hide the groups in the predefined categories and to create and manage custom categories and groups.
Categories
To manage the predefined and custom categories in the Navigation Pane, do the following:
-
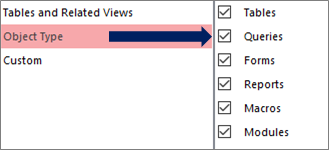
To see the groups assigned to a category in the Groups for <Category Name> section, select a category.
For example, if you select Tables and Related Views under Categories, you see a list of assigned objects under Groups for "Tables and Related Views".
-
To reorder the list of custom categories, if any are defined, select one, and then click the up or down arrow. In the following example, you have a custom category for all Northwind Traders objects:

Note You cannot reorder the predefined categories of Tables and Related Views and Object Type which normally appear at the top of the Categories list and the Navigation Pane.
-
To modify the custom categories, do the following:
-
Add To create a new custom category, select Add Item and then enter the name in the box.
-
Delete To remove a custom category, select Delete Item, and then confirm the operation.
-
Rename To change the name of a custom category, select Rename Item and then enter the name.
Note You cannot modify the predefined categories, Tables and Related Views and Object Type.
-
Groups for <Category Name>
To manage the groups assigned to the category selected in the Categories section, do the following:
-
To display or hide a group in the Navigation Pane, select or clear the check box next to the predefined or group name.
-
To reorder the groups of a custom category, select the group want to move, and then click the up or down arrow that appear next to it. In the following example, you have a custom group for all objects related to Suppliers:

-
To modify the groups of a custom category, do the following:
-
Add To create a custom group, select Add Group.
-
Delete To remove a category, select a custom group, select Delete Group, and then confirm the operation.
-
Rename To change the name of a category, select a custom group name, select Rename Group, and then enter the name.
-
Note You cannot modify groups assigned to the Tables and Views and Object Type predefined categories.
Display Options
To set display options, do the following:
-
Show Hidden Objects Select to show hidden database objects in the Navigation Pane. This setting is cleared by default.
-
Show System Objects Select to Show system tables and other system objects in the Navigation Pane. This setting is cleared by default.
By default, some system objects are hidden in Access. To see all system objects, enable the Show Hidden Objects option as well.
Open Objects with
To control how many clicks open an object, do the following:
-
Single-click Select to open with a single mouse click.
-
Double-click Select to open with a double mouse click. This is the default.


