
Your handwritten signature gives your document a personal touch. You can scan your signature and store it as a picture to insert in the document.
You can also insert a signature line to indicate where a signature should be written.
Create and insert a handwritten signature
You need a scanner to do this.
-
Write your signature on a piece of paper.
-
Scan the page and save it on your computer in a common file format: .bmp, .jpg, or .png.
For information on how to use your scanner, use the manufacturer’s manual or Web site.
-
Open the image file in Word.
-
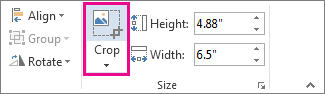
Select the image and on the Picture Format tab, select Crop and use the handles to crop the image.
-
Right-click the image and choose Save as Picture to save as a separate file.
-
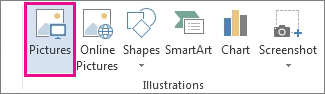
To add the signature to a document, select Insert > Picture s.
Include typewritten text with your reusable signature
If you want information like your job title, phone number, or email address to be part of your signature, save it along with the picture as AutoText.
-
Type the text you want under the inserted picture.
-
Select the picture and the typed text.
-
Select Insert > Quick Parts.

-
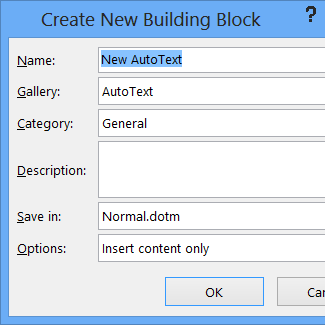
Select Save Selection to Quick Part Gallery. The Create New Building Block box opens.
-
In the Name box, type a name for your signature block.
-
In the Gallery box, select AutoText.
-
Select OK.
-
When you want to use this signature, place the insertion point where you want to insert the signature block.
-
Select Insert > Quick Parts > AutoText, and then select the name of your signature block.
Insert a signature line
Use the Signature Line command to insert a signature line with an X by it to show where to sign a document.
-
Click where you want the line.
-
Select Insert > Signature Line.

-
Select Microsoft Office Signature Line.
-
In the Signature Setup box, you can type a name in the Suggested signer box. You can also add a title in the Suggested signer’s title box.
-
Select OK. The signature line appears in your document.

Your handwritten signature gives your document a personal touch. You can scan your signature, store it as a picture, and then insert your signature in Word documents.
Scan and insert a picture of your handwritten signature
You need a scanner to do this.
-
Write your signature on a piece of paper.
-
Scan the page and save it on your computer in a common file format: .BMP, .GIF, .JPG, or .PNG.
Tip: For information on how to use your scanner, use the manufacturer’s manual or Web site.
-
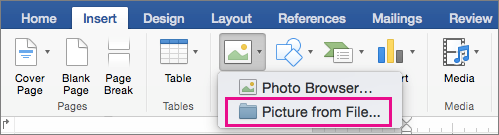
On the Insert tab, select Pictures > Picture from File.
-
Browse to the picture you want to insert, select it, and then select Insert.
-
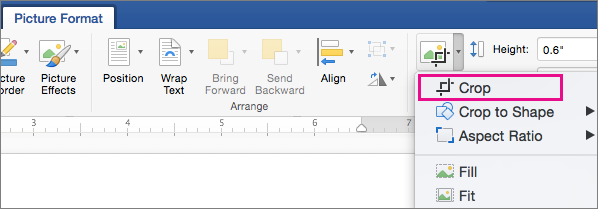
Select the picture to show the Picture Format tab.
-
On the Picture Format tab, select Crop, and then crop the signature.
-
Right-click the picture, and then select Save as Picture to save it as a separate file you can use in other documents.
Include text with your reusable signature
If you want information, such as your job title, phone number, or email address to be part of your signature, save it along with the picture as AutoText.
-
Type the text you want under the inserted picture.
-
Select the picture and the typed text.
-
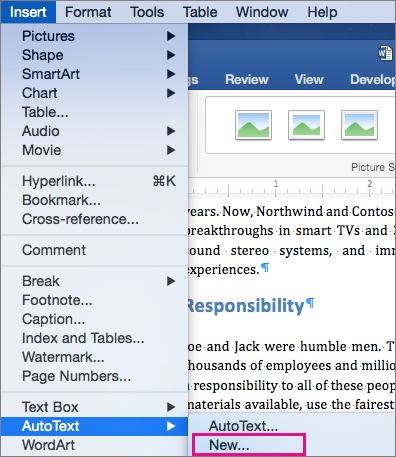
On the Insert menu, select AutoText > New.
-
The Create New AutoText box opens.

Next to Name, type a name for your signature block and select OK.
-
When you want to use this signature, place the insertion point where you want to insert the signature block.
-
On the Insert menu, select AutoText > AutoText, and then select the name of your signature block.


