
When you create a project, it uses a default base calendar to schedule work. This may be a typical Monday through Friday, 8 AM to 5 PM work week, or it may be something else that better matches your organization's work.
If your project has working times that fall outside of the default hours, you can:
-
Adjust the working times for the project calendar to meet your needs.
OR
-
Change to a different base calendar (24 Hours or Night Shift, for example).
Adjust the working times for your project
If your project's regular working schedule doesn't map to any of the available base calendars, you can change the working days and times for your project so that work gets scheduled appropriately.
Tip: Are other projects using a similar schedule? Save your coworkers time by creating your project's schedule as a new base calendar.
-
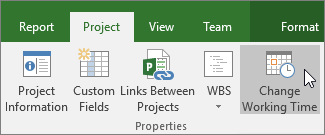
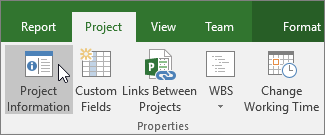
Select Project > Properties > Change Working Time.
-
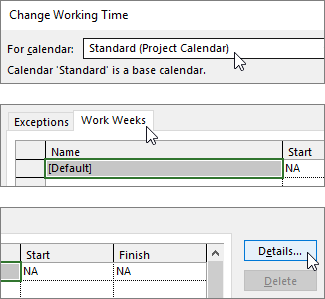
In the For calendar list, select the (project calendar) you'd like to edit. Select the Work Weeks tab, and then select Details.
Note: Use the Exceptions tab to add holidays to your schedule.
-
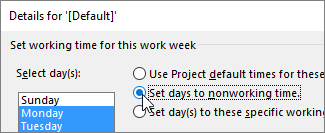
Select the day(s) you want to change the working times for, and then choose whether you want them to be working or nonworking time.
-
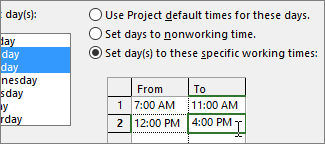
If you chose Set day(s) to these specific working times, use the From and To columns to set the working times for the selected days.
-
Select OK to return to the Change Working Time dialog box, and then select OK again.
Tip:
Do you want to change working days or times mid-project? Before selecting Details, give each timeframe a name on the Work Weeks tab, and add Start and Finish dates. Select the first timeframe to set Details, and then repeat the process for the next timeframe.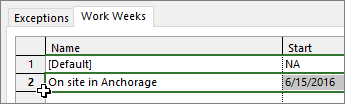
Change the base calendar for project scheduling
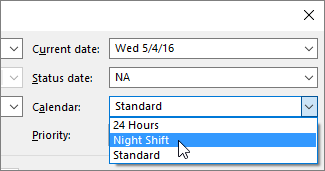
Project includes a few different base calendars, by default, and your organization may have additional base calendars that an administrator has added to capture other common schedules. If a base calendar already exists that corresponds to your project schedule, you can easily change your project's base calendar in the Project Information dialog box.
-
Select Project > Properties > Project Information.
-
In the Calendar list, choose the calendar you'd like to use to schedule work, and then select OK.
Tasks and resources can use their own calendars, in addition to this project calendar. Learn more about working with calendars.
What else can I do with calendars?
Project lets you fine-tune scheduling using multiple calendars. If you understand how calendars work together, it's easier to plan how your project's dates will be impacted. Here are a few more articles you might find helpful to build a more accurate picture of the working and nonworking days in your organization.
PROJECTS
Create a new base calendar
Add a holiday to the project calendar
TASKS
Create a calendar for a task
RESOURCES
Set a unique schedule for a specific resource
Add a resource's vacation time
Change resource availability without using a calendar
If you don't need a calendar anymore, you can delete it.
When you are working with calendars in Project Professional, there are different things you can do to account for working and nonworking time in your organization. The following sections provide examples and include steps to make each change.
Note: Steps in this article assume that you are already creating or editing a calendar. For more information about how to create a calendar, see Create a new enterprise calendar or Copy an existing calendar.
What do you want to do?
Change a working day into a nonworking day
Occasionally, you may have to turn a working day into a nonworking day. For example, if your organization observes specific days as holidays, you can turn those holidays into nonworking days. Project Server will not schedule work on nonworking days.
To change a working day into a nonworking day:
-
Select the date on the calendar that you want to convert into a nonworking day.
-
On the Exceptions tab, type a name for the nonworking day in the Name column. The Start and Finish columns are automatically populated with the date that you selected in Step 1.
Note: Although you can create multiple exceptions that contain a specific day, only the lowest-level exception will apply on that day. For example, you might have one exception that changes the standard working times for a month, and another exception that calls out a specific day within that month as a nonworking day. Because the single-day exception is at a lower level than the month-long exception, the single nonworking day exception is applied on that day. You cannot create multiple single-day exceptions on the same day.
Change a nonworking day into a working day
There may be times when your organization has to work on what would otherwise be a nonworking day. For example, say your organization participates in a convention each year that occurs over a weekend. You can convert weekend days of the convention into working days, so that Project Server knows to schedule work on those days.
To change a nonworking day into a working day:
-
Select the date on the calendar that you want to turn into a nonworking day.
-
On the Exceptions tab, type a name for the working day in the Name column, and then press Enter.
Note: While you can create multiple exceptions that contain a specific day, only the lowest-level exception applies on that day. For example, you might have one exception that changes the standard working times for a month, and another exception that calls out a specific day within that month as a nonworking day. Because the single-day exception is at a lower level than the month-long exception, the single nonworking day exception is applied on that day. You cannot create multiple single-day exceptions on the same day.
-
Select the row that you added for the working day, and then select Details.
-
In the Set working times for these exceptions section, select Working times, and then set the working times for that day by adjusting the times in the From and To columns.
-
If your organization observes these working times on a regular basis (for example, once a month or once a year), under Recurrence pattern, choose whether these times should recur Daily, Weekly, Monthly, or Yearly, and then set the following options:
-
Daily Set the frequency for these working times. For example, every 10 days.
Tip: If you find that the working day exception is happening very frequently, you may find it easier to change the default calendar options under Schedule on the Project Options dialog box in Project Professional. All calendars begin with these default days and times. It may be easier to change the default calendar options than to set up exceptions that recur frequently.
-
Weekly Specify how often you want the working times to recur, and on what day of the week you want them to recur. For example, every two weeks on Saturday.
-
Monthly Choose what day of the month and at what monthly frequency you want the working times to recur. For example, day 15 of every third month, or the third Saturday of every sixth month.
-
Yearly Choose on which day of the year you want the working times to recur. For example, August 21, or the third Saturday of July.
-
-
In the Range of recurrence section, specify the period when you want the recurrence to take place, if appropriate.
-
Start Choose the date when you want the recurrence pattern to begin.
-
End after If you want the recurrence to happen only a set number of times, choose End after, and then type the number of instances when the working times should occur.
-
End by If you want the recurrence to happen only during a certain time period, choose End by, and then choose when the recurrence should stop.
-
-
Select OK.
Change the working times for a working day
While the specific days on the calendar may be accurately accounted for as working and nonworking, there may be working days that use a different time schedule than the typical 8-hour work day. You can adjust the working times for a specific working day so that work is accurately scheduled on that day.
To change the working times for a working day:
-
Select the date on the calendar for the working day that you want to adjust.
-
On the Exceptions tab, type a name for the changed working day in the Name column, and then press Enter.
Note: While you can create multiple exceptions that contain a specific day, only the lowest-level exception applies on that day. For example, you might have one exception that changes the standard working times for a month, and another exception that calls out a specific day within that month as a nonworking day. Because the single-day exception is at a lower level than the month-long exception, the single nonworking day exception is applied on that day. You cannot create multiple single-day exceptions on the same day.
-
Select the row that you added for the changed working day, and then select Details.
-
Under Set working times for these exceptions, select Working times, and then set the working times for that day by adjusting the times in the From and To columns.
-
If your organization observes these working times on a regular basis (for example, once a month or once a year), under Recurrence pattern, choose whether these times should recur Daily, Weekly, Monthly, or Yearly, and then set the following options:
-
Daily Set the frequency for these working times. For example, every 10 days.
-
Weekly Specify how often you want the working times to recur, and on what day of the week you want them to recur. For example, every two weeks on Saturday.
-
Monthly Choose what day of the month and at what monthly frequency you want the working times to recur. For example, day 15 of every third month, or the third Saturday of every sixth month.
-
Yearly Choose what day of the year you want the working times to recur. For example, August 21, or the third Saturday of July.
-
-
In the Range of recurrence section, specify the period when you want the recurrence to take place, if appropriate.
-
Start Choose the date when you want the recurrence pattern to begin.
-
End after If you want the recurrence to happen only a set number of times, choose End after, and then type the number of instances when the working times should occur.
-
End by If you want the recurrence to happen only during a certain time period, choose End by, and then choose when the recurrence should stop.
-
-
Select OK.
Change the working times for each day of a work week
If your organization has a specific work week (or set of work weeks) when the working times are different from the default, you can make those changes to the working times for each day in a work week, during a set period of time. For example, if your organization does not use the default Monday through Friday, 08:00 to 17:00 schedule, you can change the working times for each day in the work week to reflect your organization's accurate schedule.
To change the working times for each day of a work week:
-
Select the date on the calendar where you want the changed working times to begin.
-
On the Work Weeks tab, type a name for the changed work week or weeks in the Name column, and then press Enter.
-
Change the date in the Finish column for the row that you just added, to reflect the last day that you want to include in the changed work week or weeks.
-
Select Details.
-
In the Select day(s) section, select the day of the week that you want to use adjusted working times. Press Ctrl and click, or press Shift and click to select multiple days.
-
If you want to turn the selected day or days into nonworking time, select Set days to nonworking time.
-
If you want to change the working times for the selected day or days, select Set day(s) to these specific working times, and then set the working times by typing in the From and To columns.
-
Select OK.


