
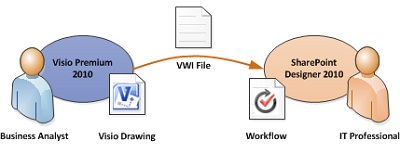
With Microsoft Visio Premium 2010, you can create a workflow in Visio and then export it to Microsoft SharePoint Designer 2010. Business analysts and process analysts who are already familiar with flowcharting in Visio can use Visio to design a workflow that represents their business logic, export the workflow, and enable a site owner or IT professional using SharePoint Designer to implement it in a form that can be automated in SharePoint 2010.
What do you want to do?
Create a workflow
Visio Premium 2010 includes a new template called Microsoft SharePoint Workflow. You can use this template to create a SharePoint Workflow in Visio that you can export to SharePoint Designer 2010and then publish it to a SharePoint site.
Note: Other Visio templates are not recognized by SharePoint as a valid SharePoint workflow.
In the Microsoft SharePoint Workflow template, several new stencils are included which feature new master shapes that are specific to SharePoint workflows:
-
SharePoint Workflow Actions – Represents a “task” or a “step” in the workflow. For example, “Send an Email” is a SharePoint workflow action.
-
SharePoint Workflow Conditions – Similar to a decision shape in a flowchart, where a flowchart path is dependent on some parameter or logic. An example of a workflow condition is “Created By,” where the next workflow activities depend on who created the item in the workflow.
-
SharePoint Workflow Terminators – Used to signify the start or the end of a workflow
All of the master shapes in the SharePoint Workflow stencils correspond directly to workflow activities in SharePoint. Shapes found in other stencils are not recognized as workflow activities by SharePoint. For more information about SharePoint workflow shapes in Visio and how they appear in SharePoint Designer 2010, see SharePoint Workflow activities guide.
To start authoring a SharePoint Workflow, you can drag shapes to the drawing canvas, just like creating any flowchart in Visio. In order to successfully pass validation, all workflows should start with the Start shape, and end with the Terminate shape.
To create a SharePoint Workflow in Visio Premium 2010, do the following:
-
In Visio Premium 2010, on the File tab, click New.
-
Under Choose a Template, under Template Categories, click Flowchart. Click Microsoft SharePoint Workflow, and then click Create.

-
From the Shapes window, drag a Start shape onto the drawing page. To pass validation, all SharePoint workflows must begin with a Start shape.

-
From the Shapes window, drag action and condition shapes to the workflow.
Note: You can replace the default shape text with a more specific and accurate description of the workflow activity. This helps the person implementing your workflow in SharePoint Designer 2010 understand the business intention of your workflow.
-
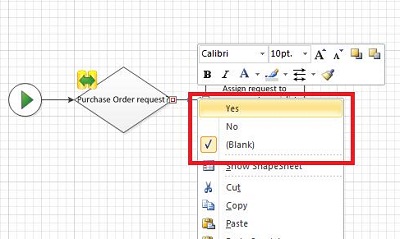
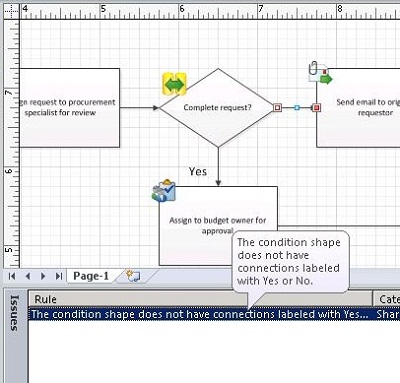
Link each activity to the previous one using connectors. For connectors following a condition shape, right-click the connector, and then click Yes, No, or (Blank) to add a label to the connector.
-
To terminate the workflow, from the Shapes window, drag a Stop action onto the drawing page. A Stop shape at the end of the workflow is necessary for the workflow to pass validation.
Validate a workflow
When exporting a SharePoint workflow from Visio Premium 2010 to SharePoint Designer 2010, the diagram must first be validated. If the workflow diagram is not valid, an Issues window appears which includes a list of issues that must be repaired before the workflow can be exported. For more information about validation issues and how to correct them, see SharePoint Workflow validation issues in Visio.
To validate your workflow, do the following:
-
On the Process tab, in the Diagram Validation group, click Check Diagram.

-
Review any issues in the Issues window and correct them.
Note: To see where the issue is located, click the issue in the Issues pane. The affected shape or connector is highlighted in red in the drawing page. For more information about validation issues and how to correct them, see SharePoint Workflow validation issues in Visio.
Export a workflow to SharePoint
When you are done authoring your workflow in Visio Premium 2010, you can export the workflow to a Visio Workflow Interchange (.vwi) file that can be imported directly into SharePoint Designer 2010. The .vwi file contains a set of XML and support files that have been bundled and compressed into a single file. Depending on the complexity of the workflow, the .vwi file is typically between 100 kilobytes (KB) and 1 megabyte (MB) in size and can be moved, copied, archived, and sent via e-mail just like any other compressed file.
To save your SharePoint Workflow as a .vwi file, do the following:
-
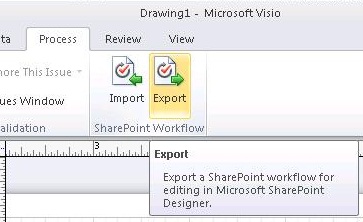
On the Process tab, in the SharePoint Workflow group, click Export.
Note: Visio will automatically validate the workflow first to make sure the workflow does not contain any issues. If there are issues related to the validation, you must fix them before you can successfully export the file. For more information about SharePoint workflow issues and how to repair them, see SharePoint Workflow validation issues in Visio.
-
In the Export Workflow dialog box, navigate to the location where you want to save the .vwi file, and then click Save.
Import a workflow from SharePoint
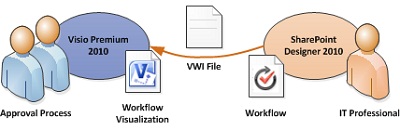
The ability to import a workflow back to Visio after having been edited in SharePoint Designer, also known as “round-tripping,” enables deeper collaboration between business users and workflow designers. When iterating the workflow design in this way, first use Visio to define the business requirements, and then use round-tripping as a way to coordinate and approve changes.
All of the master shapes in the SharePoint Workflow stencils correspond directly to workflow activities in SharePoint. For more information about SharePoint workflow shapes in Visio and how they appear in SharePoint Designer 2010, see SharePoint Workflow activities guide.
Note: Visio Premium 2010 does not support steps. Step information that has been added in SharePoint Designer may be lost when the workflow is viewed in Visio and then re-imported into SharePoint Designer.
To import a workflow from SharePoint Designer, do the following:
-
In Visio Premium 2010, on the File tab, click New.
-
In the Choose a Template pane, under Template Categories, click Flowchart.
-
Click Microsoft SharePoint Workflow, and then click Create.
-
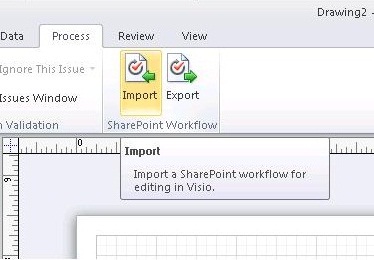
On the Process tab, in the SharePoint Workflow group, click Import.
-
In the Import Workflow dialog box, click the .vwi file you want to import, and then click Open.
To see how the workflow shapes in Visio Premium 2010 compare to the workflow activities in SharePoint Designer 2010, see SharePoint Workflow activities guide.


