
Managing and grading class assignments is more efficient than ever with Microsoft Teams! Add grades and feedback directly into assignments so that you and your students are on the same page. Request revisions on students' work when you return it with feedback. Excuse a student from an assignment. If a student experiences technical difficulties when submitting their work, act on their behalf to submit for them!
Need to put grading on pause to take care of other tasks? No problem. Comments and feedback on assignments are saved as you go, and you can quickly return to them even if you close the tab, grade other assignments, or go to another page in Teams.
Learn more about grading, returning, reassigning, and excusing students from assignments below!
In this article:
Grade and return multiple assignments at once
Grade and return assignments one-by-one
Return an assignment for revision
Take action on behalf of a student / Turn in on behalf of a student
Mark your students as excused from an assignment
Related topic: Grade an assignment with a rubric
View ungraded assignments
-
Navigate to the class and select Assignments.
Tip: Search for any assignment by keyword in the search bar.
-
Assignments with work left to grade are sorted under the Ready to grade tab.
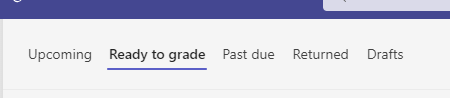
3. Assignments are sorted by To return and Returned tabs.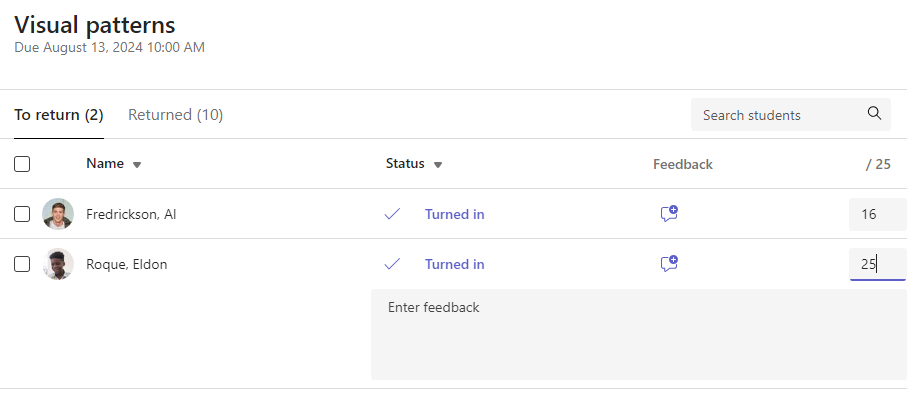
Grade and return multiple assignments at once
-
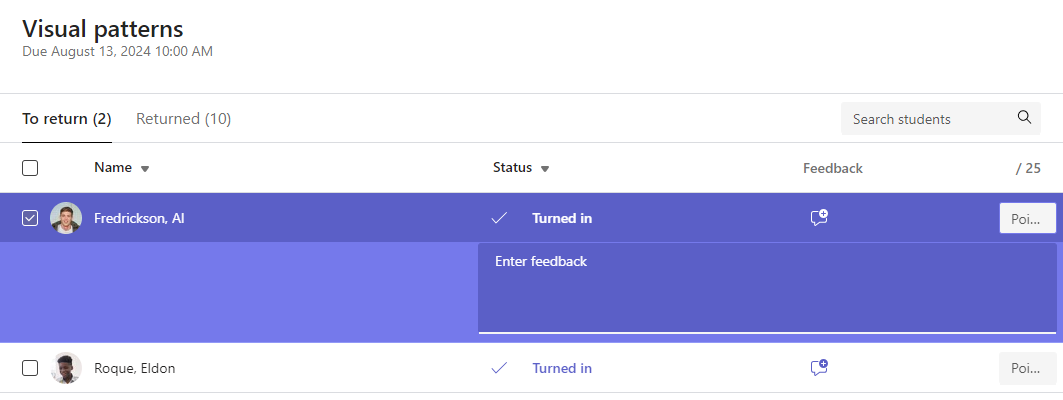
Navigate to a student's name in your To return list.
Tip: Select the arrow to sort students in ascending or descending alphabetical order.
-
Check the Status column if students turned in a document with this assignment. You'll also see if their work is late, not turned in, or returned for revision.
-
Select the Feedback icon to the right of the student's status to open a Feedback box for that student. There you can add quick comments. Your comments will be saved even if you go to another page in Teams, close the tab, or start grading assignments one-by-one.
Note: If you want to attach files as feedback, you will need to grade and return assignments one-by-one. You can also take action or turn in on behalf of a student.
-
Add points in the box to the right of the Feedback textbox if you designated points for this assignment. You can add a grading scheme as well. Learn more about setting up weighted grading categories and schemes.
-
Select Return or Return > Return for revision at the top of the page to return graded assignments to all students whose checkboxes are checked. When you add feedback or a grade to a student's assignment, the checkbox next to their name is automatically checked. You can uncheck those checkboxes if you don't want to return a student's assignment yet.
Note: The students you selected will receive a notification that their assignment has been returned. Their name will now show up in the Returned list. Their assignment status in the Grades tab will update, too.

Grade and return assignments one-by-one
View student work in full-screen mode and easily move from student to student without leaving your review pane.
Tip: Select Expand tab (icon with two arrows) to view students' work in full-screen.
-
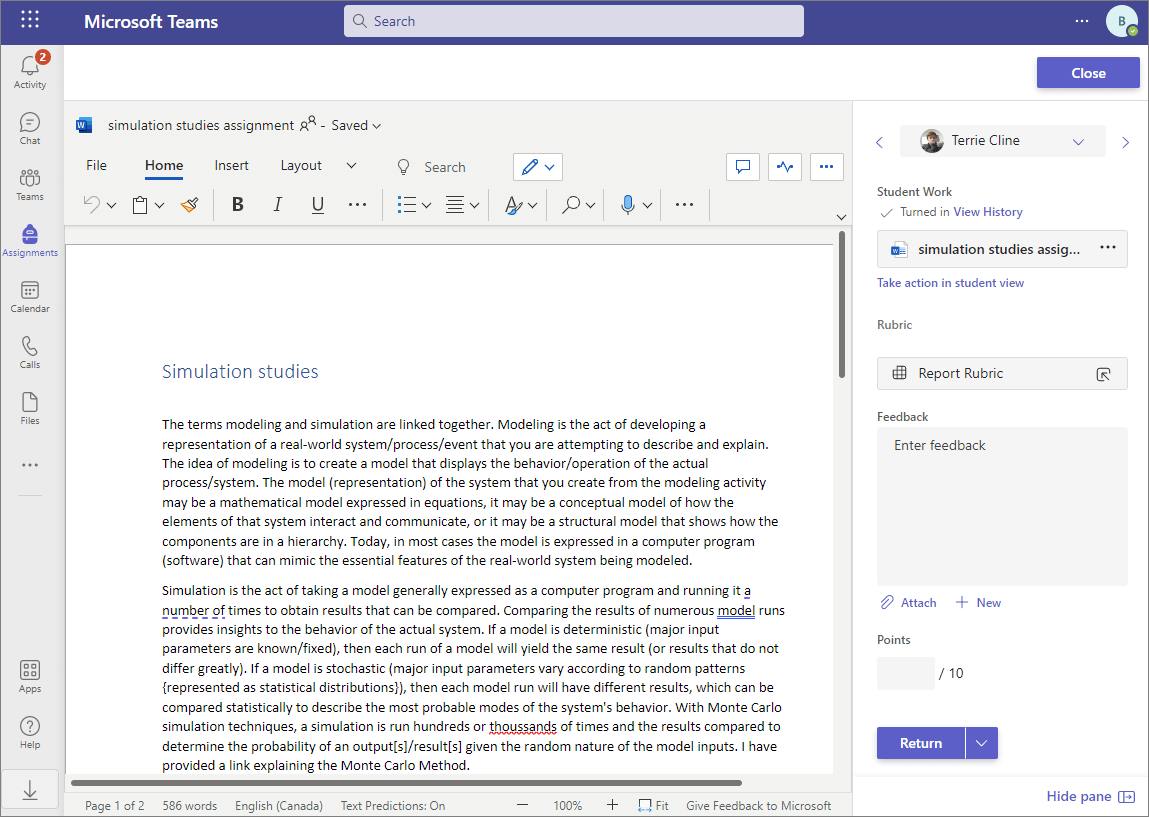
Select a student's status in the Status column to open their work.

-
View work and add comments on the document itself, where relevant. If the student submitted more than one file, you can select other files on the right to view.
Note: Not able to view a file in Teams? You may need to open files made in third-party apps separately. Older Microsoft Office files with .doc, .xls, and .ppt file extensions must be edited in the desktop versions of those apps.
-
Add feedback by typing in the Feedback textbox. Attach a file by selecting Attach file or + New.
-
If you designated points for this assignment, add points in the box below the Feedback textbox.
-
If you're ready to return work to the student, select Return, or select Return > Return for revision.
-
Use the arrows on either side of the student's name on the right to navigate from student to student.
Note: For a more focused workspace, hide the grading pane by selecting Hide pane in the lower right corner of the grading pane. You'll still be able to use arrows to navigate to other students' work and return the work by selecting Return.
-
Select Close to return to the full student list for this assignment.
Video feedback
1. Choose an assignment.
2. Select a student from the list.
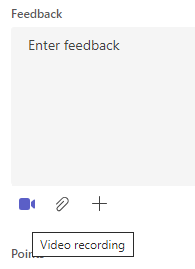
3. The student's assignment will open. Navigate down to the Feedback section.
4. Choose the camera icon 
5. With the video window open, press the center button to both record and stop the recording.
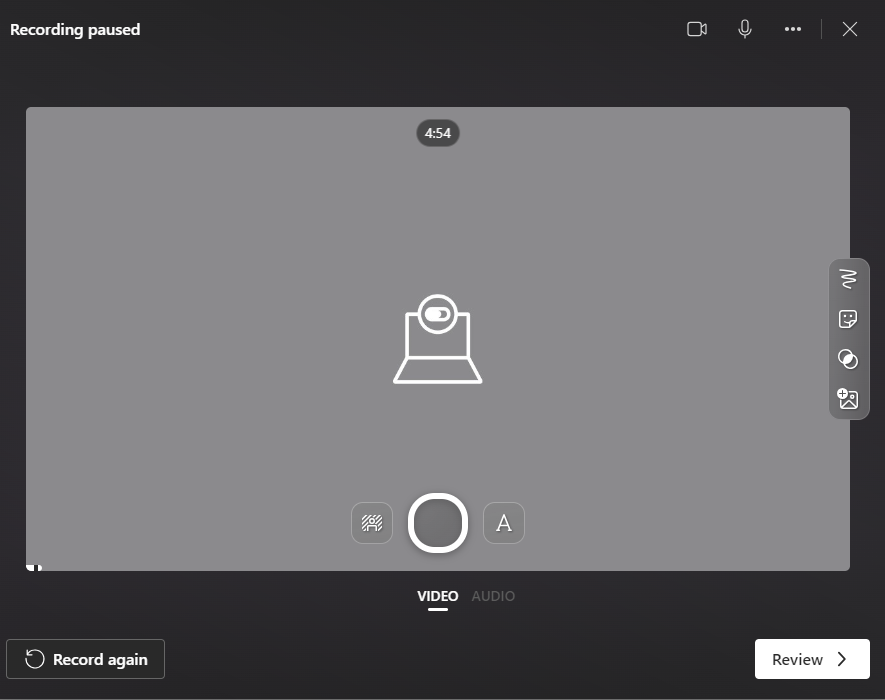
6. When finished, choose the Review button to view the recording. If you approve, move on by selecting the Next button.
7. A file name for the recording is required in order to upload it. The file will be saved as a .webm extension.
8. Choose the Upload button.
9. Once the video has been uploaded, select the Done button to complete video feedback.
Grade a group assignment
If you've created group assignments, give a group grade or give individual grades to members of the group.
After you've opened the assignment, you'll notice each group and its members in your To return tab.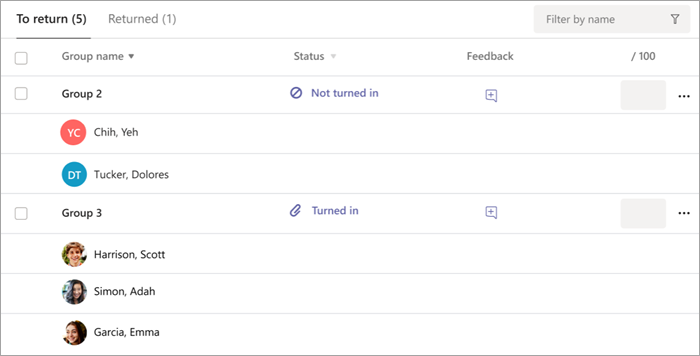
Grade and return multiple group assignments at once
-
Navigate to a group in your To return list.
Tip: Select the arrow to sort groups in ascending or descending alphabetical order.
-
Check the Status column if groups turned in a document with this assignment. You'll also see if their work is late, not turned in, or returned for revision.
-
Select the Feedback icon

Note: If you want to attach files as feedback, you will need to grade and return assignments one-by-one. You can also take action or turn in on behalf of a student.
-
Add points in the box to the right of the Feedback textbox if you designated points for this assignment.
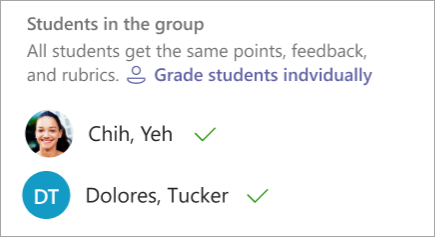
Note: If you'd like to give group members individual grades instead, select More options

-
Select Return, Return for revision, or Mark as excused and return at the top of the page to return graded assignments to all groups whose checkboxes are checked. When you add feedback or a grade to a group's assignment, the checkbox next to their name is automatically checked. You can uncheck those checkboxes if you don't want to return a group's assignment yet.
Note: The students in the groups you selected will receive a notification that their assignment has been returned or if they've been marked as excused. Their name will now show up in the Returned list. Their assignment status in the Grades tab will update, as well.
Grade and return group assignments one-by-one
-
Select a group's status in the Status column to open their work.
-
View work and add comments on the document itself, where relevant. If the group submitted more than one file, you can select other files on the right to view.
Note: Not able to view a file in Teams? You may need to open files made in third-party apps separately. Older Microsoft Office files with .doc, .xls, and .ppt file extensions must be edited in the desktop version of those apps.
-
Add feedback by typing in the Feedback textbox or attaching a file by selecting Attach file or + New.
Note: If you'd like to give group members individual grades instead, select Grade students individually.
-
Add points in the box to below the Feedback textbox if you designated points for this assignment. You can use a grading scheme as well.
-
If you're ready to return work to the group, select Return. You can also select Return for revision or Mark as excused and return.
-
Use the arrows on either side of the group's name on the right to navigate from group to group.
Note: For a more focused workspace, you can hide the grading pane by selecting Hide pane in the lower right corner of the grading pane. Even when the pane is hidden, you can still use arrows to navigate to other group work and return the work using the Return arrow button.
-
Select Close to return to the full group list for this assignment.
Return an assignment for revision
If you'd like to request a revision from a student before giving a final grade:
-
Follow the instructions above for returning an assignment to multiple students or one-by-one.
-
Select the dropdown arrow next to Return, then select Return for revision.
The student's assignment will be in your Returned list and their status will update to Needs revision. The student will also receive a notification of your revision request and will be able to turn in their assignment again after making edits.Tips:
-
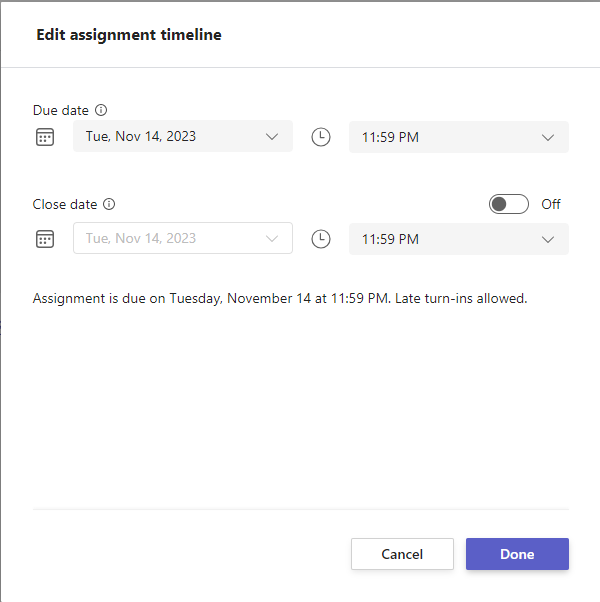
Update how long you'll accept turn-ins at any time by selecting the assignment, then selecting More options > Edit. Select Edit assignment timeline underneath the due date and time, then make your adjustments in the assignment timeline.
-
-
Take action on behalf of a student
Educators can view assignments as a specific student, upload files for them, and turn in assignments on their behalf.
-
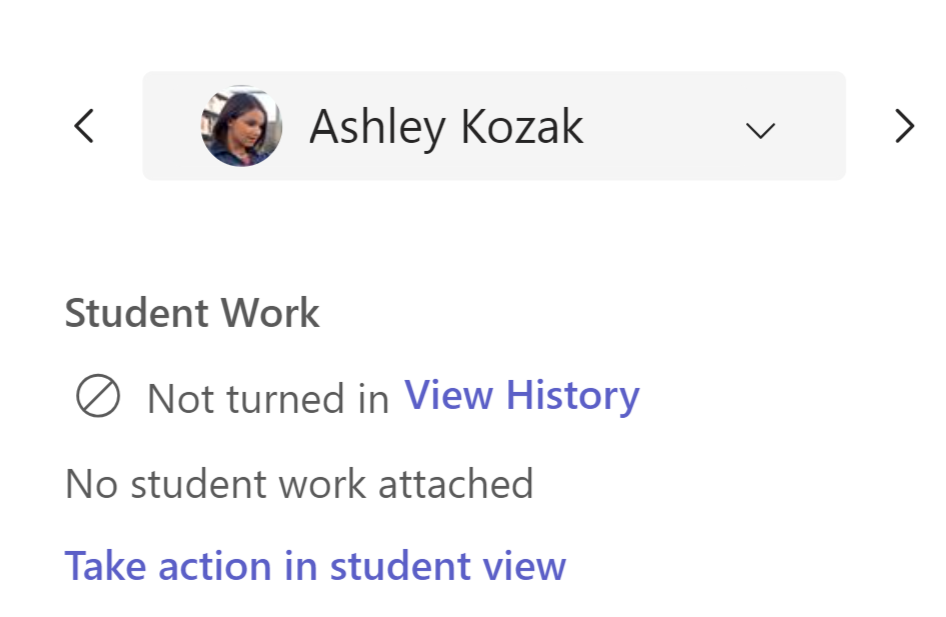
Select a student's status in the Status column to open their work (select an assignment that is Not turned in).
Note: You can take action on behalf of a student for both upcoming and past due assignments.
-
Under Student work, where all the student's files are listed, select Take action in student view.
-
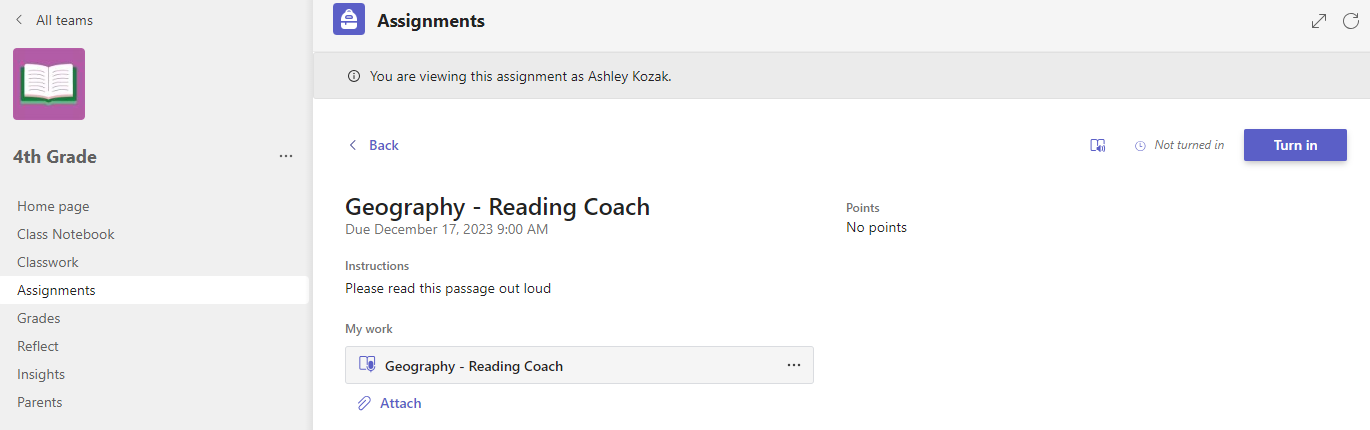
The top banner indicates which student you are viewing the assignment as. Upload files by selecting Attach or turn in the file by selecting Turn in.
Notes:
-
When uploading documents, you can only upload from your OneDrive, not the student's OneDrive.
-
You cannot upload Class Notebook, Make Code, or Reading Progress content but you can turn in the assignment if the content is already added by the student.
-
Mark your student as excused from an assignment
-
Repeat the above instructions for returning an assignment to multiple students or one-by-one.
-
Select the dropdown arrow next to Return, then select Return for revision.
-
Choose the option for Mark as excused and return.
4. A dialogue box will appear asking you if you wish to mark this submission as excused. Be aware that all rubric data and points will be removed. Feedback will still be shared the student.
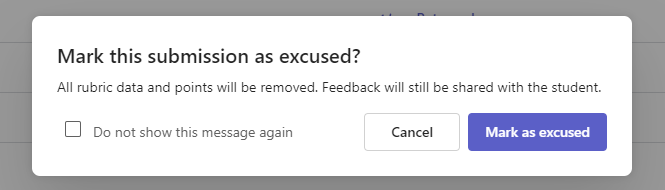
5. Choose the Mark as excused button.
6. Students with their assignments marked as excused will have their status changed to "Excused."

Mark as inactive
Any assignment can be marked as inactive, removing it from your list.
1. Select Assignments.
2. Find the assignment you with to deactivate and choose the More options ... button.
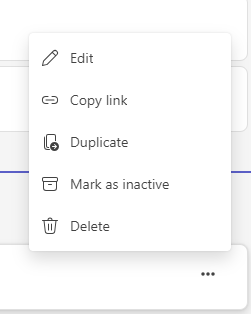
3. Pick Mark as inactive.
The assignment will immediately be deactivated and removed from your assignment list.


