
With a data loss prevention (DLP) policy in SharePoint Server 2016, you can identify, monitor, and automatically protect sensitive information across your SharePoint site collections.
For example, you can quickly create a DLP policy that:
-
Identifies different types of sensitive information that need to be protected under common industry regulations, such as the U.K. Data Protection Act or U.S. State Breach Notification Laws.
-
Displays a policy tip to users in the document library if they save a document that contains sensitive information such as credit card numbers or social security numbers.
-
Automatically blocks access to those documents for everyone but the site owner, content owner, and whoever last modified the document.
-
Allows people to override the blocking action, so that they can continue to work with documents if they have a business justification or are receiving a false positive. Policy tips can help educate your organization about your DLP policies without preventing people from getting their work done.
-
Sends an incident report to the compliance officer with details about any content that matches a DLP policy.
For more information about DLP, see Overview of data loss prevention in SharePoint Server 2016.
Before you begin
You create DLP policies in the Compliance Policy Center, a site collection where you can use permissions to control who can create and manage these policies. First you need to create the Compliance Policy Center site collection, and then add users to the site collection.
We recommend that you create a security group for your compliance team, and then add the appropriate users to the security group. Then you can grant permissions to the security group, instead of to individual users.
Step 1: Create the Compliance Policy Center
An admin with permissions to Central Administration needs to create the Compliance Policy Center site collection.
-
In Central Administration > Application Management > Create site collections.
-
On the Create Site Collection page, fill out the form, including these options:
-
Under Template Selection > Enterprise tab > select the Compliance Policy Center template.

-
Enter a primary and secondary site collection administrator. These people can add users to the Compliance Policy Center site collection as described next.
-
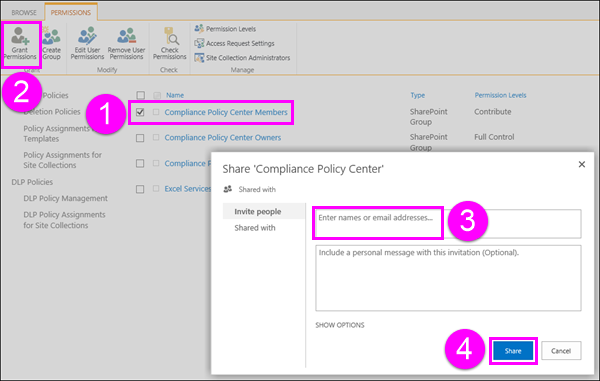
Step 2: Grant permissions to the Compliance Policy Center
A site collection admin needs to add users to the Compliance Policy Center site collection. You typically want to add users to the Members group. Members can use the Compliance Policy Center to create and assign DLP policies, but they aren’t in the Owners group, so they can’t add or remove other users or change their permissions.
-
Go to the Compliance Policy Center site collection > choose Settings (gear icon) in the upper right > Site Settings.
-
On the Site Settings page > under Users and Permissions > Site permissions.
-
Select the Compliance Policy Center Members group > on the Ribbon, choose Grant Permissions > enter the security group or users > Share.
Step 1: Create a DLP policy
After you create the Compliance Policy Center and add users to it, you’re ready to create a DLP policy. It’s a two-step process: first you create the policy, and then you assign the policy to one or more site collections where you want to protect sensitive information.
-
Go to the Compliance Policy Center site collection > in the left navigation, choose DLP Policy Management.

-
Choose new item.
-
Under New DLP Policy > choose from these options:
-
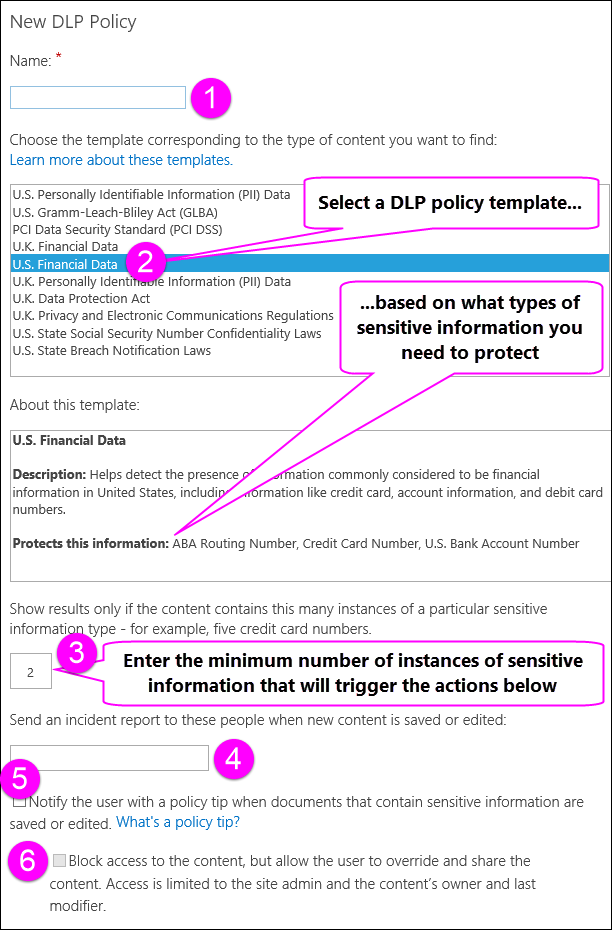
Enter a name for the policy.
-
Choose the template that corresponds to the common regulatory requirement for which you need to protect sensitive information. Each DLP template identifies and helps protect specific types of sensitive information – for example, the template named U.S. Financial Data identifies content that contains ABA Routing Numbers, Credit Card Numbers, or U.S. Bank Account Numbers.
-
Enter a number that determines the minimum number of instances of a specific type of sensitive information that must appear in a document before the protective actions are automatically taken (send an incident report, show a policy tip, block access).
For example, if you select the U.S. Financial Data template and enter 10 here, no action will be taken unless a document contains at least 10 ABA routing numbers, 10 credit card numbers, or 10 U.S. bank account numbers. The minimum count is for each type of sensitive information, not a total of all of them.
-
Enter a valid email address (typically a compliance officer) to which an incident report is sent when a DLP policy is matched. This report includes details about the detected content such as the title, document owner, and what sensitive information was detected. To enter multiple addresses, separate each with a semicolon (;).
-
Notify the user with a policy tip when documents that contain sensitive information are saved or edited. The policy tip appears on a document on the site and explains why that document conflicts with a DLP policy, so that people can take remedial action, such as removing the sensitive information from the document. When the document is in compliance, the policy tip disappears.
-
Block access to the content for everyone except the site owner, document owner, and person who last modified the document. These people can remove the sensitive information from the document or take other remedial action. When the document is in compliance, the original permissions will be automatically restored. It’s important to understand that the policy tip gives people the option to override the blocking action. Policy tips can thus help educate users about your DLP policies and enforce them without preventing people from doing their work.
-
-
When finished, choose Save.
Step 2: Assign the DLP policy to a site collection
After you create a DLP policy, you need to assign it to one or more site collections where you want to protect sensitive information. A single DLP policy can be assigned to multiple site collections, but you need to create each assignment separately, one for each site collection. Unlike document deletion policies, DLP policies cannot be assigned to a site collection template.
-
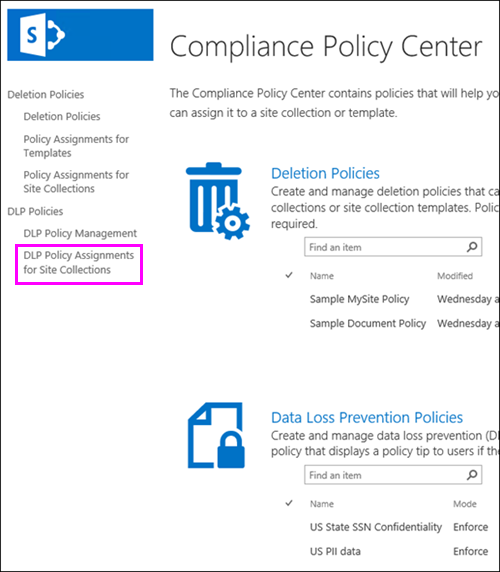
Go to the Compliance Policy Center site collection > in the left navigation, choose DLP Policies > DLP Policy Assignments for Site Collections.
-
Choose new item.
-
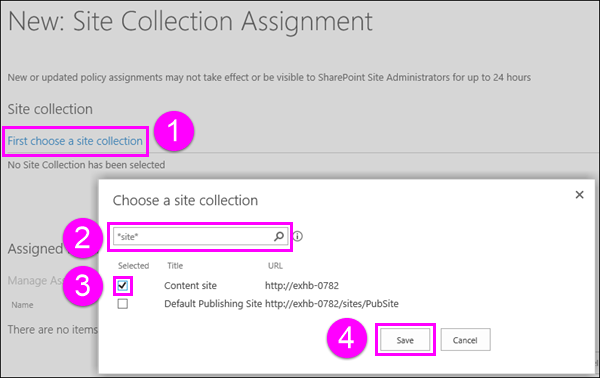
Choose First choose a site collection > search for the title or URL of the site collection > select a single site collection > Save.
Tip: When you search for site collections, you can use the asterisk (*) wildcard when searching for the title of a search collection. For example, searching for *site* returns both the “Content site” and “Default Publishing Site” site collections. Also, entering just a single asterisk in the search box and then searching is a quick way to see many (but not all) of the site collections.
-
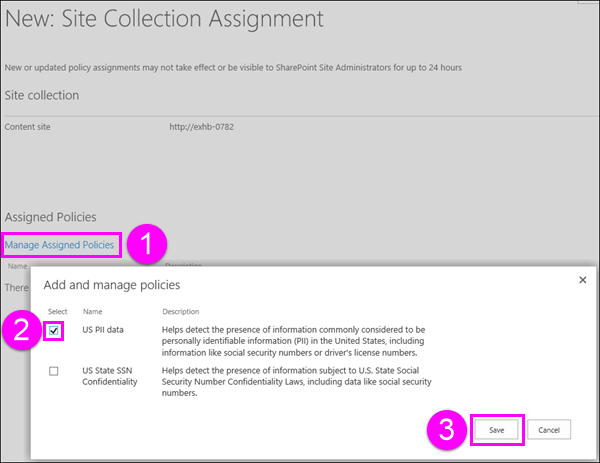
Choose Manage Assigned Policies > select a DLP policy > Save.
-
When finished, choose Save.
Edit a DLP policy
You can edit a DLP policy at any time.
-
Go to the Compliance Policy Center site collection > in the left navigation, choose DLP Policy Management.
-
Select the title of the policy you want to edit > make any changes > Save.
Turn off a DLP policy by deleting the policy assignment
To turn off a DLP policy for a specific site collection, you need to delete the DLP policy assignment. When you delete a policy assignment, the policy will no longer apply to the site collection.
-
Go to the Compliance Policy Center site collection > in the left navigation, choose DLP Policies > DLP Policy Assignments for Site Collections.
-
Select the policy assignment > More options … > Delete Item.
Delete a DLP policy
-
Go to the Compliance Policy Center site collection > in the left navigation, choose DLP Policy Management.
-
Select the policy > on the Ribbon > Items tab > Delete Item.


