
A signature block in Outlook can be as simple as your name and a telephone number. Or you can bump up its presentation with a photo or a logo, and even add some social networking service icons like Facebook, Twitter, LinkedIn, and YouTube. We’ll show you how. Before you start, find the photo or logo and any social icons that you want to include in your signature block. Your image files should use a .bmp, .gif, .jpg, or .png extension.
-
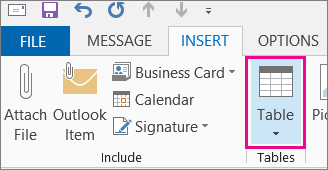
On the Home tab, choose New Email, and in the message block, choose Insert > Table.
-
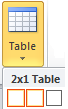
Drag your cursor in the table grid to select one row and two columns that you’ll use to hold your signature information.
-
With your cursor positioned in the first cell of the table, choose Insert > Pictures, browse to the folder where your photo or logo is stored, choose the file, and then choose Insert.

-
Position your cursor in the second column, type your name, and press Enter. On each subsequent line, type additional personal information you want in your signature block. Press Enter after each entry.
-
If you intend to add a social networking icon, press Enter twice after adding the final line of personal information. Then choose Insert > Pictures, browse to the folder where the icon is stored, choose the file, and then choose Insert. Repeat if you’re adding more than one icon.

Tip: If necessary, drag to resize the photo or logo, and then adjust the size of the column to fit the resized image.
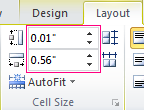
To make sure the image in the left column is not surrounded by extra white space, you can select the column, choose the Layout tab, and then in the Cell Size group, set the row height and row width to zero.
-
Select the table, right-click, choose Borders and Shading > None > OK.
Note: If you don't see Borders and Shading when you right-click, on the Format Text tab, in the Paragraph group, choose Borders

-
Select the table. right-click, choose Copy, and on the Insert tab, in the Include group, choose Signature > Signatures.
Tip: An anchor symbol

-
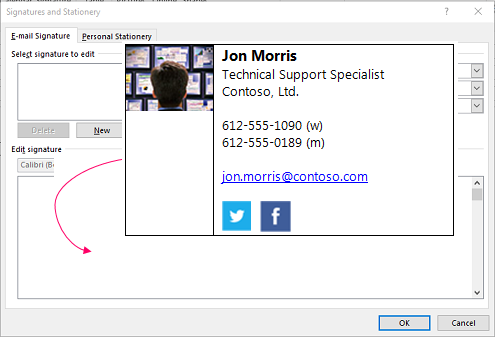
On the E-mail Signature tab, under Select signature to edit, choose New, and then type a name for the signature
-
Under Edit signature, press Ctrl+V to paste the copied signature block into the text box.
Note: If the copied signature block shows the table grid with a black background, return to step 6, but after you select the table and choose Borders and Shading, in the Color drop-down list, under Theme Colors, choose the white box in the upper-left corner, and then choose OK.
-
Under Choose default signature, do the following:
-
In the E-mail account list, choose an email account to associate with the signature.
-
In the New messages list, choose the signature that you want to be added automatically to all new email messages. If you don't want to auto sign your email messages, accept the default option of (none).
-
In the Replies/forwards list, choose the signature that you want to be added automatically (auto sign) when you reply to or forward messages. Otherwise, accept the default option of (none).
-
-
Choose OK.
Your new signature will now be available from the Signature option in the Include group whenever you create a new message.


