
You can print publications on a sheet of paper or a specific manufacturer's product and you can align your publication so it will print exactly where you want it.
To make it easier to align a publication with a specific manufacturer's product or to print multiple copies of a publication on a single sheet of paper when printing, turn crop marks on. You can turn the crop marks off after you align your publication on the sheet of paper.
Note: If you want to print different pages on the same sheet of paper — for example, by using mail merge to create mailing labels — see Create labels with different addresses in Publisher.
Determine your desktop printer's nonprintable region
If you intend to change the margins of your print job, it's a good idea to first determine your printer's nonprintable region. (To make sure that all sides of the border will print, you can preview your publication by clicking File > Print Preview.)
-
Open Microsoft WordPad.
-
Click File > Page Setup.
-
Under Margins (inches), set the Left, Right, Top, and Bottom margin values to zero. The margins will be reset automatically to the minimum margin that is supported by the printer.
-
Note the minimum margins.
Center your publication on a sheet of paper
If you want to center your publication on a sheet of paper (for example, if you are creating a proof before printing more copies), you can quickly do this by clicking One page per sheet in Print settings.
Note: If you click One page per sheet, you will not be able to adjust your margin guides.
-
Click File > Print.
-
UnderSettings, click One page per sheet.
Print at another position on the page
Whether you want to print on a blank sheet or paper or on a specific manufacturer's product, the procedure is the same.
Important: When you create a publication, such as a business card, that you want to print on a specific manufacturer's product, such as NCR's #NCR 982403 Business Card, be sure to select the template for that product before you create your business card publication. If you first design your business card and then select the manufacturer's product, you may need to redesign your card so that it fits on the product.
If the manufacturer's product is not listed, you can click Change Page Size in the Format Publications task pane and create a custom page size. For more information, see Resize the page or paper in Publisher.
Use the print options to choose a position
By adjusting the print options in the Print pane, you can specify where on a sheet of paper your publication will print.
Adjust print options
-
Create or open a publication that is smaller than the paper size that you want to print on, for example, a business card.
-
Click File > Print.
-
Under Settings, increase or decrease the Copies of print job, and choose the paper size from Letter, A4, or other available options.
-
Click Printer Properties, and in the Layout tab, under Orientation, select Landscape or Portrait.
Tip: If you want to print on a specific manufacturer's product, try printing on a blank page first to make sure that your publication will print in the correct location on the product.
What do you want to do?
Determine your desktop printer's nonprintable region
If you intend to change the margins of your print job, it's a good idea to first determine your printer's nonprintable region. (To make sure that all sides of the border will print, you can preview your publication by clicking File > Print Preview.)
-
Open Microsoft WordPad.
Note: To open WordPad, on the Windows taskbar, click the Start button, point to All Programs, point to Accessories, and then click WordPad.
-
Click File > Page Setup.
-
Set the Left, Right, Top, and Bottom margin values to zero. The margins will be reset automatically to the minimum margin that is supported by the printer.
-
Note the minimum margins.
Center your publication on a sheet of paper
If you want to center your publication on a sheet of paper (for example, if you are creating a proof before printing more copies), you can quickly do this by clicking One page per sheet on the Print pane.
Note: If you click One page per sheet, you will not be able to adjust your margin guides.
-
Click File > Print.
-
In the Print pane, under Pages, click One page per sheet.
Print at another position on the page
Whether you want to print on a blank sheet or paper or on a specific manufacturer's product, the procedure is the same.
Important: When you create a publication, such as a business card, that you want to print on a specific manufacturer's product, such as NCR's #NCR 982403 Business Card, be sure to select the template for that product before you create your business card publication. If you first design your business card and then select the manufacturer's product, you may need to redesign your card so that it fits on the product.
If the manufacturer's product is not listed, you can click Change Page Size in the Format Publications task pane and create a custom page size. For more information, see Resize the page or paper in Publisher.
Use the print options to choose a position
By adjusting the print options in the Print pane, you can specify where on a sheet of paper your publication will print.
Adjust print options
-
Create or open a publication that is smaller than the paper size that you want to print on, for example, a business card.
-
Click File > Print.
-
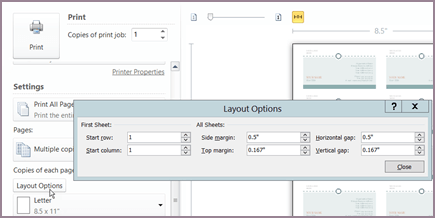
On the Print pane, under Settings, increase or decrease the Copies of each page.
-
Choose your paper size and select Landscape or Portrait.
-
On the Print pane, click Layout Options. Change the Side margin, Top margin, Horizontal gap, and Vertical gap measurements so that the Preview window displays the number of copies that you want.
Tip: If you want to print on a specific manufacturer's product, try printing on a blank page first to make sure that your publication will print in the correct location on the product.
What do you want to do?
Determine your desktop printer's nonprintable region
If you intend to change the margins of your print job, it's a good idea to first determine your printer's nonprintable region. (To make sure that all sides of the border will print, you can preview your publication by clicking File > Print Preview.)
-
Open Microsoft WordPad.
Note: To open WordPad, on the Windows taskbar, click the Start button, point to All Programs, point to Accessories, and then click WordPad.
-
Click File > Page Setup.
-
Set the Left, Right, Top, and Bottom margin values to zero. The margins will be reset automatically to the minimum margin that is supported by the printer.
-
Note the minimum margins.
Center your publication on a sheet of paper
If you want to center your publication on a sheet of paper (for example, if you are creating a proof before printing more copies), you can quickly do this by clicking One page per sheet on the Publications and Paper Settings tab of the Print dialog box.
Note: If you click One page per sheet, you will not be able to adjust your margin guides.
-
Click File > Print.
-
In the Print dialog box, click the Publication and Paper Settings tab, and then select One page per sheet.
Print at another position on the page
Whether you want to print on a blank sheet or paper or on a specific manufacturer's product, the procedure is the same.
Important: When you create a publication, such as a business card, that you want to print on a specific manufacturer's product, such as NCR's #NCR 982403 Business Card, be sure to select the template for that product before you create your business card publication. If you first design your business card and then select the manufacturer's product, you may need to redesign your card so that it fits on the product.
If the manufacturer's product is not listed, you can click Change Page Size in the Format Publications task pane and create a custom page size. For more information, see Resize the page or paper in Publisher.
Use the print options to choose a position
By adjusting the print options in the Print dialog box, you can specify where on a sheet of paper your publication will print. For example, you can change printing two columns and one row of business cards (for a total of two business cards) to two columns and three rows (for a total of six business cards) by increasing the vertical gap between the copies of your publication. Or you can print one column and five rows of business cards (for a total of five business cards) by increasing the horizontal gap between the copies of your publication.
Adjust print options
-
Create or open a publication that is smaller than the paper size that you want to print on, for example, a business card.
-
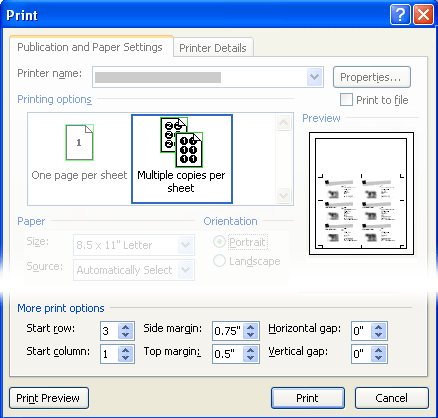
Click File > Print, and then click the Publication and Paper Settings tab.
-
Under More print options, enter the row and column where you want to start printing on the page
-
Change the Side margin, Top margin, Horizontal gap, and Vertical gap measurements so that the Preview window displays the number of copies that you want.
Tip: If you want to print on a specific manufacturer's product, try printing on a blank page first to make sure that your publication will print in the correct location on the product.


