
Create a document library in SharePoint
Create a document library in SharePoint to securely store files where you and your co-workers can find them easily, work on them together, and access them from any device at any time. SharePoint team sites include a document library by default, however, you can add additional document and other libraries to a site as needed. For more info about document libraries, see What is a document library?
Note: Site owners can create or manage lists. Other team members may not be able to.
Create a library in SharePoint in Microsoft 365 or SharePoint Server 2019
-
Go to the team site where you want to create a new document library.
-
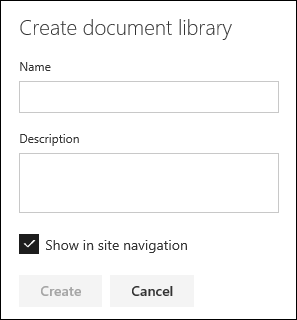
On the menu bar, select New, and then select Document library.

-
Enter a name for the new library.
-
Select Create.
For info about adding versioning, uploading files, and enabling other library features, see Next steps with your document library.
Note: 2,000 lists and libraries combined per site collection is the limit (including main site and any subsites) after which you will receive error: Sorry, something went wrong. The attempted operation is prohibited because it exceeds the list view threshold. See, SharePoint Limits.
Create a library in SharePoint Server 2016 and SharePoint Server 2013
-
Select Settings

-
Select add an app.
-
Select the library type you want (document, form, picture, and so on).
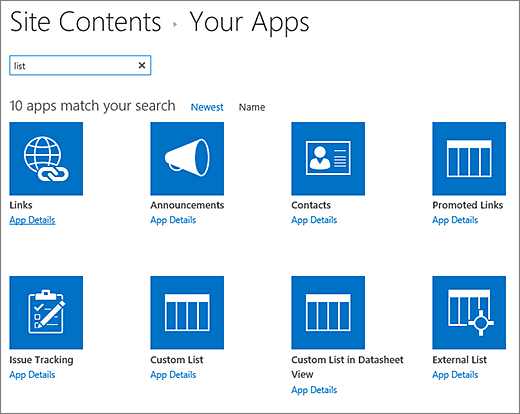
If you don't see the one you want, in the search box, enter a keyword, and select search

-
In the Name field, enter a title.
You can also select Advanced Options and enter a Description. Depending on the type of library, you can add versioning and other features.

-
Click Create.
For info about adding versioning, uploading files, and enabling other library features, see Next steps with your document library.
Create a library in SharePoint Server 2010
-
Navigate to the site where you want to create the library.
-
Select Site Actions


-
Under Libraries, select the type of library that you want, such as Document Library or Picture Library.
-
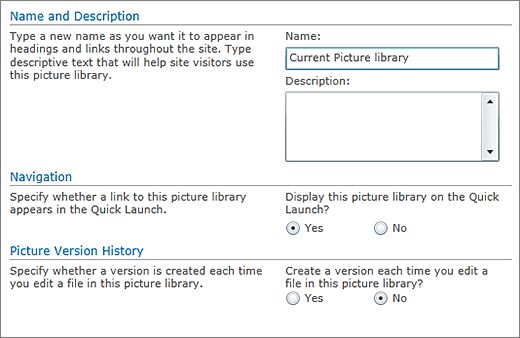
In the Name field, enter a name for the library. The library name is required.
The name appears at the top of the library page, becomes part of the address for the library page, and appears in navigational elements that help users to find and open the library.

-
Depending on the type of library, you can select More Options. The following are some of the options you can choose:
-
Enter a description in the Description field. The description is optional.
The description appears at the top of the library page, underneath the name of the library. If you plan to enable the library to receive content by email, you can add the email address of the library to its description, so that people can easily find it.
-
To add a link to this library on the Quick Launch, in the Navigation section, verify that Yes is selected.
-
Some libraries support the integration of incoming email. If an Incoming Email section appears, your administrator has enabled your site to receive content by email. If you want people to add files to the library by sending them as attachments to emails, select Yes. Then, in the E-mail address field, enter the first part of the address that you want people to use for the library.
-
To create a version each time a file is checked into the library, in the Document Version History or Picture Version History section, select Yes.
You can later choose whether you want to store both major and minor versions, and how many versions of each you want to track.
-
For some libraries, a Document Template section may be available, which lists the default programs for creating new files. In the Document Template section, in the dropdown, select the type of default file that you want to be used as a template for files that are created in the library.
Note: If content types are enabled, the default template is specified through the content type. If multiple content types are enabled, you can choose from different default file types when you create new files. In this case, the default file types are specified by the content types instead of the Document Template section when you create the library.
-
-
Click Create.
For info about adding versioning, uploading files, and enabling other library features, see Next steps with your document library.
Next steps with your document library
After creating a library, you can discover more info about:


Need more help?
Want more options?
Explore subscription benefits, browse training courses, learn how to secure your device, and more.


Communities help you ask and answer questions, give feedback, and hear from experts with rich knowledge.


