
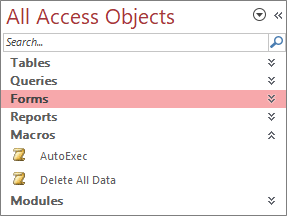
Looking for a way to track and manage your database objects? The Navigation Pane is the main way you view and access all your database objects and it displays on the left side of the Access window by default.
Note The Navigation Pane can be customized in a variety of ways. For more information, see Customize the Navigation Pane.
In this article
Common tasks
You can adjust the appearance of the Navigation Pane and work with database objects in the following ways:
|
To |
Do this |
|
Open and close the Navigation Pane |
Click the Shutter Bar Open/Close Button If F11 doesn’t work, make sure function keys (Fn) are enabled on your laptop device. Also, the F11 key is a Special Key and it may be disabled in your Access database. If the Navigation Pane is not visible, it may be turned off in your Access database. For more information, see Set user options for the current database. |
|
Change the width of the Navigation Pane |
Position the pointer over the right edge of the Navigation Pane and then, when it changes to a double-sided arrow If you can't change the width, see The Access Navigation pane is too narrow, and I can’t widen it. |
|
Open an object |
By default, double-click the object. You can change this to single click in the Navigation Options dialog box. For more information, see Navigation Options dialog box. |
|
Do other commands, such as open an object in Design view |
Right-click the object. If the right-click menu of the Navigation Pane doesn't work, it may be disabled in your Access database. For more information, see Set user options for the current database. |


Note The Navigation Pane is not available in an Access web app or web database when viewed in a browser. Although you can use the Navigation Pane in an Access web app opened in Access, you can only display, hide, sort, and search for database objects.
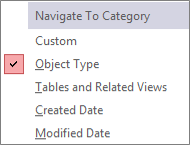
Select a predefined category
When you create a new database, the category displayed by default is Tables and Related Views, and the group is All Tables. When you select a category, the items are arranged into the groups that the category contains. For example, when you select Object Type, you see all the database objects grouped by the type of object. In addition, Access provides two more predefined categories based on when the objects were created or modified
-
To display the Navigate To Category menu, click the title bar of the Navigation Pane.
-
Select a predefine category:
Category
Description
Custom
Used to customize the Navigation Pane.
Object Type
View all the objects in the database, arranged by their type: tables, queries, forms, reports, macros, and modules.
Tables and Related Views
Arranges items one group per table, with each group containing shortcuts to all the objects that use the table — queries, forms, reports, and so on. If an object uses more than one table, it appears in all relevant groups.
Created Date
Locate objects that are created on a specific date in descending order or in a date range. You can also filter by Today or All Dates.
Modified Date
Locate objects that are modified on a specific date in descending order or in a date range. You can also filter by Today or All Dates.
Each predefined category also includes a global group that contains all the objects in the database. You can easily locate the global group for a category by looking for the word All in front of the group name. For example, if you select the Tables and Related Views category, the global group is called All Tables.
Filter by a group
You may want to show only a subset of database objects to help focus your attention.
-
To display the Filter by Group menu, click the title bar of the Navigation Pane.

-
Select a group.
By default, Access displays Tables, Queries, Forms, and Reports. You may also see Macros, Modules, and custom groups if any are defined in the database.
-
To remove the group filter, select All Access Objects.
Sort objects
By default, Access sorts the objects in the Navigation Pane by object type in ascending alphabetical order, but you can change the sorting to suit your needs by doing the following:
-
Right-click the top of the Navigation Pane to display the shortcut menu, and then do the following:
-
To change the sort order, point to Sort By and then select a sorting option.
-
To sort manually and customize the display order, click Sort By, and then click Remove Automatic Sorts.
-
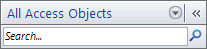
Find objects in a database
While you type text in the Search box, Access searches within the category for any groups that contain an object or object shortcut that matches your search term. Any groups that don't contain a match are collapsed.
Access searches for objects only in the categories and groups that are currently displayed in the Navigation Pane. To search the whole database for a specific object, select one of the predefined categories in the Navigation Pane, such as Tables and Related Views or Object Type. This helps make sure that all the groups are visible in the Navigation Pane.
-
If the Search box is not already visible at the top of the Navigation Pane, right-click the menu bar at the top of the Navigation Pane, and then click Search Bar.
-
Type either a part or the complete name of the object or shortcut in the Search Bar box.
While you type characters, Access searches and eliminates any group headings that don't contain a match.
-
To perform another search, click Clear Search String

When you clear the Search Bar box, the Navigation Pane again displays all available objects.
Change how objects are displayed
You can select the way in which the objects in the database are displayed in the Navigation Pane. For example, you can include the creation or modified dates, or display objects as icons or lists. To specify how objects are displayed, do the following:
-
Right-click the top of the Navigation Pane to display the shortcut menu, and then do any one of the following:
-
To change how the objects are displayed, point to View By, and then click either Details, Icon, or List. You may need to widen the Navigation Pane to see all the information.
-
To view all the groups in the database, click Show all groups.
-
Hide and unhide objects and groups
Hiding an object or group can be a better option than deleting it when the object or group is not used or you want to restrict access to it. Hiding an object does not change the database, whereas deleting an object or group (even if it appears to be a duplicate) can break part or all of the functionality of the database.
To hide an object or group
-
To hide an object, right-click the object, and then click Hide in this Group.
-
To hide an entire group, right-click the group, and then click Hide.
To hide dimmed objects or groups
-
Right-click the menu bar at the top of the Navigation Pane, and then click Navigation Options.
-
In the Navigation Options dialog box, clear the Show Hidden Objects check box, and then click OK.
To display hidden objects or groups
The following procedure does not, by itself, provide access to the objects.
-
Right-click the menu bar at the top of the Navigation Pane, and then click Navigation Options.
-
In the Navigation Options dialog box, select the Show Hidden Objects check box, and then click OK.
To enable dimmed objects or groups
The following procedure enables access to objects.
-
To enable an object, right-click the object, and then click Unhide in this Group.
-
To unhide a group, right-click the group, and then click Unhide.


