Catatan: Kami ingin secepatnya menyediakan konten bantuan terbaru dalam bahasa Anda. Halaman ini diterjemahkan menggunakan mesin dan mungkin terdapat kesalahan tata bahasa atau masalah keakuratan. Kami bertujuan menyediakan konten yang bermanfaat untuk Anda. Dapatkah Anda memberi tahu kami apakah informasi ini bermanfaat untuk Anda di bagian bawah halaman ini? Berikut artikel dalam bahasa Inggris untuk referensi.
If you have a section on your Microsoft Office InfoPath form template that is relevant only to certain users, consider making it an optional section. An optional section does not appear on the user's form by default. Users insert and fill out the optional section only if they need it.
Dalam artikel ini
When to use an optional section
Use an optional section when you want to offer users the choice to fill out a particular section of the form. For example, on a status report form template, you can include an optional Notes section. Users who want to add supplementary notes can insert and fill out this optional section. Everybody else can leave the section hidden.
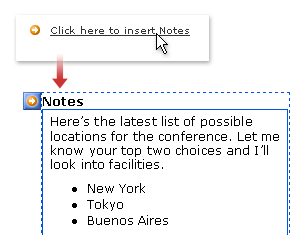
When you insert an optional section onto your form template, you are essentially inserting an empty container. For the section control to be useful, you must insert other controls inside it. In the previous example, the form designer inserted a rich text box inside the optional section, along with a Notes heading.
Kontrol yang berkaitan
InfoPath includes other controls that are similar to optional sections but that serve different purposes. To decide which of these controls works best on your form template, refer to the following list:
Section Sections are used to organize groups of related controls. Sections appear on the form template by default. You can't choose to hide them as you can with optional sections.
Repeating section To create a section that users can insert onto a form multiple times (such as a record in a database), use a repeating section or another repeating control.
Choice group To insert a section that can be replaced with another section, use a choice group. A choice group contains two or more sections. By default, one of these sections appears on the form. Users can choose to replace it with a different section. Choice groups can also be inserted on a form multiple times by the user.
Pengalaman pengguna
If you left the default settings enabled for your optional section, users will see a small orange arrow icon next to some hint text when they open a form that is based on your form template. You can customize the hint text when designing your form template.
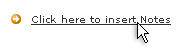
If they click either the icon or the hint text, InfoPath replaces the hint text and icon with the optional section. The user can then enter data into the controls inside the optional section.
To remove an optional section, users move their pointer over the section until an orange shortcut menu button appears in the upper-left corner. Users click this button to see a menu of options for working with the section. You can customize the menu commands when designing your form template.
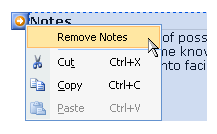
Catatan: If a user removes an optional section after filling it out, the data in that section is lost, not hidden.
Insert an optional section
The procedure for inserting an optional section differs slightly depending on whether you are designing a new, blank form template or basing the design of your form template on a database or other external data source.
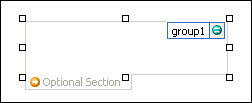
The following illustration shows how an optional section looks when it is selected in mode desain.
Kontrol bisa terikat dan tidak terikat. Ketika kontrol terikat, maka akan tersambung ke bidang atau grup di sumber data sehingga data yang dimasukkan ke dalam kontrol disimpan dalam file (.xml) yang mendasarinya. Ketika kontrol tak terikat, maka tidak tersambung ke bidang atau grup, dan data yang dimasukkan ke dalam kontrol tidak disimpan. Saat Anda memilih atau mengarahkan penunjuk di atas kontrol, teks dan ikon pengikat muncul di sudut kanan atas kontrol. Teks mengindikasikan grup atau bidang tempat kontrol terikat dalam sumber data. Ikon mengindikasikan apakah kontrol terikat dengan benar ke grup atau bidang tersebut. Saat pengikatan benar, ikon hijau muncul. Jika ada yang salah dengan pengikatan, sebagai gantinya Anda akan melihat ikon biru atau merah.
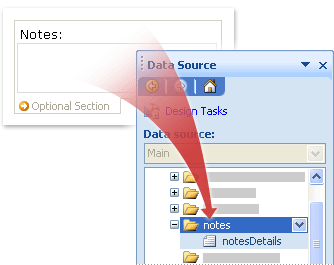
The data source for the form template consists of fields and groups that appear in a hierarchical view in the Data Source task pane. Optional sections are always bound to groups in the form template's data source. Each control in an optional section is bound to a field that is part of the section's group.
In the following example, the Notes optional section on the form template is bound to the notes group in the Data Source task pane.
Insert an optional section on a new, blank form template
Saat Anda mendesain templat formulir kosong baru, kotak centang Buat sumber data secara otomatis di panel tugas Kontrol dipilih secara default. Ini memungkinkan InfoPath secara otomatis membuat bidang dan grup di sumber data saat Anda menambahkan kontrol ke templat formulir. Bidang dan grup ini diwakili oleh ikon folder dan file di panel tugas Sumber Data.
-
Pada templat formulir, letakkan kursor di tempat yang Anda inginkan untuk menyisipkan kontrol.
-
Jika panel tugas Kontrol tidak terlihat, klik Kontrol Lainnya pada menu Sisipkan, atau tekan ALT+I, C.
-
Under Insert controls, click Optional Section.
-
To add controls to the section, drag the controls that you want from the Controls task pane into the optional section on your form template.
Catatan: You should not move a control that is already on the form template into the section, unless the control's field is already part of the section's group in the data source. Otherwise, the binding for the control may break.
-
To add a label to the control, type text above it.
Insert an optional section on a form template that is based on an existing data source
If you base the design of your form template on an existing Extensible Markup Language (XML) file, database, or Web service, InfoPath derives the fields and groups in the Data Source task pane from that existing data source. In this scenario, you can add an optional section either by dragging a group from the Data Source task pane to the form template or by inserting the section by using the Controls task pane, as described in the following procedure:
-
Pada templat formulir, letakkan kursor di tempat yang Anda inginkan untuk menyisipkan kontrol.
-
Jika panel tugas Kontrol tidak terlihat, klik Kontrol Lainnya pada menu Sisipkan, atau tekan ALT+I, C.
-
Under Insert controls, click Optional Section.
-
In the Optional Section Binding dialog box, select the group in which you want to store optional section data, and then click OK.
-
Add controls to the section, and then bind them to the appropriate fields in the data source.
Customize the hint text that users click to insert the optional section
When you insert an optional section on your form template, "Click here to insert" hint text appears on the form. This text informs users that there is an optional section available for them to insert. Do the following to customize this text:
-
Double-click the optional section.
-
Klik tab Data.
-
Select the Show insert button and hint text check box, and then replace the default text in the box with text of your own.
Show the optional section on the form by default
By default, optional sections are hidden when users first open a form. If you want to, you can choose to show an optional section instead. If you do this, InfoPath hides the "Click here to insert" hint text, because the optional section is already visible on the form.
-
Double-click the optional section.
-
Klik tab Data.
-
Under Default settings, click Include the section in the form by default.
-
Select the Allow users to delete the section check box.
Tips tata letak
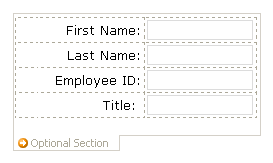
Before you insert controls onto an optional section on your form template, think about how you want to arrange those controls. You can add text boxes and other controls by dragging them into the optional section wherever you want. Or, if you want more control over the layout, you can add a tabel tata letak inside the optional section and then insert labels and controls inside the individual cells so that they align nicely. In the following illustration, a four-row, two-column layout table is used to arrange labels and controls in the optional section.
In addition to using layout tables, you can do one or more of the following:
-
To change the size of several sections at once, select the sections whose size you want to change, press ALT+ENTER, click the Size tab, and then make the necessary adjustments.
-
To change the border or color of a section, select it on the form template, on the Format menu, click Borders and Shading, click the Borders tab, and then make the necessary adjustments.
-
To see how the controls in your section will look with actual text in them, click Sample Data on the View menu. This helps you get a sense of what a form based on your form template will look like when a user fills it out.
-
On occasion, the text inside the controls in a section and the labels to the left of those controls may appear to be slightly out of alignment. To quickly realign them, double-click the control, click Align on the Size tab, and then click Apply. If the label and control are in different cells in a layout table, right-click the cell that contains the label, click Table Properties on the shortcut menu, and then click Center under Vertical alignment on the Cell tab.