Data validation is the ability to automatically check for errors while the user fills out a form. By adding data validation to controls in your form template, you can ensure that the data that you collect is accurate and consistent, and that it conforms to any standards that are already in use by your company. For example, you can use data validation to let users know when the amount that they enter for an expense item exceeds the approved amount, or when they mistakenly enter their name in a box that is used for collecting phone numbers.
If a form contains data validation errors, and it is connected to a database or Web service, users won't be able to submit the form until they fix these errors. Users can save a local copy of the form, and then correct and submit the data later.
In this article
Ways that users are notified about validation errors
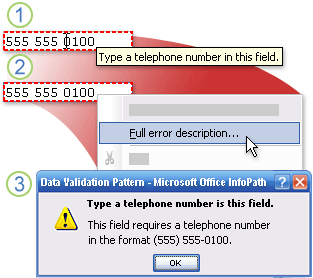
For a form that is designed to be filled out by using InfoPath, you can set a data validation message to be displayed as a ScreenTip. After viewing the ScreenTip, your users can optionally display a detailed alert that you provide. Alternatively, you can set the detailed alert to be displayed automatically. For example, if you specify an error condition that you want to occur if a user types their name into a box that is used for collecting phone numbers, you can enable a ScreenTip to display the message "Type a telephone number in this field." If you enable an alert to appear automatically, you can show a detailed message by default, such as "This field requires a telephone number in the format (555) 555-0100." If you choose to display a ScreenTip by default, your users can manually display the alert that you provide by right-clicking the field in InfoPath, and then clicking the option to show the alert.

1. The pointer changes to an I-beam when you rest it over the field, and the ScreenTip is displayed.
2. When you right-click the field, a shortcut menu appears — and when you point to Full error description, the pointer changes to an arrow.
3. When you click Full error description, the alert appears.
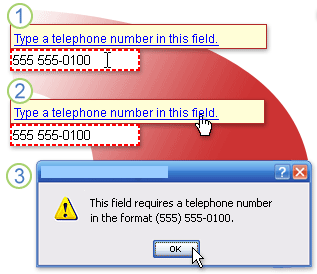
For a form that is filled out in a Web browser, alerts cannot be displayed automatically. However, users can display the alert by clicking in the field on the Web page that contains the ScreenTip, and then clicking the link that appears.

1. The pointer changes to an I-beam when you rest it over the field, and the ScreenTip is displayed.
2. The pointer changes to a hand when you move it to the ScreenTip.
3. When you click the link, the alert appears.
Compatibility considerations
When you design a form template in InfoPath, you can choose a specific compatibility mode to design a browser-compatible form template. When a browser-compatible form template is published to a server running InfoPath Forms Services, and then browser-enabled, forms based on the form template can be viewed in a Web browser. When you design a browser-compatible form template, some controls are unavailable in the Controls task pane because they cannot be displayed in a Web browser.
Some data validation features work differently in a Web browser than they do in InfoPath. For example, when you add data validation to a control, you create explanatory text to be displayed when a user enters invalid data into that control. You can have this explanatory text appear in a ScreenTip, and optionally allow users to display an alert that contains additional information, or you can have the alert appear automatically when a user enters invalid data. Alerts cannot be displayed automatically for forms that are viewed in a Web browser, but users can still view the ScreenTip, and optionally display an alert containing additional information.
Note: When users fill out forms by using a browser, they can quickly display a data validation alert by pressing CTRL+SHIFT+I.
List of controls that support data validation
The following table lists the Microsoft Office InfoPath 2007 controls that support data validation and whether they are available for browser-compatible form templates.
|
Controls that support data vali dation |
Available for browser-compatible form templates? |
|
Check box |
Yes |
|
Date picker |
Yes |
|
Drop-down list box |
Yes |
|
List box |
Yes |
|
Option button |
Yes |
|
Text box |
Yes |
|
Rich text box |
Yes |
|
Bulleted, numbered, or plain list |
No |
|
Combo box |
No |
Add data validation
-
Click the control that you want to add data validation to.
-
On the Format menu, click Data Validation.
-
In the Data Validation dialog box, click Add.
-
Under If this condition is true, add a condition.
Example
The following example shows how to create a data validation condition to ensure that data typed into a text box control matches a specific value — in this case, the word Hello.
-
In the first box, click Select a field or group, and then select the field or group that the control is bound to.
-
In the second box, click is not equal to.
-
In the third box, click Type text, and then type Hello.
Note: To require users to enter data into the control, in the Control Properties dialog box, select the Cannot be blank check box.
-
-
To automatically show a dialog box message when a user leaves a control blank, select the Show dialog box messages immediately when users enter invalid data check box.
Note: Because dialog box messages cannot be displayed automatically in a Web browser, a user who fills out your form by using a Web browser will see only the ScreenTip.
-
In the ScreenTip box, type the text that you want to display when a user points to the control or right-clicks the control.
-
In the Message box, type the text that you want to display in the message dialog box either immediately or when the user requests more details.
Note: The ScreenTip for a data validation error will not display for controls that also have a default ScreenTip set on the Advanced tab of the Control Properties dialog box. This behavior helps to ensure that the name of the control is accurately conveyed to users who are using screen readers.
Change a data validation condition
-
Click the control whose data validation you want to modify.
-
On the Format menu, click Data Validation.
-
In the Data Validation dialog box, click the condition that you want to change, click Modify, and then make the changes that you want.
Remove data validation
-
Click the control whose data validation you want to remove.
-
On the Format menu, click Data Validation.
-
In the Data Validation dialog box, click the condition that you want to remove, and then click Remove.


