
Knowing who’s available to work on your project can become a challenge when you’re working across multiple projects.
If you assign the same people to several projects or use shared resources in your project, it helps to combine all the resource information into a single central file called a resource pool. The resource pool is also useful for identifying assignment conflicts, and viewing time allocation for each project.
Create a resource pool
Note: If you use Project Professional and resources exist in your organization's enterprise resource pool, you don't need to create another resource pool. See Add resources to the enterprise resource pool for more information.
-
Open Project, click Blank Project > Resource tab.
-
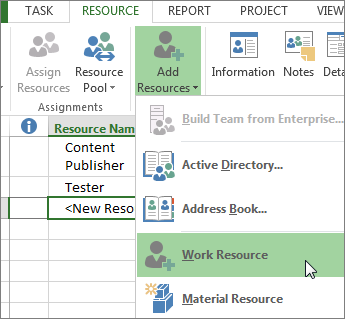
Click the arrow next to Team Planner and click Resource Sheet.
-
Click Add Resources and import existing resource information.
To type in new people information, click Work Resource and add Resource Name and details.
Note: If you’re using Project Professional with Project Server, you’ll have access to the enterprise resources. To learn more about Project versions, see Project Version Comparison. The enterprise resource list is usually managed by an administrator, and each project manager can add from these resources to their projects.
After you create a shared resource pool, the information for each shared project comes from this resource pool, and all information like assignments, cost rates and availability are in this central location.
Use the resource pool
-
Open the resource pool project.
-
Open your project that’ll share resources from the pool and click Resource > Resource Pool > Share Resources.

-
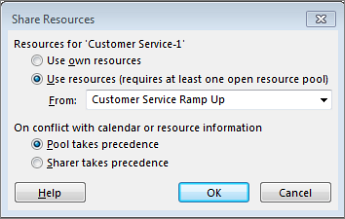
Click Use resources, and in the From box, click the resource pool project you opened in step 1.
-
Click Pool takes precedence if you want information in the resource pool to override any conflicting information from your (sharer) project.
Or
Click Sharer takes precedence if you want information in your project to override any conflicting information from the resource pool.
-
Click OK.
You can now use the resources for your project. Any resources in your project are automatically added to the pool.
-
To see the shared resource list, click Task> Gantt Chart > Resource Sheet.
Working with resource usage information
You can view and update the resource pool file from your current project (sharer file). It’s a good practice to periodically update and view resources to get the latest information on allocations and its impact on your projects.
Note: To directly edit a resource pool file, you’ll need read/write access to that file. Otherwise you can only view resource usage and make changes to your project’s resources.
-
Open your project sharer file.
-
In the box that appears, click Open resource pool to see assignments across all sharer files. This opens the resource pool as a read-only file.
-
To see assignments across projects that share the resource pool, click Task > Gantt Chart > Resource Usage.
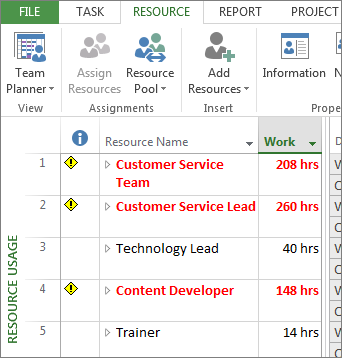
Tip: Resource names that appear in red indicate resource over allocation.
You can update with new resources, update total scheduled, and the work information. Find out more about assigning people to tasks.
-
After you make any updates, click Resource > Resource Pool > Update Resource Pool.
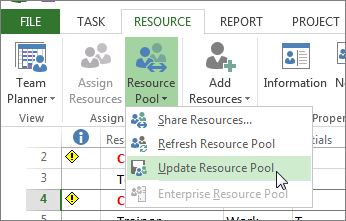
Tip: If Update Resource Pool isn’t available from your project, you might have opened the resource pool file in read/write mode. Close and reopen the resource pool in read mode.
Stop sharing resources
If your project shares resources from a resource pool or from another project file, you can disconnect it from that other file. Resources with assignments in your project file remain in the project after the file is disconnected from the resource pool or other project file, but the other resources from the resource pool or other file are no longer available.
Note: Usually you don't want the task assignments to be retained within the resource pool after you disconnect the sharer file. However, assignments will be retained if you disconnect your sharer file from the resource pool when the resource pool isn't open, or if you don't save the resource pool after you disconnect the sharer file. To remove the retained assignments from the pool, disconnect the sharer file from within the resource pool file, and all task assignment information is deleted from the resource pool without affecting the former sharer file. If there are already leftover tasks in your resource pool, reconnect the sharer file to the resource pool and disconnect it again.
Disconnect the active sharing file from its resource pool
You can disconnect the active project file from the resource pool or other file that it is connected to and sharing resources with.
-
Open the resource pool that contains the resources that you are sharing.
-
In the Open Resource Pool dialog box, click Open resource pool read/write so that you can change resource information. Keep in mind that opening the pool with read/write permission keeps others from updating the pool with new information.
-
Open your project.
-
Choose Resource > Resource Pool > Share Resources.
-
Click Use own resources, and then click OK.
-
Save both project files.
Learn more about resource pools
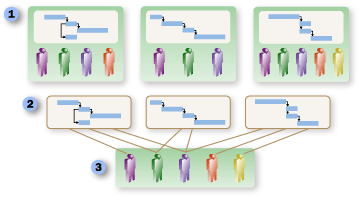
A resource pool makes it easier for you to administer people or equipment assigned to tasks in more than one project file. The resource pool centralizes resource information, such as the resource name, calendar used, resource units, and cost rate tables.
Each project that uses resources from the resource pool is called a sharer file.
Tip: Create a new (separate) project file just for resource information. This will make it easier for you to manage resource information and task assignments between the sharer files and the resource pool.


Some next steps
-
You might be interested in learning about adding people and assigning them to tasks.
-
Working on keeping a large project organized? Try creating a master project to link multiple projects.
-
If you’ve wondered about the impact of resource allocation to your project, take a look at the section on how resource assignments drive the schedule.


