
Add text to your publication by inserting a text box first. Most templates contain text boxes you can fill in, but you can also add your own text boxes.
First: Add a text box
-
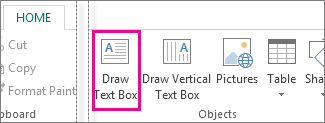
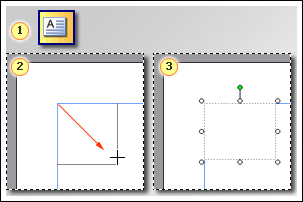
Click Home > Draw Text Box, and drag the cross shaped cursor to draw a box where you want text.
-
Type text in the text box.
If the text you type is too long for the text box, you can make the text box bigger, or link it to another text box.
Second: Link your text boxes
You can link text boxes so that text flows from one box to another.
-
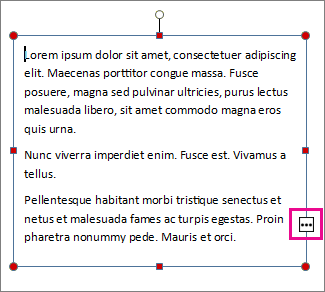
When a text box has too much text, a little box with ellipses appears in the lower right of the text box.
-
Create a new text box.
-
Click the overflow indicator and your cursor becomes a pitcher.

-
Move to the new text box and click.
The overflow text will show up in the new text box.
Now as you add text, words flow from one text box to another. If you run out of room in the second box you can link to another text box, and the text will flow through all three boxes.
Adding new text to a publication is a two-step process:
-
Create a new text box to contain the text.
-
Type the text you want.
Text boxes are independent elements, just like pictures, so you can:
-
Place a text box anywhere you want on a page and move it around at any time.
-
Make a text box any size you want and change its size whenever you want.
-
Format the text in one text box as red 24 point Verdana and in another as black 10 point Times Roman.
-
Put an orange line around one text box and give it a green background color while all the other text boxes on the page have no lines around them and white backgrounds.
-
Divide a text box into columns.
-
Connect text boxes, even text boxes on different pages, so text flows automatically from one to the other.
For an example of how flexible text boxes can be, take a look at the first page of this newsletter publication.
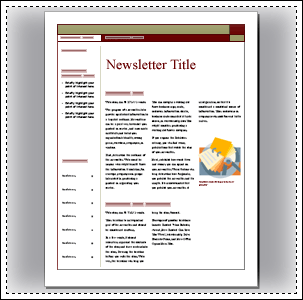
This page alone contains 16 independent text boxes, including the issue number, date, title, table of contents, story headlines, and picture caption.
Here's how to add new text to a page:


Tips:
-
To format text, select the text. On the Format menu, click:
-
Font to change the font, font size, font color, or style.
-
Paragraph to change the alignment, indentation, line spacing, and line and paragraph breaks.
-
Bullets and Numbering to add or change the style of bullets and numbers.
-
-
To format a text box, click it. On the Format menu, click Text Box.


