
In most database systems you can store only a single value in a field. But in Access, you can also create a field that holds multiple values (up to 100). For example, you want to track employees working on issues. One employee can own several issues, and each issue can have several employee working on it. This kind of data structure is called a many-to-many relationship. An Access multivalued field is also useful when you work with a SharePoint list that uses a Choice column. For a database example that uses multivalued fields, see the Issue Tracking template.
Note Access has other types of list fields: a lookup field that looks up matching data in a table (such as an ID field that looks up a Full Name) and a values list field that stores only one value with valid values defined in a property. For more information, see Create or delete a lookup field and Create or delete a values list field.
In this article
What is a multivalued field?
Suppose you have an issue to assign to one of your employees, but you decide that you need to assign it to more than one employee. You can create a multivalued field that lets you select the employees from a list.

When you click the Multi-select Combo Box arrow, check boxes appear to indicate your choices.
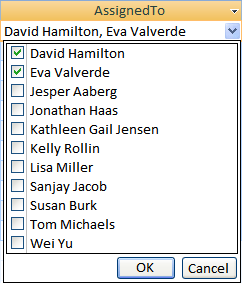
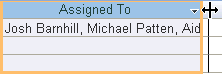
You can check or uncheck items in the list and then click OK to save your choices. The selected items are stored in the multivalued field, and are separated by commas (by default) when displayed.

The idea behind multivalued fields is to make it easy to support those instances where you want to select and store more than one choice, without having to create a more advanced database design. Behind the scenes, Access handles this for you, automatically separating the data and bringing it back together again to surface the values in one field. An Access multivalued field models a many-to-many relationship.
Important When you migrate an Access database to SQL Server, the Access multivalued field is converted to SQL Server as an ntext field that contains the delimited set of values. Because SQL Server does not support a multivalued data type that models a many-to-many relationship, additional design and conversion work might be needed.
Create a multivalued field
-
Open a table in Design View.
-
In the first available empty row, click in the Field Name column, and then type a field name.
-
Click in the Data Type column for that row, click the arrow and then, in the drop-down list, select Lookup Wizard.
Note The Lookup Wizard creates three types of lists depending on the choices you make in the wizard: a lookup field, a values list field, and a multivalued field.
-
Carefully follow these steps in the wizard:
-
On the first page, select I will type in the values that I want, and then click Next.
-
On the second page, keep 1 column selected, enter several values, one in each row under the column header, and then click Next.
-
On the third page, under Do you want to store multiple values for this lookup?, select the Allow Multiple Values check box, and then click Finish.
-
-
Save your changes.
Resize a Multi-select Combo Box control
-
Open the form or report in Design View or Layout View.
-
Click the Multi-select Combo Box control, point to one of the resize handles, and drag the edge of the control until it reaches the height or width you want:
Access moves any adjacent controls on the form or report downward or to the left or right automatically.
-
Save your changes.
Update the properties of a multivalued field
When you use the Lookup Wizard to create a lookup field, the Lookup field properties are set for you. To change the design of the multivalued field, set it's Lookup properties.
-
Open a table in Design View.
-
Click the multivalued field's name in the Field Name column.
-
Under Field Properties, click the Lookup tab.
-
Set the Display Control property to Combo Box to see all available properties. For more information, see Lookup Field Properties.
Delete a multivalued field
Important When you delete a multivalued field that contains data, you lose that data permanently — you cannot undo the deletion. For that reason, you should back up your database before you delete any table fields or other database components.
Delete from Datasheet view
-
Open the table in Datasheet View.
-
Locate the multivalued field, right-click the header row (the name), and then click Delete Field.
-
Click Yes to confirm the deletion.
Delete from Design view
-
Open the table in Design View.
-
Click the row selector next to the multivalued field, and then press DELETE, or right-click the row selector and then click Delete Rows.
-
Click Yes to confirm the deletion.
Lookup field properties
|
Set this property |
To |
|
Display Control |
Set this property to control what properties are displayed:
|
|
Row Source Type |
Choose whether to fill the lookup field with values from another table or query, or from a list of values that you specify. You can also choose to fill the list with the names of the fields in a table or query. |
|
Row Source |
Specify the table, query, or list of values that provides the values for the lookup field. When the Row Source Type property is set to Table/Query or Field List, this property should be set to a table or query name or to a SQL statement that represents the query. When the Row Source Type property is set to Value List, this property should contain a list of values separated by semicolons. |
|
Bound Column |
Specify the column in the row source that supplies the value stored by the lookup field. This value can range from 1 to the number of columns in the row source. The column that supplies the value to store does not have to be the same column as the display column. |
|
Column Count |
Specify the number of columns in the row source that can be displayed in the lookup field. To select which columns to display, you provide a column width in the Column Widths property. |
|
Column Heads |
Specify whether to display column headings. |
|
Column Widths |
Enter the column width for each column. The display value in a lookup field is the column or columns that are represented in the Column Widths property as having a non-zero width. If you don't want to display a column, such as an ID column, specify 0 for the width. |
|
List Rows |
Specify the number of rows that appear when you display the lookup field. |
|
List Width |
Specify the width of the control that appears when you display the lookup field. |
|
Limit To List |
Choose whether you can enter a value that isn't in the list. |
|
Allow Multiple Values |
Indicates whether the lookup field allows multiple values to be selected. You cannot change the value this property from Yes to No. |
|
Allow Value List Edits |
Specify whether you can edit the items in a lookup field that is based on a value list. When this property is set to Yes and you right-click a Lookup field that is based on a single column value list, you will see the Edit List Items menu option. If the lookup field has more than one column, this property is ignored. |
|
List Items Edit Form |
Name an existing form to use to edit the list items in a lookup field that is based on a table or query. |
|
Show Only Row Source Values |
Show only values that match the current row source when Allow Multiples Values is set to Yes. |


