
A Managed Metadata column is a new column type that can be added to lists, libraries, or content types to enable site users to select values from a specific term set of managed terms and apply these values to their content. You can create and configure a Managed Metadata column to map to an existing term set or term, or you can create a new term set specifically for a Managed Metadata column.
Managed Metadata columns promote the consistent use of metadata across sites because they provide users with a list of terms that they can apply to their content. These terms come from a term set that is managed centrally in the Term Store Management Tool by a Term Store Administrator or other individuals with permissions to manage terms.
Because this term set is updated and managed separately from the column itself, there is no need to update the column (or any content types, lists, or libraries associated with it) to make updated terms available to users. Whenever the term set that a specific Managed Metadata column is bound to is updated, the updated terms will automatically become available to users wherever that Managed Metadata column is available. This makes a Managed Metadata column very different from a Choice column, which would have to be updated every time you wanted to change the list of choice values a user could select.
Managed Metadata columns also have several unique features and characteristics that help users select and apply terms to content, such as support for “type-ahead,” as well as support for disambiguation of terms, descriptions, synonyms, and multi-lingual values.
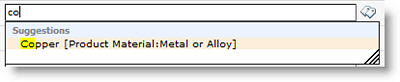
When a the user begins typing a value into a Managed Metadata field, it displays all terms in the associated term set that begin with the characters the user has typed. The name of the term set and the term's position in the hierarchy can be indicated along with the term itself, which can help users select the appropriate term.
Users can move their pointer over suggested terms to see descriptive text to help them make appropriate decisions.
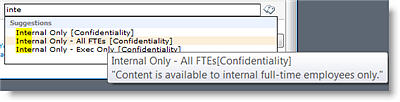
If synonyms have been specified for a term, users can enter those, and the correct term will be assigned.
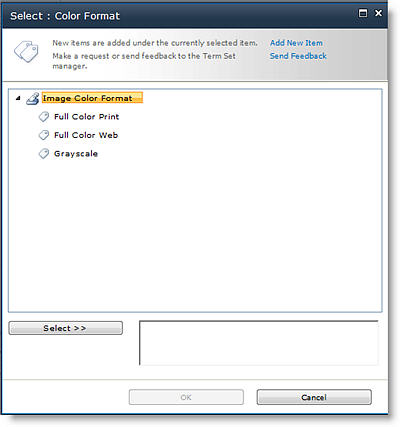
When users update a Managed Metadata column, they can type the value they want, or they can click the tags icon that displays next to the Managed Metadata field to launch the term picker dialog box, which they can use to select a value from within the hierarchy of the term set. This is useful to users who may not be familiar with the terms that are available. If the term set has been configured to be open, and the Managed Metadata column for it allows fill-in values, users may have the option to add a new term to the term set. Or they may simply have the option to send feedback to the designated contact for the term set.
Metadata columns
A managed metadata column lets you control the information that people can enter into a column. Users select the terms or phrases that they enter in the column from a pre-defined set of managed terms.
Note: You must be a Site Collection Administrator to create or configure site columns. You must have the Manage Lists permission level to create columns for lists or libraries. Site owners have this permission by default.
You can map a Managed Metadata column to a term set, or to an individual term that represents a subset of the term set (something that may be useful for hierarchical term sets). If you map the column to a term set, then it will display all available terms under that term set. If you map the column to an individual term within a term set, then the column will display that term, and any terms underneath it in the hierarchy.
How and where you create Managed Metadata columns should be factored into your organization-wide planning for managed metadata, content types, document management, and site governance.
Create a managed metadata column
You can create a Managed Metadata column that maps to an existing term set or term at any level on a site (for example, as a site column, or as a column local to a specific list or library). However, if you want a Managed Metadata column to be reusable and broadly useful for others who may be creating new site content types or configuring lists and libraries, then you might want to create it as a site column.
|
To create a new Managed Metadata site column that maps to an existing term set, do this: |
To create a new Managed Metadata column for a list or library that maps to an existing term set, do this: |
|---|---|
|
|
-
On the New Site Column in the Name and Type section, type the name you want the column to have.
-
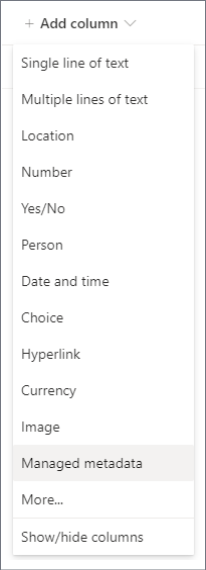
Under The type of information in this column is, click Managed Metadata.
-
In the Group section, select or create the group in which you want to organize the column.
-
In the Additional Column Settings section, type a description and specify whether you want the required users to provide a value for this column. You can also specify whether you want to enforce unique values for the column.
-
In the Multiple Value field section, specify whether you want to allow multiple values in the column. If you allow multiple values, users will not be able to sort on this column in list views.
-
In the Display format section, specify whether you want the column to display only the term label, or the term and its full path in the hierarchy of the term set.
It can be helpful to display the full hierarchical path in situations where the context for the term itself might be unclear. -
In the Term Set Settings section, select Use a managed term set, and then do one of the following:
a. To search for a term set that contains the terms you want to use, type the name of a term and click the Find button. You can select the term set or term that you want from the results that are displayed in the box. If you want to search again, click the Reset button.
b. To browse for the term set or term that you want to map to this column, click the arrow to the left of the Managed Metadata Service application that displays in the box to expand it and browse for the term set you want. Continue to expand nodes until you find the term set or term you want. Click it to select the term set or the term.
-
In the Allow Fill-in section, specify whether you want to allow users to add new values to the term set. If the term set you select is closed, you will not be able to allow Fill-in.
-
In the Default Value section, you can optionally specify the term you want to use as the default value for the column. You can type the term, or you can click the Tags icon to browse for the term using the term picker.
-
Click OK.
-
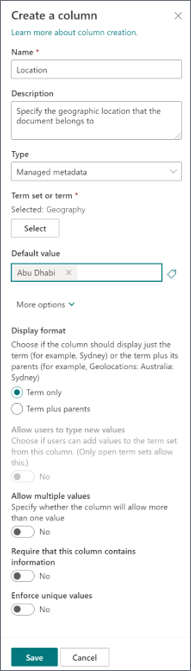
On the Create Column panel, type the name and optional description you want for the managed metadata column
-
The Type option will be pre-selected to Managed metadata, but you can choose to change the column type as well. Once changed, the column settings will default to the respective column type.
-
In the Term set or term option, select the Select button, and then search for or select the term set or term for the column.
-
In the Default Value section, you can optionally specify the term you want to use as the default value for the column. You can type the term, or you can select the Tags icon to browse for the term.
-
Select More options to do the following (optional):
a. In the Display format section, specify whether you want the column to display only the term label, or the term and its full path in the hierarchy of the term set. It can be helpful to display the full hierarchical path in situations where the context for the term itself might be unclear.
b. In the Allow users to type new values section, specify whether you want to allow users to add new values to the term set. If the term set you select is closed, you will not be able to allow Fill-in of new values.
c. In the Multiple Value field section, specify whether you want to allow multiple values in the column. If you allow multiple values, users will not be able to sort on this column in list views.
d. In the Require that this column contains information section, specify whether you want to mark the column as a mandatory field. Once enabled users must enter a value for each row.
e. In the Enforce Unique values section, you can specify whether you want to enforce users to enter only unique values in the column.
If there is not an existing term set that you want to use, you can also create a new term set for a new Managed Metadata column. The term set that you create will be a “local” term set that can be used only within the site collection where you create it. Any terms that you add to a local term set will not be offered as suggestions in Enterprise Keywords columns (unlike terms in global term sets).
You must be a Site Collection Administrator to create or configure site columns. You must have the Manage Lists permission level to create columns for lists or libraries. Site owners have this permission by default.
|
To create a new Managed Metadata site column that maps to an existing term set, do this: |
To create a new Managed Metadata column for a list or library that maps to an existing term set, do this: |
|---|---|
|
|
-
On the New Site Column or Create Column page (depending on which type of column you’re creating) in the Name and Type section, type the name you want the column to have.
-
Under The type of information in this column is, click Managed Metadata .
-
In the Additional Column Settings section, type a description for the column, and specify whether you want to require users to enter a value for the column. You can also specify whether you want to enforce unique values for the column.
-
If you are adding a column to a list or library, then you may also be able to specify whether you want to add this new Managed Metadata column to all content types for the list or library (if multiple content types are enabled for the library). You can also specify whether you want to add this column to the default view for the list or library.
-
In the Multiple Value field section, specify whether you want to allow multiple values in the column. If you allow multiple values, users will not be able to sort on this column in list views.
-
In the Display format section, specify whether you want the column to display only the term label, or the term and its full path in the hierarchy of the term set.
It can be helpful to display the full hierarchical path in situations where the context for the term itself might be unclear. -
In the Term Set Settings section, select Customize your term set, and then type a description for the term set.
-
Click Edit Using Term Set Manager, and then click OK when you are prompted to save your changes.
-
Follow the steps in the section Create and configure a new term set to set up the term set.
-
In the Properties pane of the Term Store Management Tool, specify the following information about the new term set:
|
In this field |
Do this: |
|---|---|
|
Term Set Name |
Type a name for your term set. This field should already be populated with the name of the column, but you can update it or change it |
|
Description |
Type a description that will help users understand how they should use these terms. |
|
Owner |
If you want the owner of the term set to be someone other than you, you can change the Owner to another person or group. You can enter only one item. |
|
Contact |
Type an e-mail address if you want site users to be able to provide feedback on the term set when they are updating the value for a Managed Metadata column. |
|
Stakeholders |
Add the names of users or groups who should be notified before major changes are made to the term set. |
|
Submission Policy |
Specify whether you want the term set to be Closed or Open. If a term set is closed, then users cannot add new terms to it when they are updating the value for a Managed Metadata column bound to this term set, and the term set can be updated only by individuals with permission to update managed metadata. If the term set is open, then users can add new terms to the term set if the column is also configured to allow fill-in choices. |
|
Available for Tagging |
Select the check box to make the terms in the term set available for tagging. If you clear the check box, then this term set will not be visible to most users. If the term set is still in development, or is not otherwise ready for use, you might want to clear the check box. |
-
Click Save to save your property updates.
-
To add terms to the term set, point to the term set in the tree control on the left, click the arrow that appears, and then click Create Term, and then type the name you want for your term.
-
In the Properties pane, specify the following information about your new term:
|
In this field: |
Do this: |
|---|---|
|
Available for tagging |
Select the check box to make this term available for tagging. If you clear the check box, then this term will be visible, but disabled in the tagging tools. |
|
Language |
Select the language for this label for the term. |
|
Description |
Type a description to help users understand how to apply this term, or to differentiate it from similar terms. |
|
Default Label |
Enter the word or phrase you want to use as the default label for the term in this language. |
|
Other Labels |
Specify any synonyms for this term. Do this if you want several words or phrases with the same meaning to be treated as a single entity for the purposes of metadata management. To add multiple synonyms, type a word, and then press ENTER to create additional lines. For example, if you are creating a term for the color “blue” and “blue” is the default label for the term, you could add “azure,” “sapphire,” “indigo,” and “cobalt” as possible synonyms. |
|
Member Of |
Describes the parent Term Set Name, description, Owner, and other info. |
-
Click Save.
-
Repeat steps 3 -5 to add new terms.
-
To create sub-terms underneath terms, point to an individual term underneath which you want to nest another term, click the arrow that appears, and then click Create Term, and type the name you want for your term.
-
Repeat steps 4 and 5 to specify properties for your sub-terms (select the term you want to update first).
-
By default, terms within term sets are displayed in the default sort order for the language. If you want to specify a custom sort order so that terms appear in a consistent order, regardless of the language or changes to term labels, you can do that by selecting the term set in the tree control, and then clicking the Custom Sort tab on the right. Click Use custom sort order, and then use the lists boxes to arrange terms in the desired numerical order.
A managed metadata column lets you control the information that people can enter into a column. Users select the terms or phrases that they enter in the column from a pre-defined set of managed terms.
The following example shows how this works.
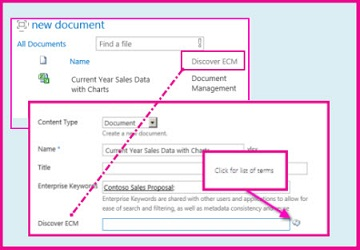
The document library in the above illustration has a managed metadata column called “Discover ECM”. To enter values in the column, a user edits the properties for an item in the library (in this case, the item is a spreadsheet).
The name of the managed metadata column, Discover ECM, is the label for a field on the properties page. To see a list of terms, users just select the tags icon.
When you set up a managed metadata column, you can use an existing term set, or you can add a term set specifically for this purpose. To learn how to add a new term set, see Set up a new term set.
You can create a column for lists and libraries, or you can create a site column.
Create a site column for managed metadata
-
On the Home page, select Site Contents.
-
On the Site Contents page, select Settings

-
Under Web Designer Galleries, select Site columns.
-
On the Site Column page, select Create.
-
On the New Site Column page, in the Name and Type section, enter the name of the column.
-
Go to step 5 in the next procedure.
Create list or library column for managed metadata
-
Go to the list or library where you want to create the column.
-
On the List or Library tab of the ribbon, select List Settings or Library Settings.
-
In the Columns section, select Create Column.
-
On the Create Column page, in the Name and Type section, enter the name of the column.
-
In The type of information in this column is section, select managed metadata.
-
In the Group section, select a group for the column or create a group for it.
-
In the Additional Column Settings section, enter a description and specify whether the value is required. You can also specify whether you want to enforce unique values for the column.
-
In the Multiple Value field section, specify whether you want to allow multiple values in the column.
-
If you allow multiple values in the column, users won’t be able to sort on this column.
-
-
In the Display format section, specify whether to display only the term label, or to display the term and its full path in the term set hierarchy.
-
In the Term Set Settings section, do one of the following:
-
To use an existing term set, select Use a managed term set, and then search or browse for the name of the term set. After you select the term set name, you can specify whether to allow users to fill-in values, and set a default value for the column.
-
To create a term set for this column, select Customize your term set, and enter a description for the term set. Then, select Edit Using Term Set Manager, and follow the steps in Set up a new term set.
-
-
Select OK.
Tip: To manage a metadata column, follow either of the previous steps to get to your site, library, or list column Site columns page. On that page, scroll through the defined columns and select the one you want to modify. You will then be back in the editing page where you can change or update the settings


