
In Visio, shapes can contain related data, called shape data, which is useful for providing details. For example, shape data can show steps in a process or pieces of equipment in a network diagram—without filling up the diagram with text.
You can add data directly to a shapes, or (if you have Visio Professional) you can link data from an external data source to a shape. This article describes how to add data directly to shapes.
The following articles discuss how to work with external data sources:
View shape data
To view the shape data for any Visio object:
-
Right-click the shape, and then select Data > Shape Data.
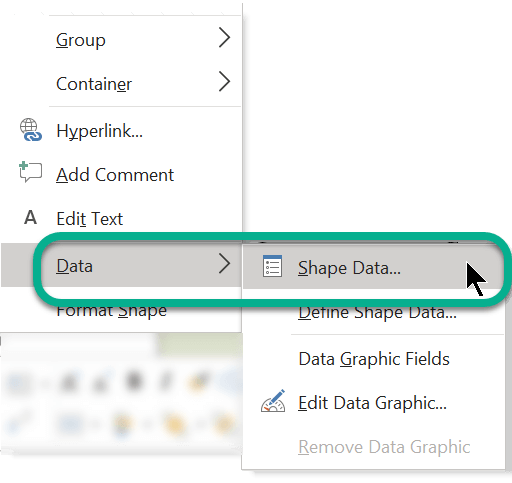
The Shape Data window opens.
Add data to selected shapes
To add data to shapes that are already in your drawing, first add the data fields to your shapes and then add values.
To add data fields to selected shapes
-
On the View tab, in the Show group, click Task Panes, and then click Shape Data.
This toggles display of the Shape Data task pane.
-
Select the shape or shapes that you want to add data to.
-
Right-click the selection, point to Data on the shortcut menu, and then click Define Shape Data.
-
In the Define Shape Data dialog box, click New, and then do the following:
-
In the Label box, type a name for the new field.
-
In the Type list, select a type of data for the new field to contain.
-
In the Format list, select a format for displaying the data. The format options change depending on the chosen data type.
-
If you want to provide a text prompt for someone adding data to the field, in the Prompt box, enter the text that you want. The text appears when the mouse pointer is held over the field in the Shape Data window.
-
-
Click OK.
To add values to your data fields
-
Select each shape one at a time, and type the values into the data fields in the Shape Data window.
The contents of the Shape Data window show the data for the selected shape only.
Create a reusable set of data fields
You don’t have to create data fields for each shape individually—you can create a set of data fields and apply it to all selected shapes in your drawing, and to shapes that you place in the drawing later.
To create a reusable set of data fields
-
On the View tab, in the Show group, click Task Panes, and then click Shape Data.
This toggles display of the Shape Data task pane.
-
Right-click anywhere in the Shape Data task pane, and then click Shape Data Sets.
-
In the Shape Data Sets task pane, click Add.
-
In the Add Shape Data Set dialog box, type a name for the data set.
-
Select Create a new set, and then click OK.
The data set appears in the Name column of the Shape Data Sets window.
-
Select your new data set, and then click Define.
-
In the Define Shape Data dialog box, define the fields for your shape data set.
-
To create another field, click New.
-
After all of your data fields are defined, click OK.
-
To apply the data set to selected shapes in your drawing, select the set in the Shape Data Sets task pane, and then click Apply.
To see your new fields in one of the shapes that you applied it to, select the shape, and then look in the Shape Data window.
Add data fields to a master shape
If you want to add the same set of shape data every time you use a particular shape, you can save time by adding the data fields to a copy of the master shape. For example, you can add data fields such as name and employee number to the master of a person shape.
To create a copy of the shape on a custom stencil
-
In the Shapes window, right-click the master shape, point to Add to My Shapes, and then do one of the following:
-
If you want to add the master shape to a new stencil, click Add To New Stencil.
-
If you want to add the master shape to an existing custom stencil, click Add To Existing Stencil.
-
-
In the Save As dialog box, type a name for the new stencil, and then click Save.
-
In the Shapes window, click More Shapes, point to My Shapes, and then click the stencil that contains the copied master shape.
To edit the new master on the custom stencil
-
Right-click the title bar of the new stencil, and then click Edit Stencil on the shortcut menu.
-
Right-click the shape that you just added to the stencil, point to Edit Master, and then click Edit Master Shape.
-
In the shape’s edit window, right-click the shape, point to Data, and then click Define Shape Data.
-
In the Define Shape Data dialog box, type a name for the field, and fill in any other information that you want. For example, you might want to change the data type or add a shape prompt at this time.
-
To create another field, click New and repeat the previous step.
-
After you finish defining your data fields, click OK.
-
To close the master shape’s edit window, on the View tab, in the Window group, click Cascade, select the window for the master shape, and then click the Close button (X) in the upper corner.
-
When you see a message that asks if you want to update the shape, click Yes.
-
In the Shapes window, right-click the stencil, and then click Save.
To delete a data field
-
Select the shape that has the data field that you want to delete.
-
Right-click anywhere in the Shape Data window and click Define Shape Data.
-
In the Define Shape Data dialog box, under Properties, select the data field that you want to delete, click Delete, and then click OK.
View and enter shape data in Visio Plan 1 or Visio Plan 2
In Visio Plan 1 and Visio Plan 2, you can add data to pre-existing shape-data fields.
-
Open the diagram for editing.
-
Select the shape.
-
On the ribbon, select the Shape tab, then select Shape Data.
The Shape Data pane opens on the right margin of the window. All pre-assigned shape data fields for that object are listed in the pane.
-
Select any field, then enter the appropriate data value.
View shape data in Visio in Microsoft 365
In Visio in Microsoft 365, you can't add data to a shape, but you can view data that has already been added to shape in another version of Visio.
-
Open the diagram for editing.
-
Select the shape.
-
On the ribbon, select the Shape tab, then select Shape Data.
The Shape Data pane opens on the right margin of the window. All pre-assigned shape data fields for that object are listed in the pane, allowing you to see any shape data that has been assigned to those fields.


