
Note: This article has done its job, and will be retiring soon. To prevent "Page not found" woes, we're removing links we know about. If you've created links to this page, please remove them, and together we'll keep the web connected.
The Outlook Web Access Web Parts enable you to display selected content from folders in your Microsoft Exchange Server 2003 to 2007 email account in a SharePoint site. This article explains how to use these Web Parts to customize your My Site.
Important: These Web Parts are connected to your organization’s Office Outlook Web Access server, not directly to Microsoft Exchange Server. To set up the Outlook Web Access Web Parts, you will need to get the URL for the Outlook Web Access server from your organization's IT department.
In this article
Overview of the Outlook Web Access Web Parts
There are five Outlook Web Access Web Parts. These can be used with Microsoft Exchange Server version 2003 to 2007:
-
My Calendar
-
My Contacts
-
My Tasks
-
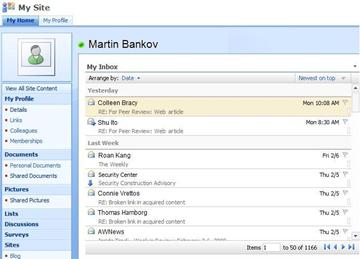
My Inbox
-
My Mail Folder
These Web Parts are most useful for your My Site, because only you (or someone who can log into your Exchange e-mail account) will be able to see the information from your folders. If you put one of these Web Parts on a shared site, other users will see the Outlook Web Access logon screen in the Web Part.
Each Web Part displays the information from a folder in your email account, so you can choose the information you want to show on your site. The Web Parts make it easy to show specific information, such as tasks, without showing all of your Outlook information. If you want to have full Outlook functionality on your SharePoint site, you can use a Page View Web Part linked to the URL for your Outlook Web Access server.
All of the Outlook Web Access Web Parts provide two-way communication with your Exchange Server e-mail account: Changes you make in a Web Part appear in Outlook.
Add an Outlook Web Access Web Part to a page
-
From a page, in the ribbon, click the Page tab, and then click the Edit Page command.

Note: If the Edit Page command is disabled, you may not have the permissions to edit the page. Contact your administrator.
-
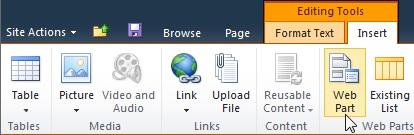
Click on the page where you want to add a Web Part, click the Insert tab, and then click Web Part.
-
Under Categories, click Outlook Web App.
-
Under Web Parts, select the Outlook Web Access Web Part that you want to add to the page, and then click Add.
-
On the page, point to the Web Part, click the down arrow, and then click Edit Web Part.
-
In the Mail Configuration section of the tool pane, type the URL for your Outlook Web Access server in the Mail server address box. For example, https://mail.contoso.com
-
In Mailbox, type your email address, such as connie@contoso.com.
-
Configure the other options for the Web Part as you prefer.
-
Click OK to save your settings and exit the tool pane, or click Apply to see your changes without closing the tool pane..
-
When you have finished editing the page, click the Page tab, and then click Stop Editing.
Note: For all of the Web Parts except the My Contacts Web Part, you can change the view while you are using the Web Part. If you choose Two Line view for the My Contacts Web Part, you cannot change it while you are using the Web Part.
You will be prompted to log into Outlook Web Access.
Use the Outlook Web Access Web Parts
My Inbox and My Mail Folder
In the My Inbox and My Mail Folder Web Parts, you can:
-
Sort the lists of messages by any of the column headings
-
Delete messages
-
Change category and follow-up indicators
To read the contents of a message, click the message subject. You will be prompted to log into Outlook Web Access.
To send a message, click the Web Part title. You will be prompted to log into Outlook Web Access.
My Contacts
While viewing the My Contacts Web Part, you can:
-
Sort the list of contacts by any of the column headings
-
Delete a contact
-
Change category and follow-up indicators
To add or edit a contact, click the Web Part title. You will be prompted to log into Outlook Web Access.
My Calendar
While viewing the Web Part, you can:
-
Select the Day, Work Week, Week, or Month view
-
Delete and appointment
To view or edit an appointment, double-click the appointment. You will be prompted to log into Outlook Web Access. After you log in, the appointment dialog box opens.
To add an appointment, double-click the date and time for the appointment. You will be prompted to log into Outlook Web Access. After you log in, the appointment dialog box opens.
You can use the New button on the calendar toolbar to create a new appointment, meeting request, email message, or contact. Click the down-arrow next to the New button and click the item you want to create. You will be prompted to log into Outlook Web Access. After you log in, the appropriate dialog box opens.
My Tasks
While viewing the My Tasks Web Part, you can:
-
Sort tasks by any of the column headings
-
Mark a task as completed
-
Change a category and follow-up indicators
-
Add a task
Use Outlook Web Access from a SharePoint site
If you want see your full Outlook account (all folders) in your SharePoint site, you can use the Page Viewer Web Part to display the Outlook Web Access page.
-
From a page, in the ribbon, click the Page tab, and then click the Edit Page command.
Note: If the Edit Page command is disabled, you may not have the permissions to edit the page. Contact your administrator.
-
Click on the page where you want to add a Web Part, click the Insert tab, and then click Web Part.
-
Under Categories, click Media and Content.
-
Under Web Parts, select the Page Viewer Web Part, and then click Add.
-
On the page, point to the Page Viewer Web Part, click the down arrow, and then click Edit Web Part.
-
Under Page Viewer on the tool pane, make sure Web Page is selected. In the Link field, type the URL for your Outlook Web Access server, such as https://mail.contoso.com
-
You may want to adjust the height of the Web Part in the tool pane until it shows as much of the Outlook Web Access interface as you want. To do this, click Appearance under Should the Web Part have a fixed height?, click Yes, and then type the number of pixels, such as 500.
-
Click OK to save your settings and exit the tool pane, or click Apply to see your changes without closing the tool pane.
-
When you have finished editing the page, click the Page tab, and then click Save & Close.
Use Outlook Web App Web Parts within SharePoint Online
Outlook Web App Web Parts do not yet work properly when used against Exchange Online in Microsoft 365 beta. However, you can instead use the Page Viewer Web Part to display your Outlook Web App information within SharePoint Online.
-
From a page, in the ribbon, click the Page tab, and then click the Edit Page command.
Note: If the Edit Page command is disabled, you may not have the permissions to edit the page. Contact your administrator.
-
Click on the page where you want to add a Web Part, click the Insert tab, and then click More Web Parts.
-
Under All Categories, click Media and Content.
-
Click the Page Viewer Web Part, and then click Add.
-
On the page, point to the Page Viewer Web Part, click the down arrow, and then click Edit Web Part.
-
Under Page Viewer on the tool pane, make sure Web Page is selected. In the Link field, type the URL for the Outlook Web App. Note that the Outlook URL must include the parameter exsvurl=1. For example, the Outlook URL typically resembles the following: https://www.outlook.com/owa/?exsvurl=1&cmd=contents&part=1&fpath=inbox&realm=contoso.onmicrosoft.com , where the SharePoint Online realm “contoso.onmicrosoft.com” represents the URL you used when you signed up for your Microsoft 365 subscription. For more details on defining the Outlook URL to enter in the Link field, see “Using Outlook Web App Web Parts” below.
-
You may want to adjust the height of the Web Part in the tool pane until it shows as much of the Outlook Web Access interface as you want. To do this, click Appearance under Should the Web Part have a fixed height?, click Yes, and then type the number of pixels, such as 500.
-
Click OK to save your settings and exit the tool pane, or click Apply to see your changes without closing the tool pane.
-
When you have finished editing the page, click the Page tab, and then click Save & Close.
For additional tips on defining an Outlook URL, such as parameters you can add to show specific pages or views, see Using Outlook Web App Web Parts on Microsoft TechNet.


