
AutoSave is a new feature available in Excel, Word, and PowerPoint for Microsoft 365 subscribers that saves your file automatically, every few seconds, as you work.
AutoSave is enabled by default in Microsoft 365 when a file is stored on OneDrive, OneDrive for Business, or SharePoint Online.
Important: Do you use File > Save As after making changes to an original document or template? If so, we recommend using File > Save a Copy before making your changes. That way AutoSave won't overwrite the original file with the changes. If AutoSave did overwrite the file with your changes, see the section below, "I didn't want my changes saved, how do I go back?"
On Windows, AutoSave is available in Excel, Word, and PowerPoint for Microsoft 365 subscribers. Here are some frequently asked questions about it.
You can restore a previous version of the file using Version History.
|
|
At the top of the window, click the filename, and then click Version History. Review the dates and times to find the version that you want to restore, and then click Open version. A second window will open showing that version of the file. To roll back to this version, click the Restore button. For more information on version history, see View historical versions of Office files. |

When you open a file and make your first changes, AutoSave saves those changes and a new version of the file is added to the version history. After that even though AutoSave is regularly saving your changes to the file, new versions are only added to the version history periodically (about every 10 minutes) for the remainder of your editing session.
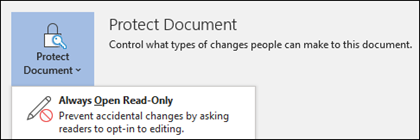
If you're the owner of the file, you can set the file to always open read-only. When people open a file with this setting, they won't be able to save edits to the file, unless they specifically enable editing. To turn this setting on for a file, go to File > Info > Protect Document > Always Open Read-Only. To turn it off again later, just repeat that process.
There are other ways to help protect the file from being edited. If the file is on OneDrive, you can change permissions for the file. If the file is on SharePoint, you can set up a library to require check-out.
|
|
Save As isn't on the File menu when you open a document from OneDrive, OneDrive for Business or SharePoint Online. In these cases, the Save a Copy command appears on the File menu instead. |
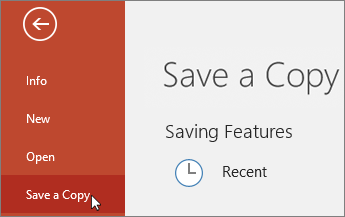
Do you use Save As a lot? Many people are used to working on a file, and then using File > Save As to keep the changes in the copy and not the original. However, when AutoSave is on, your changes are continually saved to the original. So we recommend using File > Save a Copy before you make any changes if you want your changes to apply to the copy and not the original.
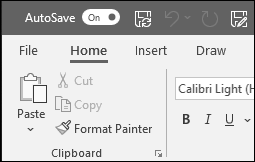
AutoSave appears in the upper-left corner, on the title bar, if you are an Microsoft 365 subscriber, and you have the latest versions of Excel, Word, and PowerPoint for Windows installed. Please note that if you have a work or school account, your administrator may control which version of Office you can install, and it may not be the latest version. See When do I get the newest features in Microsoft 365?
If you're not a subscriber, don't worry. There's still AutoRecover. AutoRecover helps protect files in case of a crash. If you reopen the file after a crash, a version of the file with your latest changes appears in a Document Recovery pane. For more information on how to turn it on, see Help protect your files in case of a crash.
And, of course, you can always save manually the way you always have, by either pressing CTRL+S, clicking the Save button, or going to File > Save.
AutoSave is enabled when working on a file that is saved to OneDrive, OneDrive for Business, or SharePoint Online. If the file is saved to another location (or if it hasn't been saved at all, yet), then AutoSave is disabled. This will happen if your file is on a SharePoint on premises site, a file server, some other cloud storage service, or saved to a local path like C:\.
There are other reasons AutoSave could be disabled as well. Here are some common reasons for it to be disabled:
-
Your file is in an older format like .xls, .ppt, or .doc.
-
Your file is in a local OneDrive folder and OneDrive synchronization is paused.
-
Your file is being synced by an older version of the OneDrive sync app. For more information on updating OneDrive, see Sync files with OneDrive in Windows.
-
Your file is embedded inside another Office file.
-
Your presentation is in slide show mode.
If you are using Excel, and tried the above, you may have a file that contains features that are not supported by AutoSave. Do one or more of the following to enable it:
-
Turn off the Shared Workbook feature. This feature is an older method of sharing. It has many limitations, and has been replaced by co-authoring.
-
If possible, remove password encryption from the file: Go to File > Info > Protect Workbook. Then delete the password and click OK.
-
If possible, remove restricted access: Go to File > Info > Protect Workbook > Restrict Access and click Unrestricted Access.
-
If you are opening a workbook snapshot from SharePoint, choose to open the file instead of the snapshot.
-
Turn off the Refresh data when opening file setting on all tables and PivotTables in the file. Select the table or PivotTable, then go to Table Tools Design > Refresh > Connection Properties. Then uncheck Refresh data when opening file.
-
Inactivate an add-in that's causing AutoSave to be disabled. Select File > Options > Add-Ins > Excel Add-ins > Go and then clear the check box for the add-in.
The easy way is to turn the AutoSave switch off before you make your changes. If the changes are meant to be temporary and not saved, close the file. Then click No when you are asked to save. If you decide you do want to save the changes, just turn AutoSave back on.
If you don’t want to save continually and you don't want to show others your changes, you can turn AutoSave off. Then, when you’re ready, click Save (or press CTRL+S) to save and show your changes to any other people working on the file. (Or, you can also turn the AutoSave switch back on to save and share your changes.)
The default for AutoSave is to always be On for files that are on the Microsoft Cloud. However, if you turn AutoSave Off for an individual file, the program will remember and will keep it off every time you reopen that file. If you switch it back On for a file, it will remember to keep in on for that file.
When AutoSave is off, AutoRecover still works in the event of a system crash while your file is open.
If you turn AutoSave Off for an individual file the program will remember to keep it off every time you reopen that file. If you switch it back On for an individual file, it will remember to keep in on for that file.
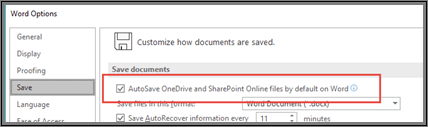
If you want to turn AutoSave off, by default, for all files, go to File > Options > Save and uncheck the box next to AutoSave OneDrive and SharePoint Online files by default on <application>.
Restart Word (or whichever application you're in) and the change will take effect.
Notes:
-
If you want AutoSave off by default for all your Office applications, such as PowerPoint and Excel too, you'll need to repeat these steps for each of those programs.
-
If you want individual files to still be AutoSaved you can open those files and manually turn AutoSave back on for those files.
On the Mac, AutoSave is available in Excel, Word, and PowerPoint for Microsoft 365 subscribers. Here are some frequently asked questions about it.
You can restore a previous version of the file. This will establish that older version as the current version. Click File > Browse Version History. In the Version History pane, review the dates and times to find the version that you want to restore, and then click Open Version. A second window will open. To roll back to this version, click the Restore button.
If the file is on OneDrive, you can change permissions for the file. If the file is on SharePoint, you can set up a library to require check-out.
Save As isn't on the File menu when you open a document from OneDrive, OneDrive for Business or SharePoint Online. In these cases, the Save a Copy command appears on the File menu instead.
Do you use Save As a lot? Many people are used to working on a file, and then using File > Save As to keep the changes in the copy and not the original. However, when AutoSave is on, your changes are continually saved to the original. So we recommend using File > Save a Copy right away if you want your changes to apply to the copy and not the original.
AutoSave appears in the upper-left corner if you are an Microsoft 365 subscriber, and you have the latest version of Excel, Word, and PowerPoint for Microsoft 365 installed. Please note that if you have a work or school account, your administrator may control which version of Office you can install, and it may not be the latest version. See When do I get the newest features for Microsoft 365? for more information.
If you're not a subscriber, don't worry. There's still AutoRecover. AutoRecover helps protect files in case of a crash. If you reopen the file after a crash, a version of the file with your latest changes appears in a Document Recovery pane. For more information on how to turn it on, see Recover files in Office for Mac.
AutoSave is enabled when working on a file that is saved to OneDrive, OneDrive for Business, or SharePoint Online. If the file is saved to another location (or hasn't been saved at all, yet) then AutoSave is disabled. This will happen if your file is on a SharePoint On Premises site, a file server, or saved to a local folder on your computer.
Additionally, you must open your file from the File menu within Word, Excel, or PowerPoint in order for AutoSave to be activated.
Note: If your File > Open looks like the image below you must click the Online Locations button, then select your OneDrive or SharePoint file from there, in order for AutoSave to work.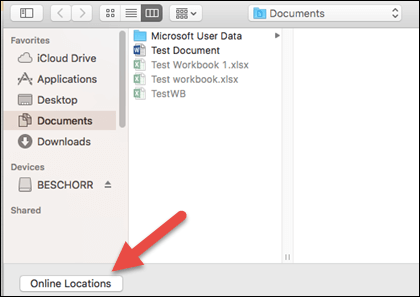
There are other reasons AutoSave could be disabled as well. Here is a list of common reasons for it to be disabled:
-
Your file is in an older format like .xls, .ppt, or .doc.
-
Your file is in a local OneDrive folder and OneDrive synchronization is paused.
-
Your file is embedded inside another Office file.
-
Your presentation is in slide show mode.
If you are using Excel, and tried the above, you may have a file that contains features that are not supported by AutoSave. Do one or more of the following to enable it:
-
Turn off the Shared Workbook feature. This feature is an older method of sharing. It has many limitations, and has been replaced by co-authoring.
-
If possible, remove password encryption from the file: On the Review tab, click Protect Workbook. Then delete the password and click OK.
-
If possible, remove restricted access: Go to File > Restrict Permissions > No Restrictions.
-
If you are opening a workbook snapshot from SharePoint, choose to open the file instead of the snapshot.
-
Turn off the Refresh data when opening file setting on all tables and PivotTables in the file. Select the table or PivotTable, then go to the Table tab. Click Refresh > Connection Properties, and uncheck Refresh data when opening file.
-
Inactivate an add-in that's causing AutoSave to be disabled. Select Tools > Excel Add-ins and clear the check box for the add-in.
The easy way is to turn the AutoSave switch off before you make your changes. If you decide to save the changes, just turn AutoSave back on. If you don't want to save the changes, close the file. Then click No when you are asked to save.
If you don’t want to save continually and you don't want to show others your changes, you can turn AutoSave off. Then, when you’re ready, click Save to show your changes to the other people working on the file. (Or, you can also turn the AutoSave switch back on to save and share your changes.)
The default for AutoSave is to always be On for files that are on the cloud. However, if you turn AutoSave Off for a file, the program will remember and will keep it off every time you reopen that file. If you switch it back On for a file, it will remember to keep in on for that file.
When AutoSave is off, AutoRecover still works in the event of a system crash while your file is open.
If you turn AutoSave Off for an individual file the program will remember to keep it off every time you reopen that file. If you switch it back On for an individual file, it will remember to keep in on for that file.
If you want to turn AutoSave off, by default, for all files, go to Preferences > Save, and uncheck the box next to Turn on AutoSave by default.
No. However, you can turn AutoSave Off for a file, and the program will remember to keep it off every time you reopen that file. If you switch it back On for a file, it will remember to keep in on for that file.


