
Use the OneDrive for work or school app in Windows 8 to store, access, and share work documents and other files in the cloud.
Sign in and out of the OneDrive for work or school app
To sign in to the OneDrive for work or school app in Windows 8, enter your Microsoft SharePoint or Microsoft 365 username and password and then select Sign In.
To sign out of the app, select Settings>Options>Sign Out.
Browse your OneDrive for work or school files
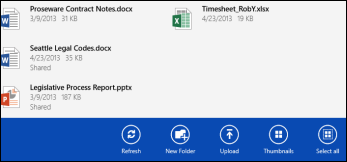
Once you’re signed in, the OneDrive for work or school app takes you directly to your files and folders. Select any item to open it.
Labels under each item tell you when it was last updated, and if it’s currently shared.
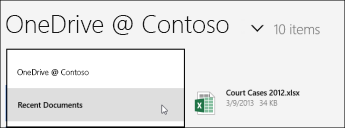
To view the files you’ve opened most recently, select the down-arrow at the top of the page, and then select Recent Documents.
Upload files or folders to the OneDrive for work or school app
To upload files in the OneDrive for work or school app:
-
Swipe up from the bottom of the screen or right-click any white space to show an action bar at the bottom of the screen.
-
Select Upload.
-
Select Files.
-
Browse to and select the files you want to upload. Files are added to the bottom action bar as you select them.
-
Select Upload to OneDrive for work or school.

To upload folders in the OneDrive for work or school app:
-
Swipe up from the bottom of the screen or right-click any white space to show an action bar at the bottom of the screen.
-
Select Upload.
-
Select Folder.
-
Browse to and select the folder you want to upload.
-
Select Choose this folder > OK.
Open or save files on OneDrive for work or school from another app
In the other app, choose the command (such as Browse, Open, or Save As) to open or save a file. Select the arrow to select the location of the file, and then choose OneDrive for work or school from the list.
Select files in the OneDrive for work or school app
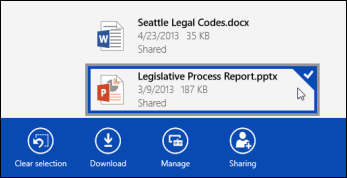
When you select a file or folder in OneDrive for work or school, an action bar appears at the bottom of the screen.
To select a file in OneDrive for work or school on a touchscreen, hold and swipe up or down on the file. If you’re in snap mode, hold and swipe left or right on the file.
To select a file with a mouse, right-click it.
Rename a file
-
Select the file you want to rename.
-
Select Manage in the action bar.
-
Select Rename.
-
Enter a new name and then select Rename.
Note: You can’t rename folders. To rename a folder, edit the folder properties in a browser.
Delete a file
-
Select the file you want to delete.
-
Select Manage in the action bar.
-
Select Delete.
-
Select Delete again to confirm.
Create a folder
-
Swipe up from the bottom of the screen or right-click any white space to show the action bar at the bottom of the screen.
-
Select New Folder.
-
Enter a name and then select Create Folder.
Share OneDrive for work or school files and folders
You can share files in your OneDrive for work or school with people in your organization.
Note: Sharing a file with someone outside your organization is only possible if your Microsoft 365 tenant administrator has activated that feature. For more information see Share SharePoint files or folders in Office 365.
Share a file
-
Select the file you want to share.
-
Select Sharing in the action bar.
If you’re already sharing the file, you see a list of the people sharing the file. -
Enter the email address of the person you want to share the file with in the Share with box. You can add several email addresses, separated with commas.
You can also select the + icon to select people in your contact list. -
Set the sharing permission. The default setting is Let recipient edit.
You can change sharing permissions later for each person you invite to share the file. -
If you want, add a message.
-
Select Share.
People you’ve invited to share the file receive an email that contains a link to the file and the message, if you included one.
Change sharing permissions
-
Select the file for which you want to change sharing permissions.
-
Select Sharing in the action bar.
-
Select the name of the person whose permissions you want to change.
-
Select the permission setting you want.
Stop sharing a file with someone
-
Select the file you want to stop sharing.
-
Select Sharing in the action bar.
-
Select the name of the person you want to stop sharing the file with.
-
Select Stop sharing.
Download local copies of your files
You can download a copy of any OneDrive for work or school file to your file system. You might do this if you want to be able to view a file when you’re offline.
-
Select the files you want to download.
-
Select Download in the action bar.
-
Browse to the folder in which you want to place the downloaded files and then select Choose this folder.
-
Select OK.
Note: If you also connect to OneDrive for work or school in a web browser, you may be able to sync the OneDrive for Business library to your computer.


