
Use slicers to filter data
Slicers provide buttons that you can click to filter tables, or PivotTables. In addition to quick filtering, slicers also indicate the current filtering state, which makes it easy to understand what exactly is currently displayed.

You can use a slicer to filter data in a table or PivotTable with ease.
-
Click anywhere in the table or PivotTable.
-
On the Insert tab, select Slicer.

-
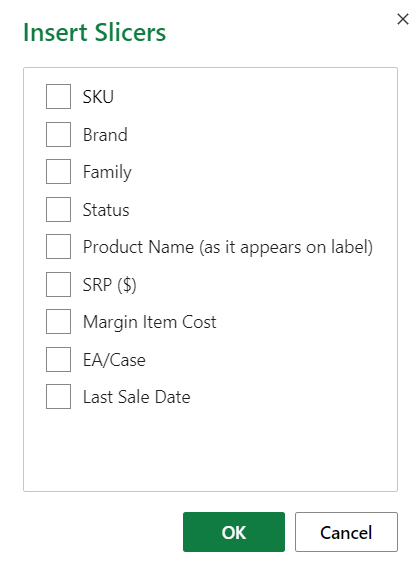
In the Insert Slicers dialog box, select the check boxes for the fields you want to display, then select OK.
-
A slicer will be created for every field that you selected. Clicking any of the slicer buttons will automatically apply that filter to the linked table or PivotTable.
Notes:
-
To select more than one item, hold Ctrl, and then select the items that you want to show.
-
To clear a slicer's filters, select Clear Filter

-
-
You can adjust your slicer preferences in the Slicer tab (in newer versions of Excel), or the Design tab (Excel 2016 and older versions) on the ribbon.
-
On the Slicer or Design tab, select a color style that you want.
Note: Select and hold the corner of a slicer to adjust and resize it.
If you have a slicer on a PivotTable already, you can use that same slicer to filter another PivotTable.
Note: Slicers can only be connected to PivotTables that share the same data source.
-
First create a PivotTable that is based on the same data source as the PivotTable that already has the slicer want to reuse.
-
Select the slicer that you want to share in another PivotTable. This displays the Slicer tab.
-
On the Slicer tab, select Report Connections.
-
In the dialog box, select the check box of the PivotTable in which you want the slicer to be available.
-
Click anywhere in the PivotTable to which slicer you want to disconnect. This displays the PivotTable Analyze tab.
-
Select the PivotTable Analyze tab, and then select Filter Connections.
-
In the dialog box, clear the check box of any PivotTable fields for which slicer you want to disconnect.
Do one of the following:
-
Select the slicer, and then press Delete.
-
Right-click the slicer, and then select Remove <Name of Slicer>.
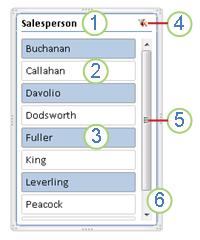
A slicer typically displays the following components:
|
|
1. A slicer header indicates the category of the items in the slicer. 2. A filtering button that is not selected indicates that the item is not included in the filter. 3. A filtering button that is selected indicates that the item is included in the filter. 4. A Clear Filter button removes the filter by selecting all items in the slicer. 5. A scroll bar enables scrolling when there are more items than are currently visible in the slicer. 6. Border moving and resizing controls allow you to change the size and location of the slicer. |
You can use a slicer to filter data in a table or PivotTable with ease.
-
Click anywhere in the table or PivotTable for which you want to create a slicer.
-
On the Insert tab, select Slicer.
-
In the Insert Slicers dialog box, select the check boxes for the fields you want to display then select OK.
-
A slicer is displayed for every field that you selected. Clicking any of the slicer buttons will automatically apply that filter to the linked table or PivotTable.
Notes:
-
To select more than one item, hold down Cmd, and then select the items that you want to show.
-
To clear a slicer's filters, select Clear Filter in the slicer.
-
-
Click the slicer that you want to format.
This displays the Slicer tab.
-
On the Slicer tab, click a colored style that you want.
If you have a slicer on a PivotTable already, you can use that same slicer to filter another PivotTable. Please note that this only works when the two PivotTables use the same data source.
-
First create a PivotTable that is based on the same data source as the PivotTable that already has the slicer you want to reuse.
-
Click the slicer that you want to share in another PivotTable. This displays Slicer tab.
-
On the Slicer tab, select Report Connections.
-
In the dialog box, select the check box of the PivotTables in which you want the slicer to be available.
-
Click anywhere in the PivotTable for which you want to disconnect a slicer.
This displays the PivotTable Analyze tab.
-
Click the PivotTable Analyze tab, and then select Filter Connections.
-
In the dialog box, clear the check box of any PivotTable fields for which you want to disconnect a slicer.
Do one of the following:
-
Select the slicer, and then press Delete.
-
Control-click the slicer, and then select Remove <Name of slicer>.
A slicer typically displays the following components:
|
|
1. A slicer header indicates the category of the items in the slicer. 2. A filtering button that is not selected indicates that the item is not included in the filter. 3. A filtering button that is selected indicates that the item is included in the filter. 4. A Clear Filter button removes the filter by selecting all items in the slicer. 5. A scroll bar enables scrolling when there are more items than are currently visible in the slicer. 6. Border moving and resizing controls allow you to change the size and location of the slicer. |
You can use a slicer to filter data in a table or PivotTable with ease.
Note: Only local PivotTable slicer creation is available in Excel for the web. To create slicers for tables, data model PivotTables, or Power BI PivotTables, please use Excel for Windows or Excel for Mac.
-
Click anywhere in the PivotTable.
-
On the PivotTable tab, select Insert Slicer.

-
In the Insert Slicers dialog box, select the check boxes for the fields you want to display, then select OK.
-
A slicer will be created for every field that you selected. Selecting any of the slicer buttons will automatically apply that filter to the linked table or PivotTable.
Notes:
-
To select more than one item, hold Ctrl, and then select the items that you want to show.
-
To clear a slicer's filters, select Clear Filter in the slicer.
-
Select the slicer that you want to format. This displays the Slicer tab.
On the Slicer tab, select a colored style that you want.
Note: Select and hold the corner of a slicer to adjust and resize it.
If you have a slicer on a PivotTable already, you can use that same slicer to filter another PivotTable.
Note: Slicers can only be connected to PivotTables that share the same data source.
-
First create a PivotTable that is based on the same data source as the PivotTable that already has the slicer you want to reuse.
-
Select the slicer you want to share in another PivotTable. This displays the Slicer tab.
-
On the Slicer tab, select Settings.
-
In the pane, under the PivotTable Connections section, select the checkbox of the PivotTables you want to the slicer to be available on.
-
Select anywhere in the PivotTable for which you want to disconnect a slicer. This displays the PivotTable tab.
-
Select the PivotTable tab, and then select Settings.
-
In the pane, under the Slicer Connections section, clear the checkbox of any PivotTable fields for which you want to disconnect a slicer.
Do one of the following:
-
Select the slicer, and then press Delete.
-
Control-click the slicer, and then select Remove.
A slicer typically displays the following components:
|
|
1. A slicer header indicates the category of the items in the slicer. 2. A filtering button that is not selected indicates that the item is not included in the filter. 3. A filtering button that is selected indicates that the item is included in the filter. 4. A Clear Filter button removes the filter by selecting all items in the slicer. 5. A scroll bar enables scrolling when there are more items than are currently visible in the slicer. 6. Border moving and resizing controls allow you to change the size and location of the slicer. |
Need more help?
You can always ask an expert in the Excel Tech Community or get support in Communities.
See Also


Need more help?
Want more options?
Explore subscription benefits, browse training courses, learn how to secure your device, and more.


Communities help you ask and answer questions, give feedback, and hear from experts with rich knowledge.


