
By flagging email messages, you can track responses to messages that you send. You can also make sure that you follow up on messages that you receive. In either case, you can include a reminder alert.
When you must have a timely response to a message, use a flag for the recipients.
Tip: Use this feature with discretion. Some recipients might not appreciate having reminders added to their Outlook.
-
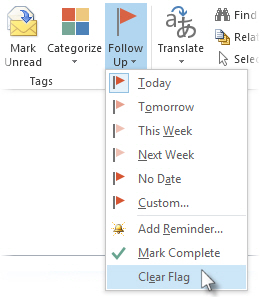
Before you select Send, on the Message tab, in the Tags group, select Follow Up, and then select Custom.
-
Select Flag for Recipients.
-
Under Flag for Recipients, select a flag in the Flag to list.
-
By default, a reminder accompanies the task. To send a flag without a reminder alert, clear the Reminder check box.
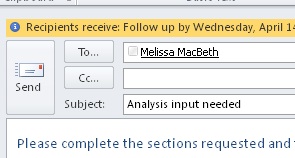
The flag text that recipients receive appears in the InfoBar.
If you must follow up on a message that you are about to send, set a reminder for yourself.
-
Before you select Send, on the Message tab, in the Tags group, select Follow Up.
-
Select a flag for when you want to be reminded about this message.
By default, the following flag start dates, due dates, and reminders are available:
|
Flag |
Start date |
Due date |
Reminder |
|---|---|---|---|
|
Today |
Current date |
Current date |
One hour before the end time of today's work day |
|
Tomorrow |
Current date plus one day |
Current date plus one day |
Start time of current day plus one work day |
|
This Week |
Current date plus two days, but no later than the last work day of this week |
Last work day of this week |
Start time of current day plus two work days |
|
Next Week |
First work day of next week |
Last work day of next week |
Start time of the first work day of next week |
|
No Date |
No date |
No date |
Current date |
|
Custom |
Current date |
Current date |
Current date |
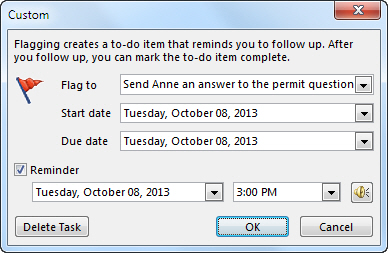
Alternately, select Custom to create a Start date and Due date that doesn’t appear on the list. Select OK to close the dialog box.
The flag text that recipients receive appears in the InfoBar.
Note: If you want to customize the flag by specifying Start and Due dates or change when the reminder alert appears, follow the steps in the Flag to remind you and recipients to follow up section. You can clear the Flag for Recipients check box to customize flags that only you see.
To flag a new message both for you and the recipients, do the following:
-
On the Message tab, in the Tags group, select Follow Up, and then select Add Reminder.
-
Select Flag for Recipients.
To send a flag without a reminder alert, clear the Reminder check box.
-
Select the Flag for Me check box, and if you want, the Reminder check box.
-
You can specify a Start date and a Due date for the Flag for Me.
-
In the Flag to list, select the flag text that you want to appear. You can also type custom text in the box, and then press ENTER.
Note: You can’t change the flag text or set the Start date and Due date if you are using an IMAP email account.
-
If either the Reminder check box for Flag for Me or the Flag for Recipients is selected, specify a time for a reminder.
-
Select OK.
The flag text appears in the InfoBar.

The flag appears in the message list and in the message.
-
In the message list, right-click the message flag.
-
Click Clear Flag.
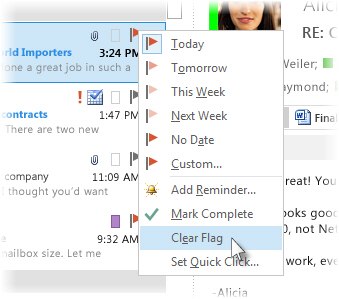
If the message is open in its own window, click Message > Follow Up > Clear Flag.
When you remove the flag, the reminder is also deleted.
Reminders are pop-up alerts that appear when action is required.
-
In the message list, right-click the message flag.
-
Click Custom.
-
Uncheck the Reminder box.
If the message is open in its own window, click Message > Follow Up > Custom, and then uncheck the Reminder box.
After you send a message that uses a flag, you can search for responses.
Note: By default, sent messages are saved in the Sent Items folder. If you use a Microsoft Exchange account and move your sent items to an Outlook Data File (.pst) either manually or with AutoArchive, this feature isn’t available.
-
Do one of the following:
-
Open the original message in the Sent Items folder.
-
Open the flagged sent message in the To-Do Bar.
-
Open any message that is a response to the original message, select the InfoBar, and then select Open original flagged message.
-
-
Select the InfoBar, and then select Find related messages.
The Advanced Find dialog box appears and a search starts for messages that are a response to your flagged message.
When you remove or clear a reminder or flag, you lose any indication the message was ever a to-do item. If you want an indicator that you’ve completed the action required for a flagged message, mark it complete instead. The flag becomes a check mark. In Tasks, you can change the view to see all completed items (until the item is deleted).
-
In the message list, click the message.
-
Right-click the flag.
-
Click Mark Complete.

When tracking a message is no longer wanted, you can clear the flag on the message.
Do one the following:
-
You added a flag to a message that you haven’t sent, but now want to remove the flag
-
In the message draft, on the Message tab, in the Tags group, select Follow Up.
-
Select Clear Flag.
-
-
You sent a message that uses a flag for yourself or others, but now want to remove the flag
Do one of the following:
-
Delete the flagged message in the To-Do Bar.
This also deletes the message in your Mail folders.
-
Right-click the message anywhere it appears in Outlook, and then select Mark Complete or Clear Flag.
Note: Recipients of the message still see the flag. When you remove a flag, it only affects what you see.
-
-
A flag reminder appears, and you want to remove the flag
-
When the reminder alert appears, right-click it, and then select Mark Complete or Clear Flag.
Tell me how Mark Complete and Clear Flag differ
Mark Complete The item remains marked with a follow-up flag, however, it appears with a strikethrough. If the To-Do Bar or Tasks is configured to show all tasks and to-do items regardless of whether they are complete or not, the message appears until you delete it from your Mail folders.
Clear Flag The flag is removed from the message and there is no record of the message ever appearing in views such as the To-Do Bar and Tasks.
If you want to keep a record of completed items, use Flag Complete. However, as soon as you delete the message the item completely disappears from all Outlook views.
-
-
A response to a flagged message arrives, and you want to remove the flag
-
In the Reading Pane or in the open message, select the InfoBar, and then select Open Original Flagged Message.
-
On the Message tab, in the Tags group, select Follow Up.
-
Select Clear Flag.
-
You can flag a message that you receive to remind yourself to follow up or take action later. To flag a received message, do one of the following:
-
In the message list, select the flag column next to the message.
Unless you have changed the default flag, the flag uses today’s date for the Start date and Due date.
-
In the message list, right-click the flag column next to the message. Select the due date for the task.
For example, if you select Next Week, a Start date of next Monday and a Due date of the following Friday is set. Select Custom to use a Start date and a Due date that don’t appear in the list.
After you select OK, the flag text appears in the InfoBar.
Flagged messages appear in the To-Do Bar, in Tasks, and in the Calendar Daily Task List.
By default, the following flag options are available.
|
Flag |
Start date |
Due date |
Reminder |
|---|---|---|---|
|
Today |
Current date |
Current date |
One hour before the end time of today's work day |
|
Tomorrow |
Current date plus one day |
Current date plus one day |
Start time of current day plus one work day |
|
This Week |
Current date plus two days, but no later than the last work day of this week |
Last work day of this week |
Start time of current day plus two work days |
|
Next Week |
First work day of next week |
Last work day of next week |
Start time of the first work day of next week |
|
No Date |
No date |
No date |
Current date |
|
Custom |
Current date |
Current date |
Current date |


