
Set the position of an image or object over a wide range of positions in the document.
Horizontal
Position an image horizontally on a page based on the following:
-
Alignment Set an image Left, Right, or Centered relative to the Page, Margin, Column, Character, Left, Right, Inside, or Outside margins. Page and Margin settings position the object relative to both the left and right of the page.
-
Book Layout Set position when your document will be produced for printing or binding. You can control where your image will appear on a left or right page. You can position images relative to the Inside or Outside of the Page or Margin.
-
Absolute position Locks your image to a specific measured position to the right of the Page, Margin, Column, Character, or specifically to the Left, Right, Inside, or Outside margin. Measurements can be specified as either positive or negative for exact position control left or right of the anchor point. The image will stay in the same position regardless of any other formatting changes you make.
-
Relative position Set an image to a position relative to the Margin, Page, Left, Right, Inside, or Outside Margins. Specific settings are percentages. This can be helpful to keep an image a set distance from a margin, even if you plan change margins.
Vertical
Position an image vertically on a page based on the following:
-
Alignment Position an image at the Top, Centered, Bottom, Inside, or Outside as relative to the Page, Margin, line, Top, Bottom, Inside, or Outside margins. Page and Margin position the image relative to both the top and bottom of the page.
-
Absolute position Locks your image to a specific measured position below the Page, Margin, Paragraph, Line, or specifically the Top, Bottom, Inside, or Outside margin. Measurements can be specified as either positive or negative for exact position control up or down from the anchor point. The image will stay in the same position regardless of any other formatting changes you make.
-
Relative position Set an image to a position relative to the Margin, Page, Top, Bottom, Inside, or Outside Margins. This can be helpful to keep an image a set distance from a margin, even if you plan change margins.
Options
Additional options to use when positioning images and objects.
-
Move object with text Moves the image with the text it's positioned with. For example, if an image is positioned with a paragraph, and you insert another paragraph before it, the image will move with the original paragraph. This only works on moveable images (not In Line with Text wrapping), and are not in a fixed position as set on the Wrap Text menu. When you enable this setting, it will also set Move with Text on the Wrap Text menu. You'll also notice that horizontal and vertical alignment will change to absolute positions relative to the margin (horizontal) and paragraph (vertical).
-
Lock anchor Locks an image with a paragraph. Move object with text will keep an image in a paragraph if you move the paragraphs on the page. However, if you select and drag a paragraph into another page, the image may shift to the other page. When you lock the anchor, if you select a paragraph and image and move the paragraph to another page, it stays with the original text.
-
Allow overlap Allows you to drag images to overlap each other. Images are in a layer format. To change which image is in front or behind, another use the Bring Forward, or Send Backward buttons in the Arrange group to change the order. This affects the whole document.
Text wrapping lets you set how a shape or picture interacts with the surrounding text.
Wrapping style
These commands control how text wraps around an image or shape, which affects how you can place it on the page.
In line with text Puts the picture or shape on a paragraph, just like a line of text. It moves with the paragraph when you add or remove text. You can move the picture or shape to other lines as you can with text, but you're it is limited to the extent of the line.
Square Wraps text around the picture or shape in a square pattern. If the picture tapers, like a triangle, the text on either side all has the same border. You can position the object randomly on the page and the text will fill around it.
Tight Text wraps at a consistent distance between the edge of the picture or shape and the text. The text follows the shape. You can position the object randomly on the page and the text will fill around it.
Through Acts much like Tight, except that you can change the wrap points so that text can fill in the spaces between elements in an image. If the image or shape doesn't have any spaces, then text wrapping works just like Tight. For more info, see Edit Wrap Points
Top and Bottom Wraps text on the top and bottom of the picture or shape, and doesn't put any text along the edges, regardless of how narrow the picture.
Behind Text Puts the picture or shape behind the text, and doesn't wrap the text around it. Once behind the text, you may have difficulty trying to select it. Go to Layout > Selection Pane and then choose the picture or shape from the list to select it.
In Front of Text Puts the picture or shape on top of the text. The text doesn't wrap, so some of it may be blocked, depending on the transparency of the image.

Wrap text
These commands control whether text wraps around an image on both sides, left, right, or where ever the largest distance between the image and the margin.
-
Both sides Wraps text around either side of the image or shape.
-
Left Wraps text around only the left side of the image or shape.
-
Right Wraps text around only the right side of the image or shape.
-
Largest Only Wraps text on the side of the image or shape with the larger distance from the margin.
Distance from the Text
-
You can enter custom values for the distance between the text and the image. You can independently set distances for the Top, Bottom, Left, and Right.
To edit wrap points, select the image or shape, and go to Wrap Text and select Edit Wrap Points from the text wrap menu.
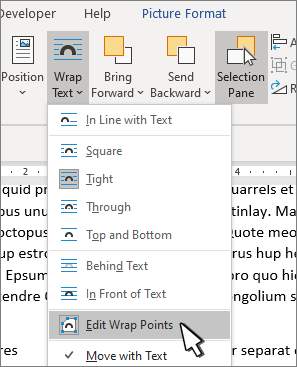
The points on the outline can be moved to let you adjust where the text will wrap.
Move the wrap points so that the text fills in around the picture. While you can't add points, you can slide them around to fit how you want the text to wrap.
OK Saves your changes and exits the dialog box.
Cancel Ignores your changes, and exits the dialog box.
Here you can set the size, rotation, and scale of your images and shapes.
Height
-
Absolute Set the actual Height of the selected object.
-
Relative Set the height as a relative percentage of the Margin, Page, Top, Botton, Inside, or Outside Margins. This isn't enabled for pictures.
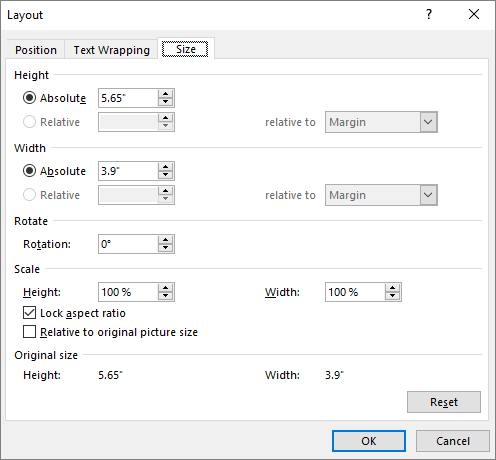
Width
-
Absolute Set the actual Width of the selected object.
-
Relative Set the width as a relative percentage of the Margin, Page, Top, Botton, Inside, or Outside Margins. This isn't enabled for pictures.
Rotate
Rotation Set the angle of the object by degrees (whole numbers only).
Scale
Scale is another way of setting the Height and Width based on a percentage of the original size. For example, if the original was 3" x 4", you can set it to 50% of that size, and the Absolute Height and Width would change to half their original values.
Lock aspect ratio When set, automatically changes one dimension based on changes to the other. For example, if an image is originally 8" x 10", and you change the width to 4", the height will automatically change to 5". When sizing pictures, use this setting to avoid distortion.
Relative to original picture size Shows the Height and Width as percentages of the size of the picture when it was inserted into the document. If you resize the image using your mouse and open the dialog, the percentages will reflect the changes. If you clear this setting, and go back and resize the image with your mouse, when you reopen the dialog, Height and Width will show 100% and changes will be relative to the new size. This is only enabled with pictures.
Original size Read only fields that show you what the original size of the selected picture. This is only enabled with pictures.
Reset Returns a picture to its original size. This is only enabled with pictures.


