
Note: This is an advanced topic on data validation. For an introduction to data validation, and how to validate a cell or a range, see Add data validation to a cell or a range.
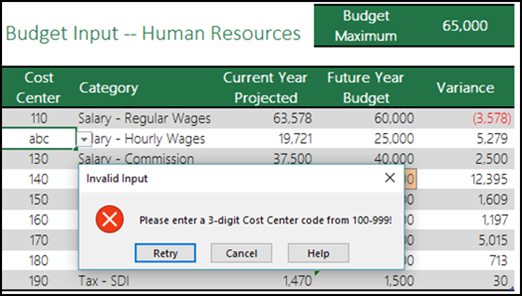
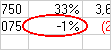
You can use data validation to restrict the type of data or values that users enter into cells. For example, you might use data validation to calculate the maximum allowed value in a cell based on a value elsewhere in the workbook. In the following example, the user has typed abc , which is not an acceptable value in that cell.

When is data validation useful?
Data validation is invaluable when you want to share a workbook with others, and you want the data entered to be accurate and consistent. Among other things, you can use data validation for the following:
-
Restrict entries to predefined items in a list— For example, you can limit a user’s department selections to Accounting, Payroll, HR, to name a few.
-
Restrict numbers outside a specified range— For example, you can specify a maximum percentage input for an employee’s annual merit increase, let’s say 3%, or only allow a whole number between 1 and 100.
-
Restrict dates outside a certain time frame— For example, in an employee time off request, you can prevent someone from selecting a date before today’s date.
-
Restrict times outside a certain time frame— For example, you can specify meeting scheduling between 8:00 AM and 5:00 PM.
-
Limit the number of text characters— For example, you can limit the allowed text in a cell to 10 or fewer characters.
-
Validate data based on formulas or values in other cells— For example, you can use data validation to set a maximum limit for commissions and bonuses based on the overall projected payroll value. If users enter more than the limit amount, they see an error message.
Data Validation Input and Error Messages
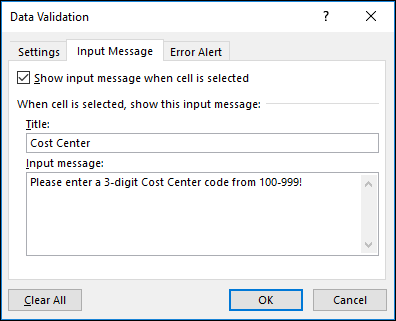
You can choose to show an Input Message when the user selects the cell. Input messages are generally used to offer users guidance about the type of data that you want entered in the cell. This type of message appears near the cell. You can move this message if you want to, and it remains visible until you move to another cell or press Esc.
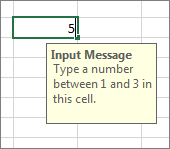
You set up your Input Message in the second data validation tab.
Once your users get used to your Input Message, you can uncheck the Show input message when cell is selected option.
You can also show an Error Alert that appears only after users enter invalid data.
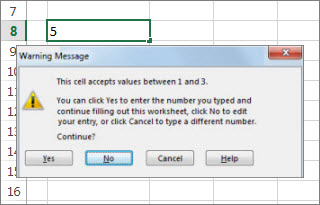
You can choose from three types of error alerts:
|
Icon |
Type |
Use to |
 |
Stop |
Prevent users from entering invalid data in a cell. A Stop alert message has two options: Retry or Cancel. |
 |
Warning |
Warn users that the data they entered is invalid, without preventing them from entering it. When a Warning alert message appears, users can click Yes to accept the invalid entry, No to edit the invalid entry, or Cancel to remove the invalid entry. |
 |
Information |
Inform users that the data they entered is invalid, without preventing them from entering it. This type of error alert is the most flexible. When an Information alert message appears, users can click OK to accept the invalid value or Cancel to reject it. |
Tips for working with data validation
Use these tips and tricks for working with data validation in Excel.
Note: If you want to use data validation with workbooks in Excel Services or the Excel Web App you will need to create the data validation in the Excel desktop version first.
-
The width of the drop-down list is determined by the width of the cell that has the data validation. You might need to adjust the width of that cell to prevent truncating the width of valid entries that are wider than the width of the drop-down list.
-
If you plan to protect the worksheet or workbook, protect it after you have finished specifying any validation settings. Make sure that you unlock any validated cells before you protect the worksheet. Otherwise, users will not be able to type any data in the cells. See Protect a worksheet.
-
If you plan to share the workbook, share it only after you have finished specifying data validation and protection settings. After you share a workbook, you won't be able to change the validation settings unless you stop sharing.
-
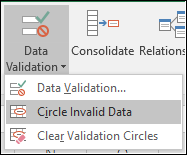
You can apply data validation to cells that already have data entered in them. However, Excel does not automatically notify you that the existing cells contain invalid data. In this scenario, you can highlight invalid data by instructing Excel to circle it on the worksheet. Once you have identified the invalid data, you can hide the circles again. If you correct an invalid entry, the circle disappears automatically.
To apply the circles, select the cells you want to evaluate and go to Data > Data Tools > Data Validation > Circle Invalid Data.
-
To quickly remove data validation for a cell, select it, and then go to Data > Data Tools > Data Validation > Settings > Clear All.
-
To find the cells on the worksheet that have data validation, on the Home tab, in the Editing group, click Find & Select, and then click Data Validation. After you have found the cells that have data validation, you can change, copy, or remove validation settings.
-
When creating a drop-down list, you can use the Define Name command (Formulas tab, Defined Names group) to define a name for the range that contains the list. After you create the list on another worksheet, you can hide the worksheet that contains the list and then protect the workbook so that users won't have access to the list.
-
If you change the validation settings for a cell, you can automatically apply your changes to all other cells that have the same settings. To do so, on the Settings tab, select the Apply these changes to all other cells with the same settings check box.
-
If data validation isn't working, make sure that:
-
Users are not copying or filling data - Data validation is designed to show messages and prevent invalid entries only when users type data directly in a cell. When data is copied or filled, the messages do not appear. To prevent users from copying and filling data by dragging and dropping cells, go to File > Options > Advanced > Editing options > clear the Enable fill handle and cell drag-and-drop check box, and then protect the worksheet.
-
Manual recalculation is turned off - If manual recalculation is turned on, uncalculated cells can prevent data from being validated correctly. To turn off manual recalculation, go to the Formulas tab > Calculation group > Calculation Options > click Automatic.
-
Formulas are error free - Make sure that formulas in validated cells do not cause errors, such as #REF! or #DIV/0!. Excel ignores the data validation until you correct the error.
-
Cells referenced in formulas are correct - If a referenced cell changes so that a formula in a validated cell calculates an invalid result, the validation message for the cell won't appear.
-
An Excel table might be linked to a SharePoint site - You cannot add data validation to an Excel table that is linked to a SharePoint site. To add data validation, you must unlink the Excel table or convert the Excel table to a range.
-
You might currently be entering data - The Data Validation command is not available while you are entering data in a cell. To finish entering data, press Enter or ESC to quit.
-
The worksheet might be protected or shared - You cannot change data validation settings if your workbook is shared or protected. You’ll need to unshare or unprotect your workbook first.
-
How to update or remove data validation in an inherited workbook
If you inherit a workbook with data validation, you can modify or remove it unless the worksheet is protected. If it’s protected with a password that you do not know you should try to contact the previous owner to help you unprotect the worksheet, as Excel has no way to recover unknown or lost passwords. You can also copy the data to another worksheet, and then remove the data validation.
If you see a data validation alert when you try to enter or change data in a cell, and you're not clear about what you can enter, contact the owner of the workbook.
Need more help?
You can always ask an expert in the Excel Tech Community or get support in Communities.


