
Follow these steps to mimic the effect of animating parts of a table. The process involves changing the table to a set of drawing objects that you can then ungroup and animate separately.
Important: This procedure converts tables to drawing objects and removes any effects, such as reflection, cell bevel, shadow, or fills (gradient, picture, and texture) that you applied to the table.
-
Duplicate the slide that has the table you want to animate. Leave the first instance of the slide untouched. For now, it is your backup, in case you have difficulty with this process, or in case you want to reuse the table later in this presentation or in another one. To duplicate the slide, select the thumbnail of the slide in the left margin in Normal view. On the Home tab of the ribbon, click the arrow next to the Copy button and then click Duplicate.
-
On the duplicate slide you've created, point to a border of the table, and click to select the entire table.
-
On the Home tab of the ribbon, in the Clipboard group, click Copy.
-
In the Clipboard group, click the arrow under Paste, and then click Paste Special.
-
Click Picture (Enhanced Metafile), and then click OK. (Enhanced metafile format helps to prevent the pasted table image table from degrading.)
-
On the Picture Format (or just Format) tab, in the Arrange group, click Group


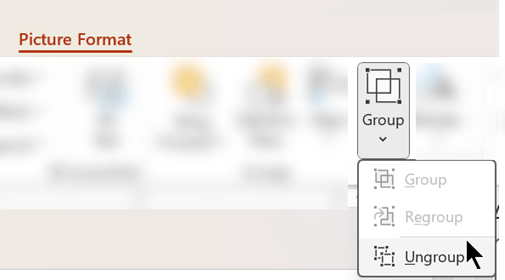
When prompted to convert the picture to a Microsoft Office drawing object, click Yes. For more information about the conversion process, click Show Help.
-
Repeat the Ungroup command a second time. Selection handles will appear on all the individual cells in the table. Click outside the table to clear these selections.
-
Press and hold the Ctrl key while you select the parts of the table that you want to animate.
-
On the Animations tab, in the Advanced Animations group, click Add Animation to open the menu of animation options:
-
To make the shapes enter with an effect, point to Entrance, and then click an effect.
-
To add an effect (such as a spin effect) to the shapes, point to Emphasis, and then click an effect.
-
To add an effect that makes the shapes leave the slide at some point, point to Exit, and then click an effect.
-
To add an effect that makes a shape move in a specified pattern, point to Motion Paths, and then click a path.
-
-
On the Timing tab, click any additional options that you want to use, such as Duration or Delay.
-
Repeat steps 8 through 10 for any other elements of the table that you want to animate separately.
Remove the original table from the duplicate slide, so that the duplicate slide only has the new enhanced metafile version of the table on it.
Tip: If you don't want to convert the table to a picture to animate it, you can create separate tables for each part that you want to animate. For example, if you want the data in a table to fly in separately from the header row of the table, then the first table should contain the header row information and the second table should contain the data. Align the left sides of the two tables and the bottom of the first table (header row) with the top of the second table (data) to make them appear as a single table. Then apply animations separately to the two tables to achieve your desired effect.
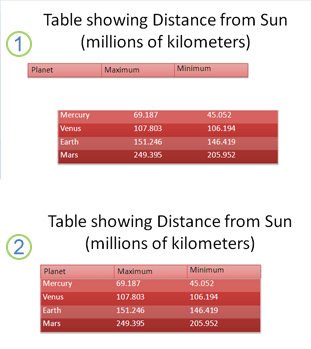
1: Two separate tables not aligned
2: Two tables aligned to appear as one


