
How do you quickly capture brainstorming ideas while creating a record that you can analyze, edit, and act on later?
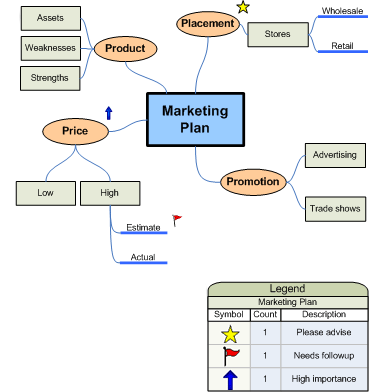
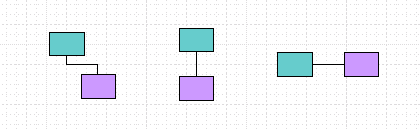
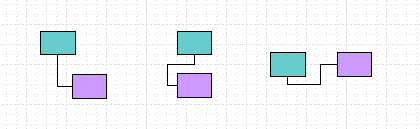
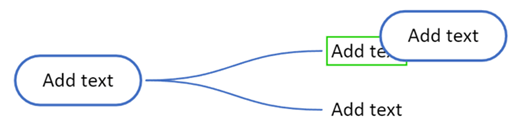
When you create a brainstorming (or mind map) diagram in Visio, you create a visual archive of your ideas like the drawing below. The diagram can help you quickly recognize and order themes and hierarchies, making it a snap to pull a plan of action out of a chaotic idea-generating session.
This article describes five different ways to create a brainstorming diagram in Visio. Each method has its appeal, depending on how you like to work.
Using a brainstorming diagram
There are two primary ways to use a brainstorming diagram. The first is to begin with a main idea and then generate related topics and subtopics hierarchically to arrive at a large number of different possible approaches.
The second is to capture all ideas as they are expressed and later to organize them in a hierarchical diagram. You then revise, refine, and share the results among the members of the group. This method is most useful during a brainstorming meeting where people are contributing ideas in rapid succession. In this setting, hierarchies aren't always apparent and you need to capture ideas quickly.
Starting a new brainstorming diagram
-
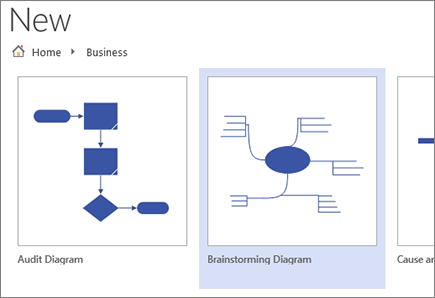
Click File, and then click New.
-
Under Business, click Brainstorming Diagram. If you don't see Business, click Templates or Categories.
Expand the drawing page to fit your brainstorming diagram
If your brainstorming diagram extends beyond the borders of the drawing page, you can easily expand the page without moving your topics to a different page. There are two ways to resize the page: by manually dragging the borders of the page or by using the Page Setup dialog box.
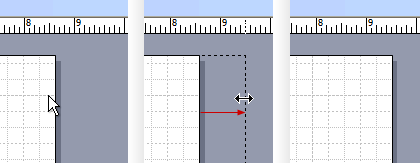
Resize the drawing page by manually dragging the borders
-
On the View menu, click Zoom, and click Whole Page. This view shows you the borders of your drawing page.
-
Place the pointer on the border of the drawing page that you want to expand, and then press the CTRL key. When the pointer changes to a two-headed arrow, drag the pointer to resize the page.
Resize the drawing page using the Page Setup dialog box
-
Click Design, and then press Shift+F5 to open the , the Page Setup dialog.
-
Click the Page Size tab.
-
Under Custom size, type the size you want to page to be, and click OK.
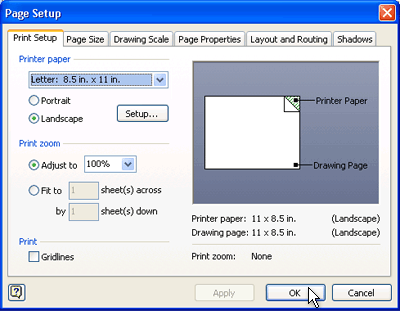
Note: The changes to the size of the drawing page apply only to the page you are currently viewing. Also, make sure that you type the right unit of measurement (inches or millimeters) in the Custom size boxes when you are typing in the size of the page.
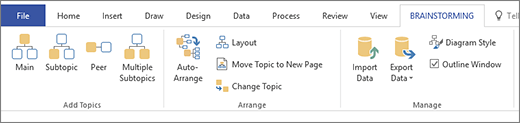
Using the Brainstorming ribbon
You can perform the most common tasks in building a brainstorming diagram, such as adding a main topic or arranging topics on the page, by clicking buttons on the Brainstorming ribbon.
You can easily access these tools without dragging the pointer off the drawing page. For example, if you are using a Tablet PC, you just tap once on the Brainstorming ribbon to place topics on the drawing page.
The Brainstorming ribbon gives you access to all the tools designed specifically for the Brainstorming template. In addition to adding or arranging topics, you can use commands on this ribbon to perform such actions as changing the type of an existing topic or moving a topic to a new page.
Create a diagram using the Brainstorming tab
-
On the Brainstorming tab, click Main.
-
With the shape selected, type the text that you want the main idea to represent.
-
With the Main Topic shape selected, click Subtopic.
A subtopic connects to and is subordinated to the main topic.
-
Type the title of the subtopic.
Add more topics using the Brainstorming toolbar
You can add more topics to your diagram by doing one of the following:
Add multiple subtopics
-
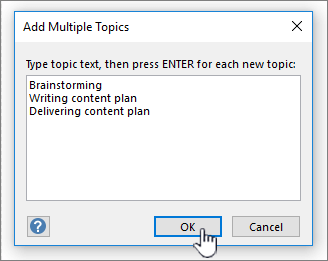
Select the topic you want to add subtopics to, and then, on the Brainstorming toolbar, click Multiple Subtopics.
-
In the dialog box, type the text for each new topic, and press ENTER after each one. When you are finished adding all the topics that you want, click OK.
Add a peer topic
-
Select the topic you want to add a same-level topic to, and then, on the Brainstorming toolbar, click Peer.
-
Type the title of the topic.
Add one topic at a time
-
Select the topic that you want to add a same-level topic or subtopic to, and then, on the Brainstorming toolbar, click Peer or Subtopic.
-
Type the title of the topic.
Arrange topics
You can improve the appearance of your diagram and maximize the space on the drawing page by doing the following:
-
On the Brainstorming toolbar, click Auto-Arrange.
Tip: You can manually arrange topics by selecting the topics that you want to move, and then dragging them to a different location on the page. When you move a topic, its connectors reposition automatically and its subtopics move with it.
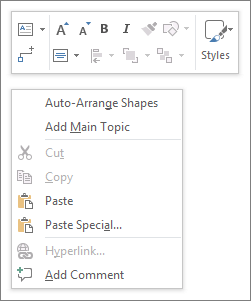
Using the shortcut menu
In any Microsoft Office application, the shortcut (or "right-click") menu is a handy tool to use when you want to quickly perform an action without moving the cursor off the page. The shortcut menu also includes standard Visio drawing page commands for tasks such as copying and pasting shapes.
Most experienced users use the shortcut method because of its accessibility. In Visio, you can easily build your diagram using this method.
Create a diagram using the shortcut method
-
Right-click the drawing page and click Add Main Topic.
-
With the shape selected, type the text that you want the main idea to represent.
-
Right-click the Main Topic shape, and then click Add Subtopic.
-
Type the title of the subtopic.
Add topics using the shortcut method
There are several ways to add topics to your diagram:
Add multiple subtopics
-
Right-click the topic you want to add multiple subtopics to, and then click Add Multiple Subtopics.

-
In the dialog box, type the text for each new topic, and press ENTER after each one. When you are finished adding all the topics that you want, click OK.
Add a peer topic
-
Right-click the topic that you want to add a same-level topic to, and click Add Peer Topic.
-
Type the text for the new topic.
Add a topic at a time
-
Right-click the topic that you want to add a same-level topic or subtopic to, and click Add Peer Topic or Add Subtopic.
-
Type the title of the topic.
Arrange topics
You can improve the appearance of your diagram and maximize the space on the drawing page by doing the following:
-
Right-click a blank area on your page, and then click Auto-Arrange Shapes.
Tip: You can manually arrange topics by selecting the topics that you want to move, and then dragging them to a different location on the page. When you move a topic, its connectors reposition automatically and its subtopics move with it.
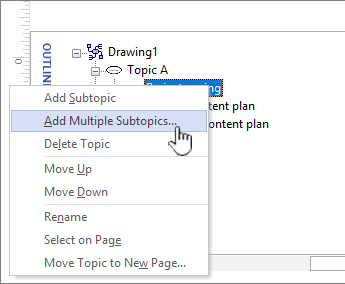
Using the Outline Window
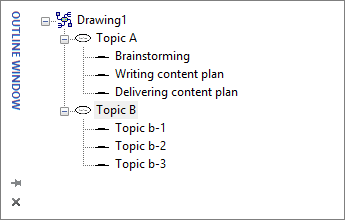
The Outline Window displays a tree structure of your brainstorming diagram, which captures the hierarchical relationships of the topics and condenses all the information that is spread over multiple shapes and pages into one central location. Use the feature when you want to organize your ideas in a linear view without affecting the appearance of your diagram and without having to navigate back and forth between shapes and pages.
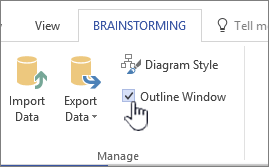
Turn Outline Window on or off
To turn the Outline Window on or off, on the Brainstorming tab, check or uncheck the Outline Window checkbox.
Create a diagram using the Outline Window
-
In the Outline Window, right-click "Drawing1" or the saved drawing file name, and then click Add Main Topic.
-
Right-click Main Topic and select Rename.
-
Type the text you want the main idea to represent.
-
To add a subtopic, right-click the Main Topic (or any other topic), and then click Add Subtopic. Rename the subtopic the same way you renamed your main topic.
Tip: To delete topics, right-click a topic, and then click Delete Topic. When you delete a topic with subtopics, all of the corresponding subtopics are also deleted. You can also delete a topic by selecting the topic that you want to delete, and then pressing the DELETE key.
Add more topics to your diagram using the Outline Window
To add more topics in the Outline Window, right-click the topic that you want to add more topics to, and then click Add Multiple Subtopics. In the Add Multiple Subtopics dialog box, type the names of the topics, and then click OK.
Change a topic into a subtopic
Because the Outline Window displays topics in a linear view, you can use it to control the hierarchical structure of your topics. In the Outline Window, you can make a topic into another subtopic by dragging the name of the topic to a different level.
If you want to move a subtopic to a higher level (or lower level) within the hierarchy, drag the name of the subtopic on top of the higher-level topic (or lower level topic). If the subtopic you moved has corresponding subtopics, they also move with it and the changes are reflected in your diagram.
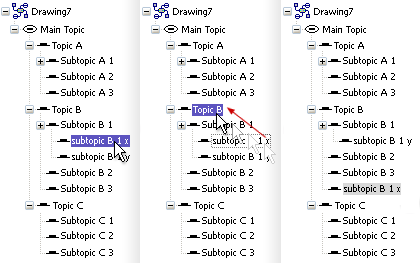
Note: Promoting or demoting a topic in the hierarchy using the Outline Window automatically changes the structure of your diagram.
Move a topic up or down within the Outline Window
You can organize or prioritize topics in the Outline Window without affecting the structure of your diagram. For example, if you want to prioritize topics, you can move the topics with higher priority to the top section of the Outline Window — the arrangement of shapes on the page will stay the same.
-
Right-click the topic that you want to move, and then click Move Up or Move Down.
This change is reflected only in the Outline Window. The topic position in your diagram remains unchanged.
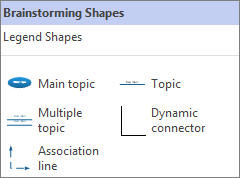
Using the Brainstorming Shapes
Dragging shapes from the Brainstorming Shapes stencil gives you the most control over the position of your topics on the drawing page and their type of connection.
Note: Because this method does not take advantage of the Brainstorming template's automated features, when you use it the Auto-Arrange command and Outline Window might not always give you the results you expect.
Create a diagram by dragging shapes onto the drawing page
-
From the Brainstorming Shapes stencil, drag the Main topic shape onto the drawing page.
-
Type the text that you want the main topic to represent.
-
To add a subtopic, drag the Topic shape to the page. With the Topic shape selected, type the name of the topic.
-
You can add multiple topics and subtopics by dragging the Multiple topic shape onto the page. In the dialog box, type the name of the topics, and then click OK.
Before you connect shapes: understand connection types
Topics do not automatically connect when you drag them from the Brainstorming Shapes stencil, so it is a good idea to understand how connectors work in Visio.
Visio includes two methods for connecting topics in your diagram: shape-to-shape and point-to-point. Each method is designed for specific situations and the method you should use depends on how fixed you want the actual point of connections to be.
Shape-to-shape
When you move shapes that are connected shape-to-shape, the connectors reposition themselves to keep the connection as direct as possible. If you want a shape-to-shape connection, drag the ends of the connector line to the center of the shape until a red box surrounds the topic shape.
Point-to-point
When a connection is point-to-point, the ends of the connector are glued to specific points on each shape. If you want a point-to-point connection, drag the ends of the connector line to a point on the shape until a red X appears. If you move the shapes, the connector remains attached at those original points.
Identify the connection type
To see whether a connection is shape-to-shape or point-to-point, click the connector to select it.
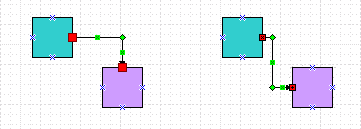
If the ends of the connector become large red squares, the connection is shape-to-shape. If the ends become small red squares with symbols in them (x or +), the connection is point-to-point.
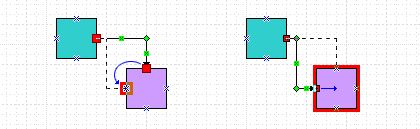
Change one type of connection to another
To change a shape-to-shape connection to point-to-point, drag a connector endpoint away from the shape, and then drag it back to the connection point, marked with a blue x, where you want it to connect to the shape.
To change a point-to-point connection to shape-to-shape, drag a connector endpoint over the process step shape until a red box surrounds the entire shape.
Connect topics
-
Drag the Dynamic connector from the Brainstorming Shapes stencil onto a blank area on the page.
-
Drag one end of the connector line to the center of the first shape that you want to connect until the topic shape is surrounded by a red box.
-
Drag the other end of the connector line to the center of the second shape that you want to connect until it too is surrounded by a red box.
When you release the mouse and select the connector, each endpoint appears as solid red square, which indicates the shapes are connected correctly.

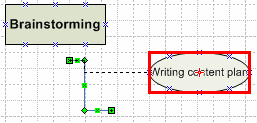
Show associations between topics
You can show a special relationship between two topics in your brainstorming diagram using an Association line, which appears as a dashed line between associated topics. Unlike the Dynamic connector, which defines the main structure of your diagram, the Association line connects topics on different branches at the same (hierarchical) level.
The Association line is a visual cue only and is not included in the hierarchy of your diagram. The Outline Window does not display the association between the topics.
You can connect topics using an Association line shape the same way you use the Dynamic connector. When you connect topics using the Association line, it reroutes with the topics when you move them.
With a Visio Plan 1 or Visio Plan 2 license, you can create mind maps in Visio for the web. This article describes how to create a mind map in Visio for the web by using either a pre-designed template or samples. You can then edit the mind map by using your mouse or keyboard shortcuts.
If you have Visio in Microsoft 365, you will need to upgrade to either Visio Plan 1 or Visio Plan 2 to create mind maps in Visio for the web. Start your 30-day free trial today to enjoy additional features and diagram types available in Visio for the web. To see a list of features available with your Visio Plan 1 or Visio Plan 2 subscription, visit the "Subscription plans" tab on the Visio comparison page.
Create mind maps using a template or sample
One of the easiest ways to create a mind map in Visio for the web is to use a template or a sample:
-
The basic mind-map template gives you a minimal starting point with a predefined layout, theme, and simple placeholder text, all of which you can edit to your liking.
-
Samples are designed to help you get started on a specific use case that you can also modify further to suit your needs.
To create a mind map using a template or a sample, follow these steps:
-
Go to the Visio Templates page and sign in with your work or school account.
-
Under the Templates section, select the Mind Maps category.
-
Select Mind Map sample (Project Tracking, Customer Persona, and so on) that you want to try. (When you point at a sample, you'll see a Preview option that gives you a quick visual example.) Select Create to create the mind map.
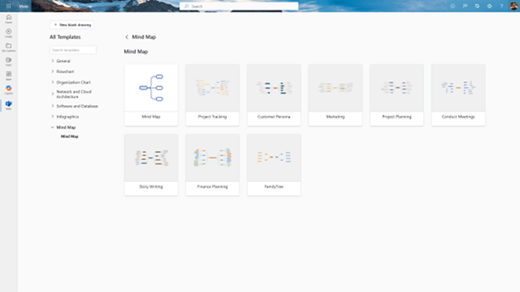
-
A new tab opens with the mind map on the canvas. You can start editing it by adding or deleting nodes, changing the text, formatting the shapes, and so on.
Tip: Alternatively, you can create a blank mind map: Under the Mind Maps category, select the Create Blank option.
Features and tools
You can capture and convey your ideas with the features and tools described below.
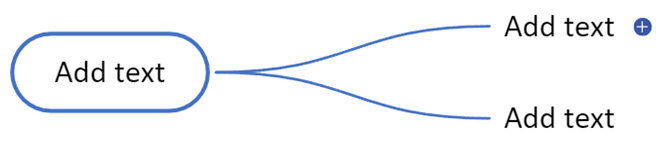
Create new nodes
When you hover over a node, a plus button appears on each side of the node. Use a plus button to add a child node to the selected node.
A child node is automatically connected to your selected node with a connector. To add a child node, select the plus button on side where you want to add it.
-
A new child node is added as the last node in the sibling order vertically.
-
A sibling node is a node that shares the same parent node as another node.
You can also use the keyboard shortcuts Tab and Enter to create child and sibling nodes to the selected node, respectively. For a full list of shortcuts, see Keyboard shortcuts below.
Right-click options when editing nodes
Right-clicking a node also gives you options to Add Child or Add Sibling to the selected node.
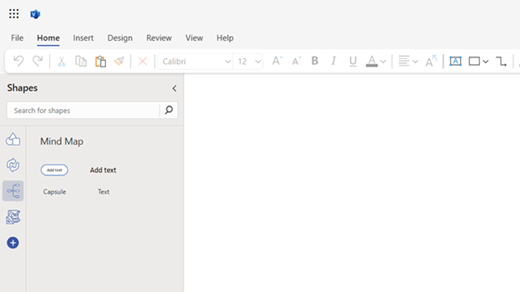
Use a mind-map stencil
If you are starting with a blank canvas, you can drag a mind map shape (Capsule or Text) from the mind map stencil in the Shape panel onto the canvas. You can find this stencil by either clicking the ‘plus’ button on the Shape pane or by searching for the stencil in the search bar on the Shape pane.
To then expand the mind map, you can add child and sibling nodes as described in the previous section. You can also connect two nodes by snapping them together, as described in the next section.
Snapping nodes together
If you select and drag a node to hover over an existing node on the canvas, you will see a highlight around the node on the canvas. When you release the selected node, the two nodes become connected to each other. The snapped node becomes a child node of the existing node and is connected to it by a connector. You can snap the node to any existing node on the canvas by aligning them over each other.
You can also snap together two nodes that are already on the canvas. Simply drag one node over another node and release it when you see the highlight around the underlying node. The dragged node’s connection will be transferred from its earlier parent to the new parent.
If you snap a node to another, all the child nodes of the selected node will also be re-parented to the underlying node, to the last level. The connection between the selected node and its child nodes will not be affected.
Cut, copy, and paste operations
The whole sub-tree, a selected node and its child nodes, is affected by cut, copy, and paste actions on the root node of a sub-tree. When you cut or copy the root node of a sub-tree and paste it on canvas, the whole sub-tree appears on the canvas as a separate mind map.
Reordering nodes
To change the order in which the sibling nodes appear, drag a sibling node with your mouse and drop it in a different position. The nodes automatically adjust to maintain the overall layout of the mind map. You can also reorder nodes by using the Alt+Arrow keys keyboard shortcut. For a full list of shortcuts, see the following section, "Keyboard shortcuts."
Keyboard shortcuts
We have enabled creating and editing mind maps quickly in Visio for the web with the use of keyboard shortcuts. Keyboard shortcuts are combinations of keys that you can press to perform certain actions without using the mouse. Keyboard shortcuts can help you save time and get work done efficiently.
Following are the keyboard shortcuts that you can use while creating and editing a mind map. (A full list of Visio keyboard shortcuts is available anytime by selecting the Help tab in Visio and search for keyboard shortcuts.)
|
Shortcut |
Description |
|---|---|
|
Tab |
Create a child node in the mind map. |
|
Shift+Tab |
Create a child node to the left of root node in the mind map. |
|
Enter |
Create a sibling node (not for root node) in the mind map. |
|
Shift+Enter |
Add a new line while editing text in a shape. |
|
Arrow keys |
Navigate mind map nodes and to other shapes. |
|
Delete |
Delete a mind map node and all connected child nodes. |
|
Shift+Delete |
Delete only selected mind map node. Child nodes reconnect to the grandparent node. |
|
Alt+Arrow keys |
Rearrange mind map nodes. |
Note: When you're working with mind maps, keyboard shortcuts for regular shapes are overridden by the ones active for mind maps. For example, while you're working on a mind map, the Tab key l does not move the selection to the next shape. Instead, you can instead use Arrow keys to do that.


