
You can insert a check box on your Microsoft Office InfoPath form template so that users can quickly enter true or false values.
In this article
When to use a check box
Use one or more check boxes when you want to:
-
Enable users to make a true/false or yes/no choice.
-
Display true/false or yes/no information that comes from a database, Web service, or other data source.
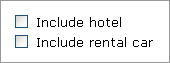
In the following illustration, users select check boxes to indicate whether they want to reserve a hotel or rental car along with their airline reservation.
Tip: By default, a check box is not selected. If you want a check box to be selected by default, you can double-click it and change its default state.
Related controls
InfoPath includes other controls that are similar to a check box but that serve different purposes. To decide which of these controls works best on your form template, refer to the following list:
Option button Like a check box, a group of option buttons enables users to make a choice. However, with option buttons, users select from a set of small circles instead of from a set of square check boxes. Also, check boxes typically represent nonexclusive choices, whereas option buttons are used to represent a single choice within a limited set of mutually exclusive choices.
Multiple-selection list box A multiple-selection list box consists of a number of check boxes inside a scrollable list. Users can select more than one check box in the list or add their own entry to the list, depending on how your form template is designed.
Insert a check box
The procedure for inserting a check box differs slightly depending on whether you are designing a new, blank form template or basing the design of your form template on a database or other external data source.
The following illustration shows how a check box looks when it is selected in design mode.
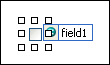
Controls can be bound or unbound. When a control is bound, it is connected to a field or group in the data source so that data entered into the control is saved in the underlying form (.xml) file. When a control is unbound, it is not connected to a field or group, and data entered into the control is not saved. When you select or move your pointer over a control, text and a binding icon appear in the upper-right corner of the control. The text indicates the group or field to which the control is bound in the data source. The icon indicates whether the control is correctly bound to that group or field. When the binding is correct, a green icon appears. If there's something wrong with the binding, you'll see a blue or red icon instead.
The data source for the form template consists of fields and groups that appear in a hierarchical view in the Data Source task pane.
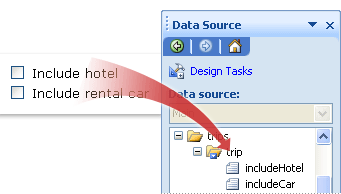
Check boxes are always bound to fields. In the following example, the Include hotel check box on the form template is bound to the includeHotel field in the Data Source task pane.
If you are binding the check box to a repeating field, the check box must be inside a repeating control, such as a repeating table or repeating section.
Insert a check box on a new, blank form template
When you design a new, blank form template, the Automatically create data source check box in the Controls task pane is selected by default. This enables InfoPath to automatically create fields and groups in the data source as you add controls to the form template. These fields and groups are represented by folder and file icons in the Data Source task pane.
-
On the form template, place the cursor where you want to insert the control.
-
If the Controls task pane is not visible, click More Controls on the Insert menu, or press ALT+I, C.
-
Under Insert controls, click Check Box.
-
To replace the control's default label, select the text next to the check box that was inserted on your form template, and then enter your own label.
-
To change the value that is stored in the data source when users clear or select the check box on the form, double-click the check box, click the Data tab, and then click the values that you want in the Value when cleared list and the Value when checked list.
Note: For check boxes, by default, TRUE means "selected" or "checked," whereas FALSE means "cleared" or "unchecked."
Insert a check box on a form template that is based on an existing data source
If you base the design of your form template on an existing Extensible Markup Language (XML) file, database, or Web service, InfoPath derives the fields and groups in the Data Source task pane from that existing data source.In this scenario, you can insert a check box by dragging a check box from the Data Source task pane onto the form template or by inserting a check box from the Controls task pane instead, as described in the following procedure:
-
On the form template, place the cursor where you want to insert the control.
-
If the Controls task pane is not visible, click More Controls on the Insert menu, or press ALT+I, C.
-
Under Insert controls, click Check Box.
-
In the Check Box Binding dialog box, select the field in which you want to store the check box value, and then click OK.
-
InfoPath uses the name of the field or group as the control's label. If necessary, change the label text.
-
To change the value that is stored in the data source when the check box is cleared or selected, double-click the check box that was inserted on the form template, click the Data tab, and then enter the values that you want in the Value when cleared and Value when checked boxes.
Note: For check boxes, by default, TRUE means "selected" or "checked," whereas FALSE means "cleared" or "unchecked."
Tip: You can also use the Data Source task pane to insert controls. In the Data Source task pane, right-click the field that you want to bind the check box to, and then click Check Box on the shortcut menu. For you to see this command, the field must use an appropriate data type, such as the True/False (Boolean) data type.
Layout tips
Use the following tips to help you refine the appearance, size, and other aspects of a check box control:
-
To change the size of several check boxes at once, select the check boxes whose size you want to change. Press ALT+ENTER, and then make the necessary adjustments on the Size tab.
-
If you make the check box too large, the check mark inside the check box may appear distorted.
-
To change the border or color of a check box, select the check box that you want to change. On the Format menu, click Borders and Shading, and then make the necessary adjustments.
-
You can use conditional formatting to display items on your form template when users select a particular check box. For example, on an expense report form, you can use conditional formatting to show a manager approval section to people when they select a Manager approval requested check box. If manager approval isn't necessary, users don't select the check box, and the section remains hidden on the form.


