
Want to organize database objects in a way that works best for you? Then create custom categories and groups in the Navigation Pane to reorganize, highlight, and even hide objects. You can also hide the Navigation Pane to provide your own method of navigation and use macros for more advanced control.
If you are looking for just the basics, see Use the Navigation Pane.
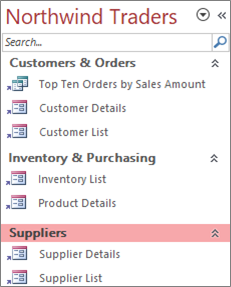
A customized Navigation Pane organized by three business functions
In this article
Before you begin
To help things go smoothly: plan your approach, proceed in phases, and understand security implications.
Planning custom categories and groups
When you plan and design the navigation system for a database, work with the people who will use it. If that's not practical, keep their needs central to your design process. Depending on your resources, consider using focus groups for planning and conducting usability tests during your design. In short, focus on the user.
For example, suppose you have many reports in your database, and that you run the reports with varying frequencies. You might create a Reports category, and then create Daily, Weekly, Monthly, Quarterly, and Yearly groups. In each group, you could add the appropriate reports.
For many examples of Navigation Pane customization, see Featured Access Templates.
Taking a phased approach
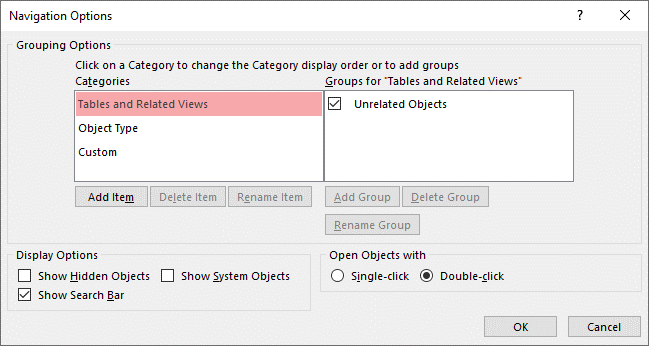
When you're ready, create your custom categories, custom groups within those categories, and then add the database objects to each group. Use the Navigation Options dialog box to create and manage custom categories and groups. The dialog box displays a list of all the categories that have been defined in the database, and shows the groups for a selected category.
Creating custom categories and groups
Think of the creation of custom categories and groups as the scaffolding for you custom navigation.
-
Create custom categories Access provides one pre-built custom category for you called Custom. You can rename that category and then add or remove groups to suit your needs. You can also create new custom categories.
Note When you create a custom category, it applies to the current database only. You cannot transfer custom categories and groups to other databases.
-
Create custom groups After you create a category, you create one or more custom groups for the new category. You can create as many groups as you need.
When you create a new custom category, groups named Unassigned Objects and Custom Group 1 are created for that category. By default, Access doesn’t put any objects in the Unassigned Objects group. Instead, all the objects in a category that aren’t in a group are displayed in the Unassigned Objects group in the Navigation Pane.
Organizing database objects in custom groups
Once you have created your categories and groups, you can add, hide, or show groups and objects to fit your needs. You can add or remove the objects in a group at any time.
-
Add objects to custom groups In the Navigation Pane, you can drag or copy and paste the objects from the Unassigned Objects to assign to a custom group. By doing so, you are adding a shortcut to a database object and not moving or copying the object itself. Shortcuts can be identified by a small arrow next to the lower-left corner of the object icon.
Each group should have only one shortcut to a given database object. When you open a shortcut, you open the object it points to.
Note The built-in categories and groups in the Navigation Pane do not display shortcuts, and instead display actual database objects. These groups include all groups in any built-in category and the Unassigned Objects group of any custom category.
-
Show or hide groups or objects After you populate your custom group or groups, you can hide the Unassigned Objects group and any other groups that you don't want to display.
You can hide some or all of the groups in a custom category and some or all of the objects in a group. You can use right-click commands that are provided by the Navigation Pane or you can choose a property for each object and hide it from all the groups and categories in the open database.
You can make hidden objects and groups completely invisible, or you can display them in the Navigation Pane as dimmed, unavailable icons. You make that choice by selecting or clearing the Show Hidden Objects check box in the Navigation Options dialog box. You also use that check box when you need to unhide a group or an object.
Important Although you can remove objects from a custom category or group, you cannot remove objects from a predefined category or group. Although you can delete (that is, permanently remove) predefined groups, we do not recommend doing this because it can cause problems in the database. Databases are sets of components that work together, and if an object is deleted from that set of components, it can break part or all the functionality of the database.
Advanced customization
There are several advanced ways to customize the Navigation Pane.
Hide the Navigation Pane You may prefer to provide your own method of navigation, such as a switchboard form or a navigation form.
Disable Design View You can hide database objects to help prevent design changes, but still provide shortcuts to them in custom categories and groups.
Related macros You can also use macro actions to control the Navigation Pane:
-
SetDisplayedCategories Use to show or hide a category regardless of the settings in the Navigation Options dialog box.
-
NavigateTo Use to navigate to a category or group, or automatically navigate to a category or group when the database opens.
-
LockNavigationPane Use to prevent users from accidentally adding, moving, or deleting items in the Navigation Pane. You can also use RunMenuCommand.
Security considerations
Usability features can be bypassed. Customizing the Navigation Pane doesn't prevent a malicious user from making unwanted design changes to your database or prevent unauthorized access to data. Consider the following:
-
If you use a macro to control and lock the Navigation Pane, users can disable the macro at startup by pressing and holding the SHIFT key.
-
You can hide the categories and groups that contain database objects and you can hide the objects themselves, but it is possible for users to unhide them.
-
Locking the Navigation Pane does not prevent users from copying database objects to the clipboard.
For more information on database security, see Decide whether to trust a database and Encrypt a database by using a database password. For more information on controlling database startup, see Set user options for the current database.
Create custom categories and groups
The following procedures show how to create and rename custom categories and groups.
Important For the following procedures to work, the Navigation Pane must be visible and its right-click menu command enabled. For more information, see Advanced customization and Set user options for the current database.
Create a custom category
-
Right-click the top of the Navigation Pane and then select Navigation Options.
-
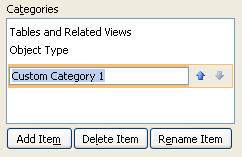
In the Navigation Options dialog box, under the Categories list, click Add Item. A new category appears in the list.
-
Type a name for the new category and then press ENTER.
Try to create a name that makes sense to the people who use your database. After you create the name, notice that the caption for the list on the right changes to match that name. For example, if you name the new category My Switchboard, the caption in the list on the right reads Groups for "My Switchboard".
Also, notice that the list on the right contains a group called Unassigned Objects. Access creates that group by default. This group contains all of the objects in your database, and you use those objects to populate your custom group.
Rename a custom category
-
Right-click the top of the Navigation Pane and then select Navigation Options.
-
Under Categories, click the custom category, and then click Rename Item.
-
Type a new name for the category, and then press ENTER.
Create a custom group
-
Right-click the top of the Navigation Pane and then select Navigation Options.
-
Select the category for which you want to add one or more groups.
-
For each group, under the Groups for <Group Name> list, click Add Group.
-
Type a name for the new group, and then press ENTER.
-
Leave the check box next to Unassigned Objects selected, and then click OK. Access closes the Navigation Options dialog box and adds your new custom group to the Navigation Pane.
Rename a custom group
-
Right-click the top of the Navigation Pane and then select Navigation Options.
-
Under Groups for <Group Name>, click the custom group, and then click Rename Group.
-
Type a new name for the group, and then press ENTER.
Create a custom group from a database object
-
With a custom category and group open in the Navigation Pane, right-click an object that you want to place in a new group.
-
Point to Add to group, and then click New Group.
A new group appears in the Navigation Pane.
-
Enter a name for the new group, and then press ENTER.
Organize objects in custom groups
The following procedures show how to organize database objects within custom categories and groups.
Important For the following procedures to work, the Navigation Pane must be visible and its right-click menu command enabled. For more information, see Advanced customization and Set user options for the current database.
Add objects to a custom group
You can add object shortcuts to a custom group in several different ways.
-
Click the menu at the top of the Navigation Pane, and in the upper section of the menu, click your new category.
The group or groups that you created for your category appear in the lower section of the menu, along with the Unassigned Objects group.
-
In the Unassigned Objects group, select the items that you want to use in your custom group, and then move them to that group. Access provides several ways to move the selected items. You can:
-
Drag the items individually.
-
Hold down CTRL, click multiple items, and then drag the items to your custom group.
-
Right-click one of the selected items, point to Add to group, and then click the name of your custom group.
-
Copy and paste:
-
In the Navigation Pane, right-click the object that you want to copy, and then click Copy.
-
Right-click the group in the Navigation Pane where you want to paste the object, and then click Paste. You can also paste the object into the Navigation Pane of another open Access database.
-
-
When you finish, you can leave the Unassigned Objects group visible in the Navigation Pane, or you can hide it.
Hide the Unassigned Objects group
-
Right-click the top of the Navigation Pane and then select Navigation Options.
-
In the Categories pane, select the appropriate category.
-
In the Groups for <Category> pane, clear the Unassigned Objects check box.
Hide a group
-
Right-click the top of the Navigation Pane and then select Navigation Options.
-
In the Groups for <Category> list, clear the check box next to the group that you want to hide.
Alternatively in the Navigation Pane, right-click the title bar of the group that you want to hide, and then click Hide.
Unhide a group
-
Right-click the top of the Navigation Pane and then select Navigation Options.
-
In the Groups for <Category> list, select the check box next to the group that you want to hide or unhide.
Hide an object
-
Right-click the top of the Navigation Pane and then select Navigation Options.
-
In the Categories list, select the appropriate category.
-
In the Groups for <Category> list, select the group that contains the hidden object.
Clear the check box next to the object.
-
Click OK.
Alternatively in the Navigation Pane, right-click the object and then click Hide.
Note You can't hide objects in the Unassigned Objects group of a custom category in the Navigation Pane.
Unhide an object
-
Right-click the top of the Navigation Pane and then select Navigation Options.
-
Under Display Options, select the Show Hidden Objects check box.
-
Click OK.
In the Navigation Pane, a dimmed icon appears for all hidden objects.
-
Do one of the following:
-
If you hid a shortcut in a group, right-click the shortcut and then click Unhide in this Group.
-
If you hid the object only from its parent group and category, right-click the object and then click Unhide.
-
If you hid the object from all categories and groups by setting the Hidden property, right-click the object, click View Properties, and then clear the Hidden check box.
-
Hide an object from all categories and groups
-
Right-click the top of the Navigation Pane and then select Navigation Options.
-
Right-click the object that you want to hide, and then click Object Properties or (for a table) Table Properties on the shortcut menu.
-
Select the Hidden check box.
-
Click OK.
Rename an object shortcut
When you rename an object shortcut, Access doesn’t rename the database object that the shortcut points to.
-
In the Navigation Pane, right-click the object that you want to rename, and then click Rename Shortcut.
-
Type the new name for the shortcut and then press ENTER.
Delete an object shortcut
-
In the Navigation Pane, right-click the shortcut that you want to remove, and then click Remove.
When you delete an object shortcut, Access doesn’t delete the database object that the shortcut points to.
Delete an object
-
In the Navigation Pane, right-click the object that you want to remove, and then click Delete.
Important If you choose to delete an object from a group, be aware that this can cause problems. We do not recommend deleting an object because a database is a set of components that work together, and if an object is deleted from that set of components, it can break part or all of the functionality of the database.
Advanced customization
There are more advanced ways to customize the Navigation Pane. You can hide the Navigation Pane by using the Options dialog box and disable an object Design view by using an object property. You can also use macros to selectively show or hide categories, navigate to a category or group, hide the Navigation Pane, or lock the Navigation Pane.
To run macro actions automatically when a database opens, put the actions in a macro named autoexec. For more information, see Create a macro that runs when you open a database. For more information about creating macros to control the user interface, see Create a user interface (UI) macro.
Hide the Navigation pane using the Options dialog box
You can hide the Navigation Pane and use an alternative method of navigation, such as a switchboard form, a navigation form, or strategically located buttons and links on a startup form (See Featured Access Templates).
-
From the open desktop database, click the File tab, and then click Options.
-
Click the Current Database category, and under Navigation, clear the Display Navigation Pane check box.
-
Click OK.
-
For this setting to take affect, close and then re-open the database.
Note To redisplay the Navigation pane, repeat the procedure, but, select the check box.
Disable Design view for database objects
In the Navigation Pane, you can set a shortcut's Disable Design View shortcuts property (Right-click the shortcut and click Object Properties) to control whether users can use the shortcut to open the target object in Design view or Layout view. For example, if you enable this property for a shortcut to a form, users cannot change the design or layout of the form by using the shortcut.
-
In the Navigation Pane, right-click the shortcut for which you want to disable Design view, and then click Object Properties or (for a table) Table Properties.
-
In the <Object Name> Properties dialog box, select the Disable Design View shortcuts check box.
Use the SetDisplayedCategories Macro to show or hide a category
-
Do one of the following:
-
To create a new macro, on the Create tab, in the Macros & Code group, click Macro.
-
To add the actions to an existing macro, right-click that macro in the Navigation Pane, and then click Design View.
-
-
On the Design tab, in the Show/Hide group, click Show All Actions.
-
In the macro designer, select SetDisplayedCategories from the drop-down list. The action appears in the macro designer.
-
In the Show box, choose a setting. Choose Yes if you want the category to display in the Navigation Pane. Choose No if you do not want the category to display in the Navigation Pane.
-
In the Category box, click the name of the category that you want to show or hide.
-
Repeat steps 3 through 5 for each category that you want to control by using the macro.
For more information, see SetDisplayedCategories Macro Action.
Use the NavigateTo Macro to navigate to a category or group
-
Do one of the following:
-
To create a new macro, on the Create tab, in the Macros & Code group, click Macro.
-
To add the action to an existing macro, right-click that macro in the Navigation Pane, and then click Design View.
-
-
On the Design tab, in the Show/Hide group, click Show All Actions.
-
In the macro designer, select NavigateTo from the drop-down list. The action appears in the macro designer.
-
In the Category box, click the name of the category that you want to navigate to.
-
If you want to navigate to a specific group in the category, click the arrow in the Group box, and then click the name of the group that you want to navigate to.
For more information, see NavigateTo Macro Action.
Use the LockNavigationPane Macro to lock the Navigation Pane
-
Do one of the following:
-
To create a new macro, on the Create tab, in the Macros & Code group, click Macro.
-
To add the actions to an existing macro, right-click that macro in the Navigation Pane, and then click Design View.
-
-
On the Design tab, in the Show/Hide group, click Show All Actions.
-
In the macro designer, select LockNavigationPane from the drop-down list. The action appears in the macro designer.
-
Specify a value for the Lock argument. Choose Yes to lock the Navigation Pane.
For more information, see LockNavigationPane Macro Action.
Use the RunMenuCommand Macro to hide the Navigation Pane
If you prefer to create your own navigation system, you can hide the Navigation Pane by using the RunMenuCommand macro action and the WindowHide argument.
-
Do one of the following:
-
To create a new macro, on the Create tab, in the Macros & Code group, click Macro.
-
To add the action to an existing macro, right-click that macro in the Navigation Pane, and then click Design View.
-
-
On the Design tab, in the Show/Hide group, click Show All Actions.
-
In the macro designer, select RunMenuCommand from the drop-down list. The action appears in the macro designer.
-
In the Command box, select WindowHide.
You can also turn the display of the Navigation Pane on or off by using the Display Navigation Pane check box in the Access Options dialog box. If you use the RunMenuCommand macro action with the WindowHide argument, it will hide the Navigation Pane whether the Display Navigation Pane check box is selected or cleared.
For more information, see RunMenuCommand Macro Action.


