
Use layout guides to organize text, pictures, and other objects into columns and rows so that your publication has an ordered, consistent look.
In this article
What are layout guides?
Layout guides help you maintain the alignment of objects, such as pictures, text boxes, and tables. When enabled, the layout guides give you visible guidance to align objects on the page.
Shapes, Pictures, Text Boxes, Tables, WordArt, and Grouped objects can align using their edges or their midlines. Tables can also align using their gridlines. As you drag or resize an object over a layout guide, the edges, midlines, and (in the case of tables) gridlines will briefly stick to the guide giving you an indication of the guides location.
Layout guides include margin, column, row, and baseline guides.
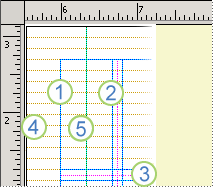
1. Margin guides
2. Column guides
3. Row guides
4. Baseline guides
5. Ruler guides
You can use layout guides to create a grid on a master page. This grid appears on every page in your publication where that master page is used.
Find more information about ruler guides in the Show or hide rulers article.
Structure the page with layout guides
Set up your publication to print on facing pages (like a book)
-
Click Page Design > Guides > Grid and Baseline Guides.
-
Click the Margin Guides tab.
-
Under Master Pages, select the Two-page master check box.
-
Under Margin Guides, enter the amount of space that you want for the page margins in the Inside, Outside, Top, and Bottom boxes.
Set up the column and row guides
-
Click Page Design > Guides > Grid and Baseline Guides.
-
Click the Grid Guides tab.
-
Under Column Guides, enter the number of columns that you want in the Columns box, and then enter the amount of space that you want between the columns in the Spacing box.
-
Under Row Guides, enter the number of rows that you want in the Rows box, and then enter the amount of space that you want between the rows in the Spacing box.
-
Click OK.
-
Create text boxes for the columns by clicking Insert > Draw Text Box

Set up the baseline guides
Baseline guides help you to align text that is not linked between several text boxes in columns. You can turn the text alignment on or off by selecting or clearing the Align text to baseline guides check box (Home > Paragraph Settings > Indents and Spacing tab).
Note: You must have a text box selected to access the Indents and Spacing tab.
-
Click Page Design > Guides > Grid and Baseline Guides.
-
Click the Baseline Guides tab.
-
Under Horizontal Baseline, enter the amount of space that you want between baselines in the Spacing box.
To view the baseline guides in your publication, click View, and then select the Baselines check box.
Note: If you have East Asian editing languages installed you will click Horizontal Baselines and Vertical Baselines.
-
In the Offset box, enter the amount of space you want between the first baseline guide and the top margin.
Note: The offset is measured from the top margin, not the top of the text box.


