
SharePoint workflows are pre-programmed mini-applications that streamline and automate a wide variety of business processes. Workflows can range from collecting signatures, feedback, or approvals for a plan or document, to tracking the current status of a routine procedure. SharePoint workflows are designed to save you time and effort, and to bring consistency and efficiency to tasks that you perform on a regular basis.
Notes:
-
SharePoint 2010 workflows have been retired since August 1, 2020 for new tenants and removed from existing tenants on November 1, 2020. If you’re using SharePoint 2010 workflows, we recommend migrating to Power Automate or other supported solutions. For more info, see SharePoint 2010 workflow retirement.
-
SharePoint 2013 workflow has been deprecated since April 2023 and will be turned off for new tenants as of April 2, 2024. It will be removed from existing tenants and will be fully retired as of April 2, 2026. If you’re using SharePoint 2013 workflow, we recommend migrating to Power Automate or other supported solutions. For more info, see SharePoint 2013 workflow retirement in Microsoft 365.
What is a SharePoint workflow?
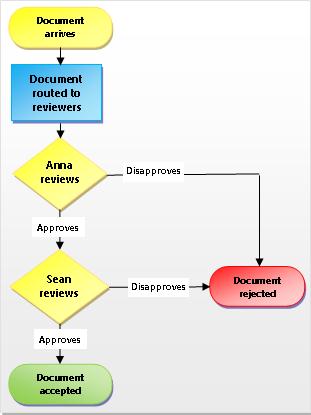
You probably already know what a flowchart is. It’s a graphical map of a process, with instructions about what happens at each step.
A SharePoint workflow is like an automated flowchart that takes a lot of the labor, guesswork, and randomness out of your standard work processes.
For example, look at the document approval-process in the illustration. Running this process manually can mean a lot of checking up and keeping track, forwarding documents and sending reminders — and each of those tasks has to be performed by you or by one or more of your colleagues. That means a lot of extra work and a constant stream of interruptions.
But when you use the SharePoint document approval workflow to run the process, all of that checking and tracking and reminding and forwarding is done by the workflow, automatically. If someone is late in completing a task, or if some other issue comes up, most of the included workflows generate a notification to let you know about it. Monitoring of the process is reduced.
Running a SharePoint workflow is easy. Choose the workflow type, select your options, and let the workflow run. If you need to, cancel or terminate the workflow.
Each of the workflow types included act like a template. You add an instance of the workflow for a single list or library, or for a whole site collection using an initiation form to specify the options and selections that you want for the instance. These options and selections include who the workflow assigns tasks to, task deadlines, how the workflow can be started and by whom, and instructions to be included in the task notifications. Create a new workflow by going to List Settings > Workflow Settings > Add a workflow. If you'd like to, read more about 2010 and 2013 workflows.
Important: By default, the Approval, Collect Feedback, and Collect Signature workflows are not activated and are not listed in the Select a workflow template list box of the association form. To make them available for use, a site administrator must activate them at the site collection level. Go to Site Settings > Site Collection Features > Activate Workflows feature. Also, SharePoint 2013 provides workflow templates based on SharePoint 2010. In case you want to create a SharePoint 2013 based workflow with the similar logic, use a tool like SharePoint Designer 2013.
There are five pre-programmed workflow types.


With each transition between states, the workflow assigns a task to a person and sends that person an e-mail alert about the task. When this task is completed, the workflow updates the status of the item and progresses to the next state. The Three-state workflow is designed to work with the Issue Tracking list template, but it can be used with any list that contains a Choice column that has three or more values.
To learn more, and for step-by-step instructions, see Use a Three-state workflow.

To add or start a workflow, you must have the correct permission for the list, library, or site collection where the workflow runs:
-
To add a workflow By default, you must have the Manage Lists permission to add a workflow. (The Owners group and the Members group have the Manage Lists permission by default; the Visitors group does not.)
-
To start a workflow Also by default, you must have the Edit Items permission to start a workflow that’s already been added. (The Owners group and the Members group both have the Edit Items permission by default; the Visitors group does not.)
Alternatively, Owners can choose to configure specific workflows so that they can be started only by members of the Owners group. In case of a sub site with unique permissions, Owners will need to ensure the required permissions are assigned to the workflow users explicitly. See Edit and manage permissions for a SharePoint list or library. < This is based on the feedback - "I created a sub site on my company sp site to test the workflow feature, so I should have permission to start a workflow, but I can't - why not?">
The following diagram provides a high-level view of the basic stages for planning, adding, running, and modifying a SharePoint workflow. Individual sections on each of the steps follow.

-
Plan Make sure that you know which options you want and what information you’ll need to have available when you use the initiation form to add your version of the workflow.
-
Add Fill out the initiation form to add your workflow version to a list, library, or site collection.
-
Start Start your new workflow, either manually or automatically, on a document or other item in a list or library. (If you start it manually, you’ll have the opportunity to change some of the workflow’s association form settings on a briefer initiation form.) When the workflow starts, it creates tasks, sends notification messages, and begins to track actions and events.
-
Monitor While the workflow is running, you can view the Workflow Status page to see which tasks are complete and what other actions have occurred. If necessary, you can adjust current and future tasks from here, and even cancel or terminate this workflow run.
-
Review When the run is complete, its whole history can be reviewed on the Workflow Status page. Also from the status page, statistical reports on the general performance of this workflow can be created.
-
Change If the workflow isn’t working quite like you want it to, you can open the original association form that you used to add it, and make your changes there.
If you need more flexibility with a built-in workflow, you can customize it further with a tool like SharePoint Designer 2013. You can also create your own original workflow from scratch.
Using the Workflow Designer, you create rules that associate conditions and actions with items in SharePoint lists and libraries. Changes to items in lists or libraries trigger actions in the workflow.
For example, you could design a workflow that launches an additional approval workflow, if the cost of an item exceeds a specific amount.
You can also define a workflow for a set of related documents. For example, if your workflow is associated to a document library, or if it is filtered to the Document content type, a group of contextual Document Set actions appear. A Document Set allows a group of documents to be treated as a single unit, so a workflow action for a Document Set will run on each of the items in that Document Set.
See also
Creating a workflow by using SharePoint Designer 2013 and the SharePoint Workflow platform


