
Create a notebook in OneNote

OneNote is a digital notebook that automatically saves and syncs your notes as you work.
-
Type information in your notebook or insert it from other apps and web pages.
-
Take handwritten notes or draw your ideas.
-
Use highlighting and tags for easy follow-up.
-
Share notebooks to collaborate with others.
-
Access your notebooks from any device.
Tip: This training covers the OneNote app on Windows 10. To get started with OneNote on your Mac, see Basic tasks in OneNote for Mac.
Create a notebook
Start with a single notebook. You can create additional notebooks for different subjects or projects whenever you want.
-
Open OneNote for Windows 10.
Tip: If you have multiple versions of OneNote on Windows 10, see What's the difference between OneNote and OneNote 2016?
-
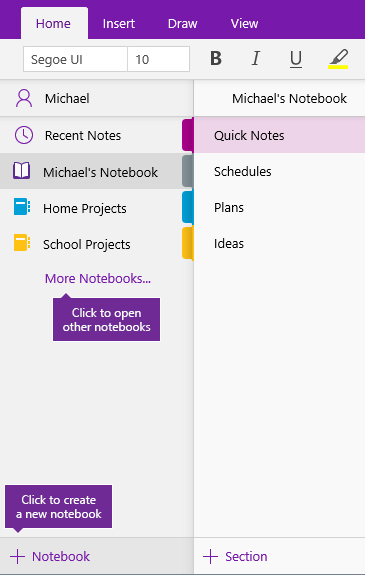
Select the Show Notebooks button

-
At the bottom of the list that opens, select the + Notebook button.
-
Type a name for the notebook in the Notebook Name box.
-
Select Create Notebook.
Open a notebook
Aside from creating your own notebooks, you can open notebooks that someone else has created and shared.
-
Select the Show Notebooks button
-
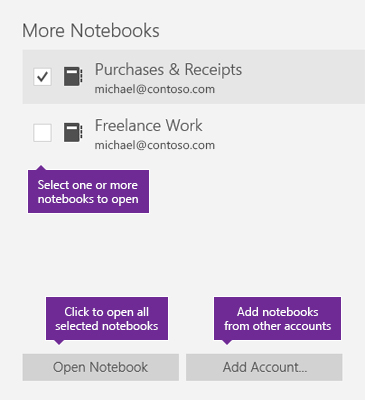
In the list that opens, select More Notebooks.
-
In the More Notebooks window, select any notebook in the list, and then select Open Notebook.
Don’t see the notebook you’re looking for? Select Add Account and then sign in with the account where your notebooks are stored.
Switch between open notebooks
OneNote lets you keep several notebooks open at once and it’s easy to switch between them.
-
Select the Show Notebooks button
-
In the list of open notebooks, select the notebook you want to work in.
To return to the previous notebook (or any other notebook that you’ve opened before), repeat the preceding steps.


Need more help?
Want more options?
Explore subscription benefits, browse training courses, learn how to secure your device, and more.


Communities help you ask and answer questions, give feedback, and hear from experts with rich knowledge.


