
The Hold and eDiscovery feature, which is available for any site, enables organizations to locate and suspend items such as documents, images, pages, from expiration policies. You would typically use this feature for items that are subject to events such as litigation, audits, or investigations. Organizations can use holds to prevent items that may be relevant to ongoing litigation or investigation from expiring or being destroyed before the event to which they are relevant has been resolved. Furthermore, when placing a hold on an item you have the option to lock it down so it cannot be edited or deleted.
You must be a site collection administrator to add, edit, or remove holds.
In this article
How a hold works
The Hold and eDiscovery feature must be activated for any site that will host items in order to use the Hold feature. By default, every Records Center site has a Holds list that records managers can use to create and manage holds for events such as litigation, audits, or investigations. You are not limited, however, to only using the Hold and eDiscovery feature in a Records Center site. You can add a Holds list to any site by accessing the Site Settings page for the site and activating the Hold and eDiscovery feature.
You create a new hold for a specific event by adding a new entry to a Holds list. The Holds list provides tools for finding and holding relevant items, viewing items that are currently on hold, or releasing a hold when it is no longer required.
When an item is added to a hold, its hold status is updated to indicate that it is on hold, and the application prevents this item from expiring or being deleted. After items are added to a hold, they are typically reviewed by the legal staff within an organization to determine whether they are relevant to the event that prompted the creation of the hold. Individual items can be removed from a hold if they are determined not to be relevant.
An organization can have multiple holds in effect at one time. It is also possible for one item to be added to several different holds. If an item is put on multiple holds, it is suspended from its original information management policy until all of the holds to which it has been added are released
Important: Users with View permissions to the Holds list can add or remove items from holds. Users with Edit permissions to the Holds list can directly modify the holds themselves.
Create a hold
On any site that has the Hold and eDiscovery feature enabled, you can create a hold to add items to.
-
On a Records Center site, click Site Actions

-
On the Site Settings page, in the Hold and eDiscovery section, click Holds. To learn how to activate the Hold and eDiscovery feature, see the links under See Also.
-
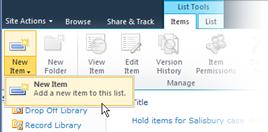
On the Holds page, click Items on the List Tools tab of the Ribbon.
-
On the Ribbon, click New Item.
-
In the Title box, type a name for the hold that you want to create. Typically, the title should identify information about the event (for example, the litigation, audit, or investigation) that is prompting the hold.
-
In the Description box, type any additional information about the hold. For example, you can provide additional information about the event that is prompting the hold.
-
In the Managed By box, enter the name of the records manager person or group who is responsible for managing the hold.
-
Click OK.
Add items to a hold
If you know that a specific item is relevant to a hold, you can add that item to the hold directly from the list or library where it is stored.
-
Open the list or library that contains the item that you want to add to the hold.
-
Point to the item that you want to add to the hold, click the arrow that appears, and then click Compliance details.
-
On the Compliance Details page, click Add/Remove from hold.
-
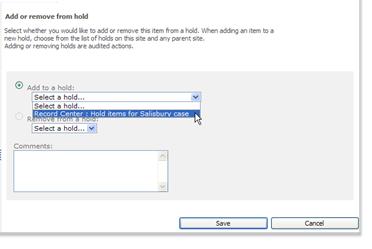
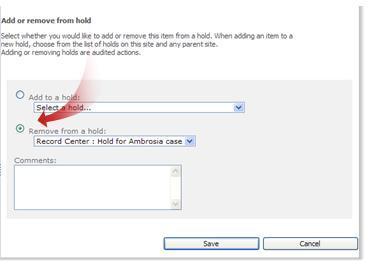
In the Add or remove from hold section, select the Add to a hold option, and then select the specific hold to which you want to add the item.
-
In the Comments box, type any comments that you want to provide about why you are adding this item to the hold.
Note: These comments are audited.
-
Click Save.
Search for items to add to a hold
You can use search to find and add multiple items to a hold all at once. You can search for items across multiple sites as long as each site has the Hold and eDiscovery feature enabled. To search for items across multiple sites, you should activate the Hold and eDiscovery feature for the top level site in your site collection.
-
On the site that contains items you want to search for click Site Actions
-
On the Site Settings page, in the Hold and eDiscovery section, click Discover and hold content.
To learn more about keywords and keyword syntax, see the links under See Also
.
-
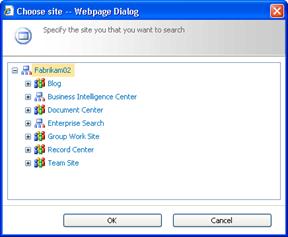
On the Search and Add to Hold page, in the Search Criteria section, click Select Site .
-
On the Choose site dialog, select the site in which you want to search for items to add to a hold, and select OK.
-
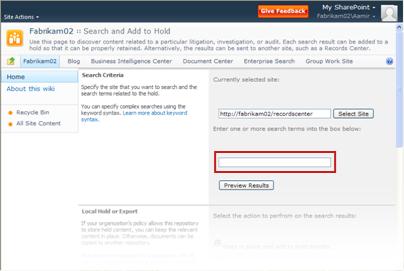
In the Search box, type the keywords that you want to use to help you find relevant items, and then click Preview Results.
To learn more about keywords and keyword syntax, see the links under See Also.
-
After the list of results appear, in the Relevant Holds section, select the hold you want to apply to the items in the list.
-
Click OK.
View all items on a Hold
Each hold that you create has a hold report that you can use to quickly view all items that have been added to that hold. By default, hold reports are scheduled to run at 11:00 PM which is the earliest time you can view all items that are associated to a hold. Your administrator can configure when these reports are created or manually run the reports at any time. To learn more about configuring report schedules, see the links under See Also.
Note: You can view hold reports from any site that has the Hold and eDiscovery features enabled.
-
On the site that contains the items put on hold, click Site Actions
-
On the Site Settings page, in the Hold and eDiscovery section, click Hold Reports to open the Hold Reports list.
If you do not see the Hold and eDiscovery section on the Site Settings page, the Hold and eDiscovery features have not been enabled on the site.
-
In the Hold Reports list, click the name of the report you want to view.
-
The report opens in spreadsheet format.
-
Click the Items on Hold tab to view all items that are part of the selected hold.

View all holds against an item
If an item has been added to more than one hold, you can view the list of holds that pertain to that by using the Compliance Details command.
-
Open the list or library that contains the item for which you want to view the hold information.
-
Point to the item that you want, click the arrow that appears, and then click Compliance Details.
-
On the Compliance Details dialog, click Add/Remove from hold.
-
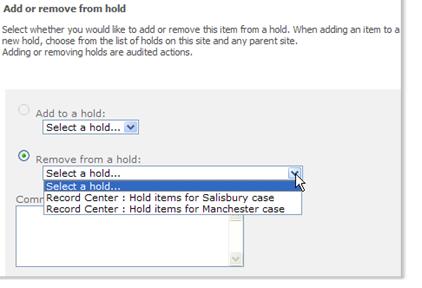
On the Hold Status page, click the arrow under the Remove from hold option to view a list of holds the item is associated with.
Remove an item from a hold
You can use the Compliance Details command to remove an individual item from a hold.
-
Open the list or library that contains the item that you want to remove from a hold.
-
Point to the item that you want, click the arrow that appears, and then click Compliance Details.
-
In the Hold Status section, click Add/Remove from a hold.
-
On the Item Hold Status page, select the Remove from hold option and then select the hold from which you want to release the item.
-
Click Save.
Note: An item can be associated with more than one hold, so it is important that you select the correct hold from which to release the document.
Release all items from a hold
If the event that a hold is resolved for one or more items and the hold is no longer required, you can release all of the items that have been added to the hold. When you release a hold, normal enforcement of the information management policy resumes for the items that were subject to that hold.
By default, hold reports are scheduled to run at 11:00 PM which is the earliest time you can verify that items have been released from a hold. Your administrator can, however, configure when these reports are created or manually run the reports at any time.
-
On the site that contains the items put on hold, click Site Actions
-
On the Site Settings page, in the Hold and eDiscovery section, click Holds to open the Hold list.
If you do not see the Hold and eDiscovery section on the Site Settings page, the Hold and eDiscovery features have not been enabled on the site.
-
Point to the hold that contains the items you want to release from the hold, click the arrow that appears, and then click Compliance Details.
-
On the Compliance Details page, in the Hold Status section click Add/Remove from hold.
-
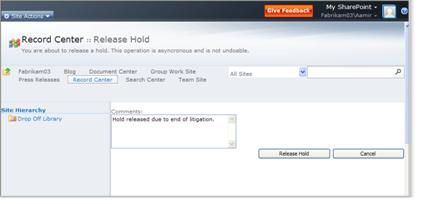
On the Holds dialog, in the Hold Status section, click Release hold.
-
On the Release Hold page, type any comments that you want to provide about why you are releasing the hold.
Note: These comments are audited.
-
Click Release Hold.
When you release a hold, normal enforcement of the information management policy resumes for all of the items that were subject to that hold. This means that items are no longer suspended from expiration or destruction. If specific items are subject to more than one hold, these items cannot be restored to normal policy enforcement until all of the holds to which they belong are resolved and released.
-


