
Note: This article has done its job, and will be retiring soon. To prevent "Page not found" woes, we're removing links we know about. If you've created links to this page, please remove them, and together we'll keep the web connected.
You can use flow charts to show a process flow. Basic flow charts are easy to create and, because the shapes are simple and visual, they are easy to understand.
Follow these steps to create a flow chart.
-
On the Insert tab, click Shapes.
-
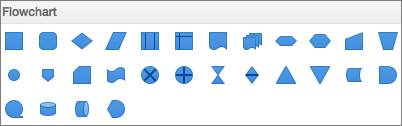
To choose a shape, point to it for a Screen Tip and see the name of the shape. For example:
-
Rectangle is a process shape, used for main steps in the process.
-
The diamond is a decision shape, used to show a decision point in the process.
-
The elongated oval is a terminator shape, used to start and end the process.
You want to be sure to use the right shape for the right purpose.
-
-
When you're ready, click the shape you want and drag the crosshairs to draw it in your file.
Before you connect the shapes, make sure the center points are aligned. Press Shift to select your shapes and then on the Shape Format tab, click Align and select one of the options.

-
Next, use the Lines gallery for the connectors between the shapes.

See also
By using a SmartArt graphic in Excel, PowerPoint, or Word, you can create a flow chart and include it in your worksheet, presentation, or document.
Which Office program are you using?
Excel
Do any of the following:
Add a shape
-
On the Standard toolbar, click Show or hide the Media Browser
-
Click Shapes
-
Click the shape that you want to add.
-
In your document, drag the cursor to the size that you want.
Tip: To maintain the shape proportions, hold down SHIFT as you drag the cursor.


Add a line connector between two shapes
-
On the Standard toolbar, click Show or hide the Media Browser
-
Click Shapes
-
Click the line style that you want.
-
Drag to draw the line so that it joins one shape to another.
Tips:
-
To attach connectors to shapes so that they move with a shape, draw the connector from one red handle to another.
-
To draw a line at a pre-set angle, such as vertical or horizontal, hold down SHIFT as you draw the line.
-
Add text to a shape
-
Select a shape.
-
Type the text that you want.
Tip: To format the shape text, select the text, and then on the Home tab, select the formatting options that you want (for example, font, color, or bold).
Add text to a line connector
-
On the Insert menu, click Text Box.
-
In the document, drag to draw the text box the size that you want.
-
Type the text that you want.
PowerPoint
Do any of the following:
Add a shape
-
On the Home tab, under Insert, click Shape, point to any shape type, and then click the shape that you want.
-
In your document, drag the cursor to the size that you want.
Tip: To maintain the shape proportions, hold down SHIFT as you drag the cursor.

Add a line connector between two shapes
-
On the Home tab, under Insert, click Shape, point to Lines and Connectors, and then click the line style that you want.
-
Drag to draw the line where you want, so that it joins one shape to another.
Tips:
-
To attach connectors to shapes so that they move with a shape, draw the connector from one red handle to another.
-
To draw a line at a pre-set angle, such as vertical or horizontal, hold down SHIFT as you draw the line.
-
Add text to a shape
-
Select a shape.
-
Type the text that you want.
Tip: To format the shape text, select the text, and then on the Home tab, select the formatting options that you want (for example, font, color, or bold).
Add text to a line connector
-
On the Home tab, under Insert, click Text, and then click Text Box.
-
In the document, drag to draw the text box the size that you want.
-
Type the text that you want.
Word
Do any of the following:
Add a shape
-
On the Home tab, under Insert, click Shape, point to any shape type, and then click the shape that you want.
-
In your document, drag the cursor to the size that you want.
Tip: To maintain the shape proportions, hold down SHIFT as you drag the cursor.
Add a line connector between two shapes
-
On the Home tab, under Insert, click Shape, point to Lines and Connectors, and then click the line style that you want.
-
Drag to draw the line where you want, so that it joins one shape to another.
Tips:
-
To attach connectors to shapes so that they move with a shape, you can group them. First select the shapes and connectors. Click the purple Format tab. Under Arrange, click Group, and then click Group.
-
To draw a line at a pre-set angle, such as vertical or horizontal, hold down SHIFT as you draw the line.
-
Add text to a shape
-
Select a shape.
-
Type the text that you want.
Tip: To format the shape text, select the text, and then on the Home tab, select the formatting options that you want (for example, font, color, or bold).
Add text to a line connector
-
On the Home tab, under Insert, click Text Box, and then click Text Box.
-
In the document, drag to draw the text box the size that you want.
-
Type the text that you want.
Do you have a question about Word that we didn't answer here?
Post a question in the Word Answers Community.
Help us improve Word
If you have a feature you'd like to request, please send us your feedback to help us prioritize new features in future updates. See How do I give feedback on Microsoft Office? for more information.


