
You can add, remove, or arrange fields and also filter or sort data by applying a query to the data source. Query options are available only for the following data sources:
-
Structured Query Language (SQL)-based data sources, including Microsoft SharePoint lists and libraries
Note: You can modify query options only in data source connections that were copied from an existing connection to a SharePoint list or library.
-
Individual databases
-
Linked databases
Note: Field selection, filtering, and sorting at the source level aren't available for XML files, REST, RSS and server-side scripts, or SOAP Web services, because these data sources don't have a query language like SQL. Instead, field selection, filtering, and sorting for these data sources are performed when you create the Data View that displays the data.
If you want to modify the fields that are included for default SharePoint lists or libraries in the Data Sources list, or if you want to link lists or libraries to other data sources, you first need to create a copy of the data source connection for that list or library and then modify it.
In this article
Unique query options for different types of data sources
In addition to offering the ability to pick fields, apply filters, and sort data in a data source, each of the data source types provides additional options for specifying a query.
SharePoint lists and libraries
You cannot modify the query for SharePoint lists and libraries as you can for other sources in the Data Sources list. You can, however, copy the connection for a SharePoint list or library and then create a custom query on the list or library so that it displays the exact data that you want. When you create a new data source connection for a SharePoint list, you do not copy the source data. Instead, you create an additional connection to the same data.
When you specify a query for SharePoint lists and libraries, you can also specify the scope of the query by using the options in the Item and folder scope list.
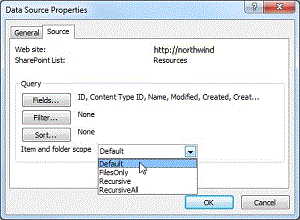
The Item and folder scope options specify whether the current query spans folders and subfolders. This is particularly useful when you are working with SharePoint libraries. For example, if the Shared Documents folder contains not only files but also subfolders that also contain files, you can specify which files or folders or both should be included in the query. The options are as follows:
-
To apply the query to all of the files and all of the subfolders in the current folder, click Default.
-
To apply the query only to the files in the current folder and not to any of the subfolders, click FilesOnly.
-
To apply the query to all of the files in all of the folders and not to any of the subfolders in the entire site, click Recursive.
-
To apply the query to all of the files in all of the folders and all of the subfolders in the entire site, click RecursiveAll.
Database connections
When you specify an SQL query for database connections, you can also specify whether the read and write statements are synchronized when the query is modified.
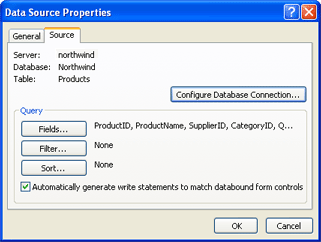
A read statement is an SQL statement that retrieves and displays data that cannot be modified. A write statement is an SQL statement that retrieves data that can be modified and then saved to the original data source. If you are automatically generating write statements, you already have the statements generated in case you ever want to create a data form. .
Linked data sources
As noted earlier, you can modify a query for a linked data source only if the linked data source comprises two database connections that are joined rather than merged. Also, when you are working with linked database connections, you have the option of outputting the data in tabular form or in hierarchical form.
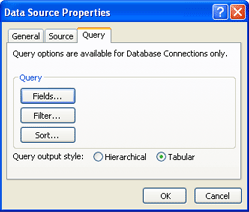
Tabular is the best option when you are working with two linked databases that have a one-to-one relationship (that is, one record in either database is related to exactly one other record in the other database).
Hierarchical may be the better option if you have linked databases that have a one-to-many relationship (that is, one record in one database is related to multiple records in other databases).
Add, remove, or arrange fields
You can add, remove, or arrange fields in the data source. When you do so, you are only changing which fields are available for viewing in the Data View Details task pane. You are not adding, removing, or arranging fields in the actual data.
-
Click Data Sources in the Navigation pane.
-
In the Data Sources tab in the gallery, right-click a data source and select Properties.
The Data Sources Properties dialog box displays.
-
If your data source is a SharePoint list or a database connection —click the Source tab, and under Query, click Fields.
--OR--
If your data source is a linked data source, click the Query tab, and under Query, click Fields.
Notes:
-
The options under Query are available only for these SQL data sources—SharePoint lists and libraries (when data source is a copy of a SharePoint list or library), databases, and linked data sources that comprise two database tables in the same database.
-
If the data source uses a custom query, you see the Edit Custom Query button instead of options for Fields, Filter, and Sort. If you want to delete the custom query, follow these instructions:
-
Click Configure Database Connection, click Next, and then click Finish.
-
In the Edit Custom SQL Commands dialog box, for each tab that displays an SQL statement, click Edit Command, and then delete the SQL statement.
For more information on modifying the custom query, see topic Add a database as a data source.
-
-
-
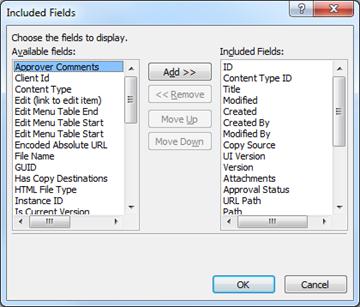
In the Included Fields dialog box, do any of the following:
-
To add a field to the data source, under Available fields, click the field that you want, and then click Add.
-
To remove a field from the data source, under Included Fields, click the field that you want, and then click Remove.
-
To change the order of the fields in the data source, under Included Fields, click the field that you want to move, and then click either Move Up or Move Down.
Note: Moving a field up in the list moves the column to the left in the data table. Moving a field down in the list moves the column to the right.
-
Click OK.
Tip: To select multiple fields at the same time, hold down CTRL while you click each of the fields.
-
Add, delete, or modify a filter
You can filter data by creating a filter query. When you filter a data source, you apply a filter so that the data source displays only data that satisfies the criteria that you specify. For example, you may have a data source that includes hundreds or thousands of records. However, you want to view only a subset of those records. You can create a filter so that only that subset of records is displayed in your data source.
-
Click Data Sources in the Navigation pane.
-
In the Data Sources tab in the gallery, right-click a data source and select Properties.
The Data Sources Properties dialog box displays.
-
If your data source is a SharePoint list or a database connection —click the Source tab, and under Query, click Filter.
--OR--
If your data source is a linked data source, click the Query tab, and under Query, click Filter.
Notes:
-
The options under Query are available only for these SQL data sources—SharePoint lists and libraries (when data source is a copy of a SharePoint list or library), databases, and linked data sources that comprise two database tables in the same database.
-
If the data source uses a custom query, you see the Edit Custom Query button instead of options for Fields, Filter, and Sort. If you want to delete the custom query, follow these instructions:
-
Click Configure Database Connection, click Next, and then click Finish.
-
In the Edit Custom SQL Commands dialog box, for each tab that displays an SQL statement, click Edit Command, and then delete the SQL statement.
For more information on modifying the custom query, see topic Add a database as a data source.
-
-
-
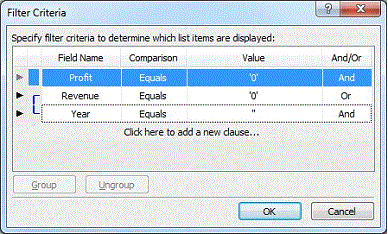
In the Data Source Properties dialog box, click Filter. The Filter Criteria dialog box appears.
You are now ready to add, delete, or modify a filter.
Add a filter
-
In the Filter Criteria dialog box, click Click here to add a new clause.
-
Click the Field Name box, and then click the field that contains the values that you want.
-
Click the Comparison box, and then click the operator that you want.
-
Click the Value box, and then type or select the criteria that you want.
-
Click OK.
Delete a filter
-
In the Filter Criteria dialog box, click the arrow in the leftmost column of a clause, and then press DELETE.
Modify a filter
-
In the Filter Criteria dialog box, click an existing clause, and then do any of the following:
-
Click the Field Name box, and then click the field that contains the values that you want.
-
Click the Comparison box, and then click the operator that you want.
-
Click the Value box, and then type or select the criteria that you want.
-
-
Click OK.
Add a clause to an existing filter
You can use multiple expressions in a single filter. You do this by adding new clauses that specify additional criteria that the data must satisfy.
-
In the Filter Criteria dialog box, at the end of an existing clause, click the And/Or box, and then do one of the following:
-
To create a filter in which the data must match the criteria in both clauses, click And.
-
To create a filter where the data must match the criteria in only one clause, click Or.
-
-
On the next row, click Click here to add a new clause.
-
Click the Field Name box, and then click the field that contains the values that you want.
-
Click the Comparison box, and then click the operator that you want.
-
Click the Value box, and then type or select the criteria that you want.
-
Click OK.
Group the clauses in a filter
When your filter contains multiple clauses, you may want to group two or more clauses so that they are applied before another clause.
-
In the Filter Criteria dialog box, at the end of the second clause, click the And/Or box, and then click Or.
-
In the Filter Criteria dialog box, click Click here to add a new clause.
-
Click the Field Name box, and then click the field that contains the values that you want.
-
Click the Comparison box, and then click the operator that you want.
-
Click the Value box, and then type or select the criteria that you want.
-
Hold down SHIFT while you click the arrows in the leftmost column of the clauses that you want to group, and then click Group. (To remove grouping, click Ungroup.)
-
Click OK.
Modify a clause
-
In the Filter Criteria dialog box, click an existing clause, and then do any of the following:
-
In the Field Name box, click the field that contains the values that you want.
-
Click the Comparison box, and then click the operator that you want.
-
Click the Value box, and then type or select the criteria that you want.
-
Click OK.
-
Delete a clause
-
In the Filter Criteria dialog box, click the the arrow in the leftmost column of the clause that you want to delete, and then press DELETE.
Add or remove a sort order
When you sort the data in a data source, you modify the order in which the data appears. Sorting is a technique that you can use to rearrange records in a way that makes it easier for you to understand your data. Common sort orders include alphabetical and numerical.
You can also sort on multiple fields by adding more fields to the sort order list. When you sort on multiple fields, the sort order determines the order in which the sorting occurs and may affect the output of the data.
-
Click Data Sources in the Navigation pane.
-
In the Data Sources tab in the gallery, right-click a data source and select Properties.
The Data Sources Properties dialog box displays.
-
If your data source is a SharePoint list or a database connection —click the Source tab, and under Query, click Fields.
--OR--
If your data source is a linked data source, click the Query tab, and under Query, click Fields.
Notes:
-
The options under Query are available only for these SQL data sources—SharePoint lists and libraries (when data source is a copy of a SharePoint list or library), databases, and linked data sources that comprise two database tables in the same database.
-
If the data source uses a custom query, you see the Edit Custom Query button instead of options for Fields, Filter, and Sort. If you want to delete the custom query, follow these instructions:
-
Click Configure Database Connection, click Next, and then click Finish.
-
In the Edit Custom SQL Commands dialog box, for each tab that displays an SQL statement, click Edit Command, and then delete the SQL statement.
For more information on modifying the custom query, see topic Add a database as a data source.
-
-
-
In the Data Source Properties dialog box, click Sort. The Sort dialog box appears.
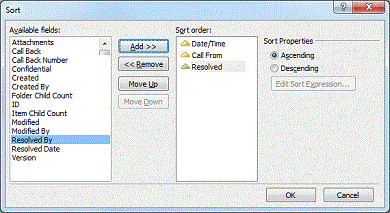
You are now ready to add or remove a sort order.
Add a sort order
-
In the Sort dialog box, under Available fields, click the field that you want to sort on, and then click Add.
Note: If no fields appear under Available fields, double-click More Fields, click the field that you want to sort on, and then click OK
-
Under Sort Properties, do one of the following:
-
To sort a field from lowest to highest (for example, A, B, C, or 1, 2, 3), click Ascending.
-
To sort a field from highest to lowest (for example, C, B, A, or 3, 2, 1), click Descending.
Tip: To change the sort order of a field from ascending to descending (or vice versa), double-click the field in the Sort order list. Notice that the triangle next to the field name indicates whether a field is sorted in ascending or descending order.
-
-
To sort on multiple fields, add more fields to the Sort order list.
-
Click OK.
-
You can also change the order in which the fields are sorted. To change the order of the fields, click a field in the Sort order list, and then click Move Up or Move Down.
Remove a sort order
-
In the Sort dialog box, under Sort order, click the field that you want to remove from the sort order, and then click Remove. To remove the entire sort from the database, remove all fields from the sort order.


