
It can be useful to have a count of how many records are contained in a report. In grouped or summary reports, you can display a count of how many records are in each group. Or, you can add a line number to each record to make it easier to refer to each one. This article explains, step-by-step, how to add counts and line numbers to your report.
What do you want to do?
Count the number of records in a report or group
Layout view provides you with the quickest way to add counts to your report.
Count records by using Layout view
-
In the Navigation Pane, right-click the report, and then click Layout View on the shortcut menu.
-
Click a field that you want to count. To ensure that all records are counted, click a field that you know does not contain any null values, such as an ID field.
-
On the Design tab, in the Grouping & Totals group, click Totals.
-
Do one of the following:
-
To count all the records in the report regardless of whether there is a value in the selected field, click Count Records.
-
To count only records for which there is a value in the selected field, click Count Values.
Note: Count Values is not available for fields of the following data types:
-
Long Text (Memo)
-
OLE Object
-
Hyperlink
-
Attachment
-
-
-
Access adds a text box to the Report Footer section and sets its Control Source property to an expression that performs the Count function. If there are any grouping levels in your report, Access also adds a text box to each group footer that performs the same calculation.
Note: If you use Layout view to create a count on a specific field, Access builds an expression that counts only those records where that field is not null. For example, if there are 10 records in the report, and you add the count to a field that contains three null values, the count text box displays 7 — the number records containing non-null values. You can avoid this by adding counts only to fields that do not allow nulls (such as ID fields), or you can edit the control source of the text box so that it will always count all records whether they contain null values or not. To do so:
-
Select the text box that displays the count. If the property sheet is not already displayed, press F4 to display it.
-
Click the Data tab.
-
In the Control Source property box, delete the expression and type =Count(*).
-
Save the report and switch to Report view to see the results.
Count records by using Design view
-
In the Navigation Pane, right-click the report and click Design View on the shortcut menu.
-
On the Design tab, in the Controls group, click Text Box.
-
Do one of the following:
-
To add a count of all records in the report, click the Report Header or Report Footer section where you want to place the text box.
-
To add a count of all the records in each group of a grouped report, click the Group Header or Group Footer section where you want to place the text box.
-
-
Select the text box and press F4 to display the property sheet.
-
Click the Data tab.
-
In the Control Source property box, type =Count(*).
This expression uses the Count function to count all the records in the report or group even if some fields in some records are null. To count records only where a specific field is not null (for example, SupplierName), use the following expression instead: =CDbl(Nz(Count([SupplierName]),0)).
Add a line number for each record in a report or group
You can number items in your report. For example, in a Sales by product report, you might want "1" to precede the first item in a product group, "2" to precede the second item, and so on. When the next product group begins, the count starts over, and "1" precedes the first item.
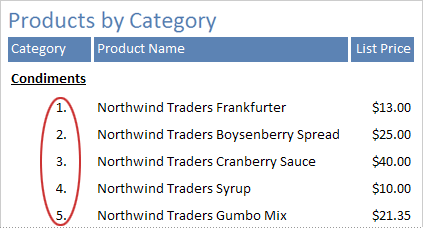
You can number the items in your report by using a calculated control and setting its Running Sum property.
-
In the Navigation Pane, right-click the report and then click Design View on the shortcut menu.
-
On the Design tab, in the Controls group, click Text Box.
-
In the Detail section of the report, drag the pointer to create the text box, making sure that it's wide enough to accommodate the largest item number.
For example, if you will likely have one hundred orders, you will need space for at least three characters (100). If a label appears next to the text box, delete the label by clicking it and then pressing DELETE. If you placed the text box near the left margin, the label might be hidden under the text box. Using the move handle on the upper left corner of the text box, drag the text box to the right so that you can see the label. Then, you can click the label and press DELETE.
-
Select the text box. If the property sheet is not already displayed, press F4 to display it.
-
Click the All tab. In the Name property box, type a name, such as txtItemNumber.
-
Click the Data tab.
-
In the Running Sum property box, select Over Group.
-
In the Control Source property box, type =1.
-
Click the Format tab.
-
In the Format property box, type #. (a pound sign followed by a period).
This formats the line number with a period following the number.
-
Save the report and switch to Report view to see the results.


