
Note: This article has done its job, and will be retiring soon. To prevent "Page not found" woes, we're removing links we know about. If you've created links to this page, please remove them, and together we'll keep the web connected.
You can use the AutoCorrect feature to correct typos, capitalization errors, and misspelled words, as well as automatically insert symbols and other pieces of text. By default, AutoCorrect uses a standard list of typical misspellings and symbols, but you can modify the entries in this list.
Note: Text included in hyperlinks is not automatically corrected.
All of the tasks described in this article are carried out on the AutoCorrect tab.
Find the AutoCorrect tab in your Office program
Word, Excel, Access, and PowerPoint:
-
Click the Microsoft Office Button

Outlook:
-
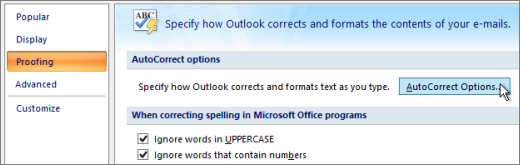
Open a mail item, and then click the Microsoft Office Button
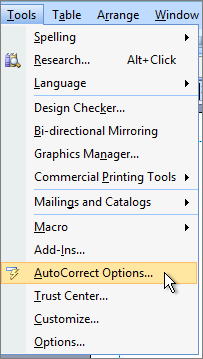
OneNote, Project, Publisher, and Visio:
-
On the Tools menu, click AutoCorrect Options.
Click the headings below for more information
You can enable or disable various options for automatically correcting capitalization on the AutoCorrect tab.
-
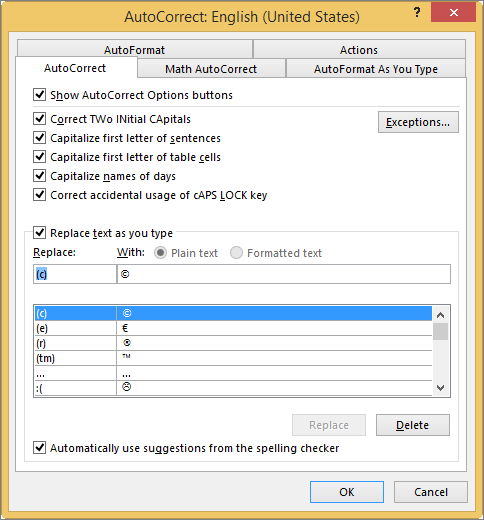
On the AutoCorrect tab, select or clear any of the following check boxes:
-
Correct TWo INitial CApitals
-
Capitalize first letter of sentences
-
Capitalize first letter of table cells (Not in Excel or OneNote)
-
Capitalize names of days
-
Correct accidental use of cAPS LOCK key
-
You can specify exceptions to a few of the capitalization rules. The exceptions that you set apply across all the Office programs that support the AutoCorrect feature, which means that any change you make to this list in one program also affects the other programs.
-
On the AutoCorrect tab, click Exceptions, and then do one of the following:
-
If you selected the Correct TWo INitial CApitals check box, and you want to prevent AutoCorrect from correcting a specific word that contains mixed uppercase and lowercase letters (such as "IDs"), click the INitial CAps tab.
To add a word to the exception list, type the word in the box and then click Add. To delete a word, select the word and click Delete.
-
If you selected the Capitalize first letter of sentences check box, and you want to prevent AutoCorrect from capitalizing words that follow certain abbreviations (such as "appt."), click the First Letter tab.
To add a word to the exception list, type the word in the box and then click Add. To delete a word, select the word and click Delete.
Note: In some Office programs, you can also select or clear the Automatically add words to list check box. This option takes effect while you are editing a file or an item. When AutoCorrect makes an unwanted correction, you can undo it by pressing CTRL+Z. If the Automatically add words to list check box is selected, the unwanted corrections that you undo are added to the list of exceptions.
-
AutoCorrect uses two parallel lists of words. The first word is the word that you type, and the second word or phrase is what the program automatically enters to replace that word.

The AutoCorrect list applies across all the Office programs that support the AutoCorrect feature, which means that when you add or delete a word from the list in one Office program, the other Office programs are also affected.
You can add multiple entries that point to the same "With" text. For example: "youve", "you'vr", and "you'ww" can all be replaced with "you've". Just add a separate entry for each of these changes.
Important: If AutoCorrect doesn't seem to be working at all, on the AutoCorrect tab, make sure the Replace text as you type check box is selected.
Add, change, or delete an entry on the AutoCorrect list
To add an entry follow these steps:
-
Go to the AutoCorrect tab.
-
In the Replace box, type a word or phrase that you often mistype or misspell — for example, type usualy.
-
In the With box, type the correct spelling of the word — for example, type usually.
-
Click Add.
To change the replacement text for an entry, select it in the list of entries and type a new entry in the With box.
To delete an entry, select it in the list and click Delete.
Note: The Exceptions list tells the spellchecker not to autoreplace items it thinks are misspelled. If a word is getting automatically replaced, and you've confirmed that it's not on the AutoCorrect list, add the word to the Exceptions list to ensure the spellchecker doesn't automatically replace it.
Add an entry using Editor
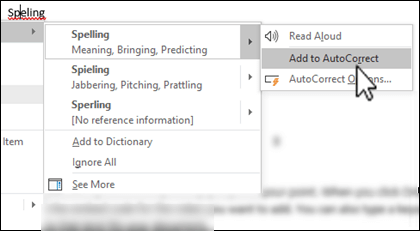
If you're a Microsoft 365 subscriber with the latest updates installed you should have the Editor feature in the Office desktop applications. If Office discovers a misspelled word it will underline it with a red squiggle. Right-click the misspelled word and the context menu will open with suggested corrections. If you want to add that misspelling/correction pair to AutoCorrect just click the arrow next to the correction and choose Add to AutoCorrect.
If you want to prevent all automatic changes and replacements made by AutoCorrect, open the AutoCorrect tab, and then:
-
Clear all the check boxes at the top of the tab to turn off all automatic capitalization.
-
Clear the Replace text as you type box to turn off all automatic text replacements.
Tip: If Office has auto corrected something for you and you didn't want that change, just click Undo or press CTRL+Z on your keyboard to undo the change.
When you install Microsoft Office, AutoCorrect is set by default to try to match and correct a misspelled word with a word in the main dictionary that the spelling checker uses. However, if you want to make sure this option is enabled, do the following.
-
On the AutoCorrect tab, select Automatically use suggestions from the spelling checker if it is not already selected.
-
If you made a change, click OK to make it effective.
To insert a symbol quickly without accessing any menus, assign a keystroke or text to the symbol. This is especially handy if you plan to insert the symbol often and don't want to have to go thru the Symbols command on the ribbon each time.
The steps are slightly different in Excel or PowerPoint vs Word so select the product you're using from the drop-down control below:
- Which application are you using?
- Word
- Excel or PowerPoint
-
On the Insert tab, click Symbol > More Symbols.
-
Scroll down the list, and click the symbol you want to use.
Tip: Most of the commonly used symbols are part of the Wingdings font sets. Set the font to Wingdings in the Symbol dialog box to speed your search.
-
Click AutoCorrect.
The symbol you select will automatically appear in the With box.
-
In the Replace box, type a word or phrase that you want to associate with the check mark symbol, for example, type check1.
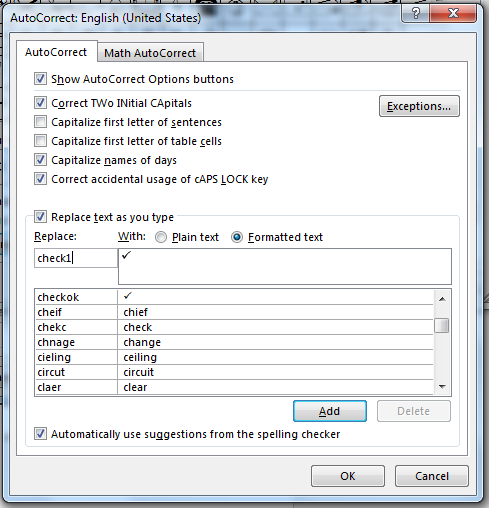
-
Click Add > OK.
-
Whenever you want to use the check mark symbol that you just defined, type the word that you used in step 5 to add the symbol.
Tip: If the character inserted is not the one you wanted, try highlighting the character that was inserted and make sure the font of that character is Wingdings.
In Excel and PowerPoint you have to insert the symbol once, copy it, then add the AutoCorrect rule. Once you've completed step 8, below, you can delete the symbol you inserted to create the rule, if you want to, so don't worry too much about where you insert it.
-
On the Insert tab, click Symbol > More Symbols.
-
Scroll down the list, and double-click the symbol you want to use to insert it in the file. Close the symbols dialog box.
Tip: Most of the commonly used symbols are part of the Wingdings font sets. Set the font to Wingdings in the Symbol dialog box to speed your search.
-
Select the inserted symbol in your workbook, and click Copy from the Home tab of the ribbon. (or press CTRL+C).
-
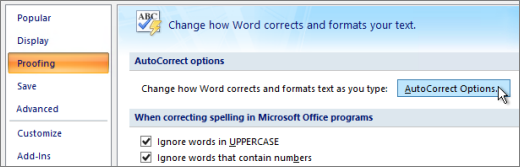
Click File > Options > Proofing >AutoCorrect Options.
-
Click the With box and press CTRL+V to paste the copied symbol into the field.
-
In the Replace box, type a word or phrase that you want to associate with the symbol, for example, type check1.
-
Click Add > OK.
-
Whenever you want to use the check mark symbol that you just defined, type the word that you used in step 7 to add the symbol.
Tip: If the character inserted is not the one you wanted, try highlighting the character that was inserted and make sure the font of that character is Wingdings.
Undo an AutoCorrection
If Office has auto corrected something for you and you didn't want that change, just click Undo or press CTRL+Z on your keyboard to undo the change.


