
The audit feature for Microsoft SharePoint and SharePoint Server lets you track user activity on content types like lists and libraries within your site collection. Knowing which users have accessed specific content at any given time is critical for many business requirements, such as regulatory compliance and records management.
Notes:
-
Only site-collection owners can run audit log reports.
-
If the Audit log Reports link is not available under Site Settings, make sure you have the Site Collection Feature “Reporting” activated.
-
Pages (such as .aspx) aren't considered documents so they can't be audited in SharePoint Servers 2019 or 2016.
-
SharePoint SharePoint audit log reports function differently than classic audit log reports.
-
SharePoint administrators can directly download data from the Microsoft 365 Management Activity API.
Select your version of SharePoint from one of the tabs below:
Changes to SharePoint audit settings
Microsoft 365 Unified Audit Logging now supports SharePoint and OneDrive. Unified auditing provides access to event logs (like view, create, edit, upload, download, and delete) and sharing actions like invitation and access requests, and synchronization activity. For more information about what Unified Audit Logging in Microsoft 365 provides for SharePoint, see Audited activities.
Summary of Audit Log Report changes:
-
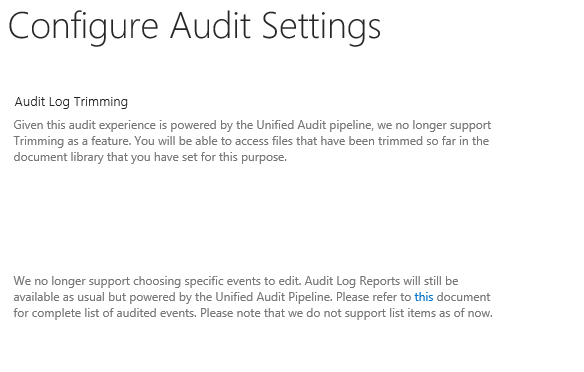
Trimming audit log reports is no longer a feature but you can still access files that have been trimmed in the past in the document library that you have set for this purpose.
-
Audit Log Reports will no longer allow for specific events to be edited. Audit Log Reports will still be available but will be limited to specific types of events.
-
For Customize Reports, the location option has been hidden because reports scoped at the sub-site level are no longer supported.
Run Audit Log Reports in SharePoint:
-
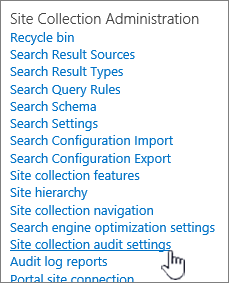
Select Settings > Site settings. If you don't see Site settings, select Site information and then select View all site settings. Some pages might require you to select Site contents, and then Site settings.
-
If you are not at the root of your site collection, under Site Collection Administration, select Go to top level site settings.
Notes:
-
The Site Collection Administration section won't be available if you don't have the necessary permissions. You need to be a member of the default Site Collections Administrators group or a farm administrator.
-
If the Audit log Reports link is not available under Site Settings, make sure you have the Site Collection Feature “Reporting” activated.
-
-
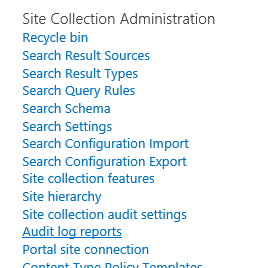
On the Site Settings page, under Site Collection Administration, select Audit log reports.
SharePoint Server 2019
SharePoint Servers 2016 and 2013
As a site collection owner, you can retrieve the history of actions taken by a particular user and actions taken during a particular date range. For example, you can determine when a specific document was edited and by which user.
You can manage the size of the audit log in the Audit Log Trimming section and specify which events to audit in the Documents and Items and Lists, Libraries, and Sites sections. You can also specify the maximum number of days that items will be retained. By default all items are removed at the end of the month.
Note: When multiple users are co-editing a document, auditing events from multiple authors or editors can be difficult to interpret. If this is a concern, consider limiting editing permission to a minimum number of users.
-
Click settings

-
If you are not at the root of your site collection, under Site Collection Administration, select Go to top level site settings.
Note: The Site Collection Administration section will not be available if you do not have the necessary permissions.
-
On the Site Settings page, under Site Collection Administration, select Site collection audit settings.
-
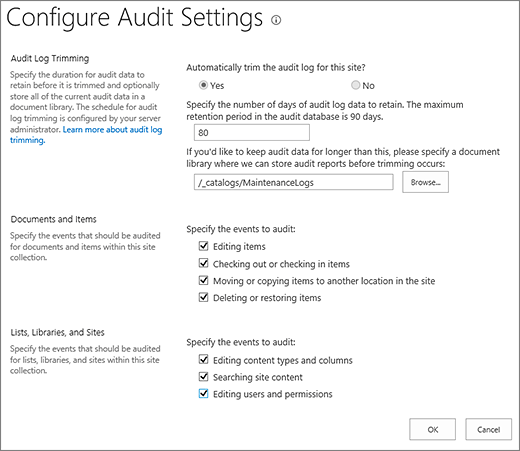
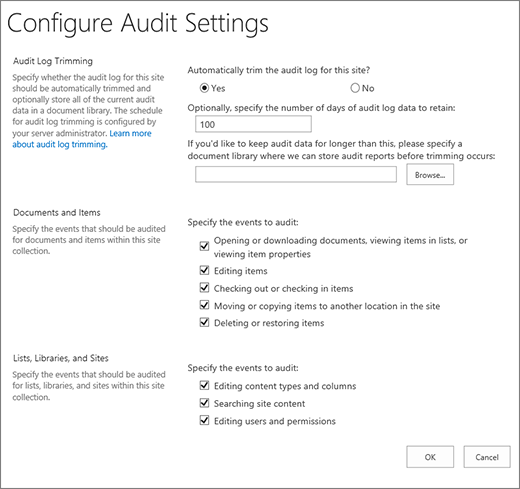
On the Configure Audit Settings page, in the Audit Log Trimming section, set Automatically trim the audit log for this site? to Yes.
Notes: For SharePoint
-
Trimming is not supported for SharePoint.
-
We no longer support choosing specific events to edit. Please refer to this document for complete list of audited events.
-
-
Optionally, specify the number of days of audit log data to retain. SharePoint Server doesn't have a limit.
Note: The default setting for retaining audit log data is zero days. That means if you don't specify a different retention period, all audit log entries are deleted at the end of the month. You can change this setting to retain audit log entries for a longer period of time. For example if you specify 30 days, then audit log data that was created in the month of September wouldn't be deleted until the end of October. To retain audit log data, you can also save it to an audit log report before the audit log is trimmed.
-
You can also specify the document library to save audit log reports to before the audit log is trimmed. Set this option if you need access to audit log data, using audit log reports, after the audit log has been trimmed.
-
Select OK.
-
Select Settings > Site settings. If you don't see Site settings, select Site information and then select View all site settings. Some pages might require you to select Site contents, and then Site settings.
-
If you are not at the root of your site collection, under Site Collection Administration, select Go to top level site settings.
Note: The Site Collection Administration section won't be available if you don't have the necessary permissions. You need to be a member of the default Site Collections Administrators group or a farm administrator.
-
On the Site Settings page, under Site Collection Administration, select Site collection audit settings.
-
On the Configure Audit Settings page, in the Documents and Items and List, Libraries, and Site sections, select the events you want to audit, and then select OK.
Which events you audit depends on your auditing needs. For example, regulatory compliance usually has specific requirements that will dictate which events you need to audit. We recommend that you only audit the events required to meet your needs. Additional, unnecessary auditing can affect the performance and other aspects of your site collection(s).
Note: For SharePoint Server 2013, we recommend that you only select the Opening or downloading documents, viewing items in lists, or viewing item properties event when absolutely necessary. This option is likely to generate a large number of events that will potentially degrade the performance and other aspects of your site collection(s).
Audited events are captured in audit reports that are based on Microsoft Excel 2013 and are available from the Auditing Reports page. You can also create a custom report that includes a number of these events over a specified date range, within a specific area of the site collection, or filtered to an individual user. You cannot modify events once they are logged, but site collection administrators can delete items from the audit log and configure automatic trimming of the audit log data.
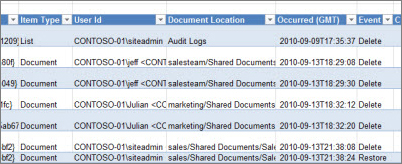
The audit log captures the following information for the events that are selected to be audited:
-
Site from which an event originated
-
Item ID, type, name, and location
-
User ID associated with the event
-
Event type, date, time, and source
-
Action taken on the item
Following is an example of the data in a Deletion audit log report. With this report, you can determine who deleted and restored data across the site collection. You can use the features of Excel to filter, sort, and analyze the data.
When you select an event to audit for a site collection, the report will audit every item in the site collection each time the event occurs. Auditing can potentially generate a large number of audit events, creating a large audit log that could fill the hard drive, impacting performance and other aspects of a site collection.
Important: To prevent the audit log from filling the hard drive and potentially degrading the performance of the site collection, we recommended that you enable audit log trimming for site collections with extensive auditing.
To manage the size of the audit log report you can configure it to automatically trim, and optionally archive, the current audit log data in a document library before the data is trimmed. The schedule for audit log trimming is configured by your server administrator in Central Administration. The default is the end of the month.
To view an audit log report:
-
Click Settings

Note: The Site Collection Administration section won't be available if you don't have the necessary permissions. You need to be a member of the default Site Collections Administrators group or a farm administrator.
-
Click Audit log reports in the Site Collection Administration section.
-
Select the report that you want on the View Auditing Reports page.
-
Type a URL or Browse to the library where you want to save the report, and then select OK.
-
On the Operation Completed Successfully page, select click here to view this report. If you get an error, it may be because audit logs weren't enabled or there was no data to show.
Notes:
-
At a minimum, Excel version 2013 must be installed to view audit log reports by clicking Click here to view this report.
-
Alternatively, if opening documents in the browser is enabled for the library, go to the library where you saved the audit log report, point to the audit log report, select the down arrow, and then select View in Browser.
-
You can use standard Excel features to narrow the reports to the information you want. Some ways in which you can analyze and view the log data include:
-
Filtering the audit log report for a specific site.
-
Filtering the audit log report for a particular date range.
-
Sorting the audit log report.
-
Determining who has updated content.
-
Determining which content has been deleted but not restored.
-
Viewing the changes to permissions on an item.
We're listening
Updated November 2019
Was this article helpful? Was it missing content? If so, please let us know what's confusing or missing at the bottom of this page. Please include your version of SharePoint, OS, and browser. We'll use your feedback to double-check the facts, add info, and update this article.


