
Use the Lync Online participant and content management options for a productive and distraction-free meeting.
Important: If you are not the meeting organizer or lead presenter, be aware that many of these options affect what others are able to see, hear, or do in the meeting. Presenter discretion is advised.
What do you want to do?
Manage participants
You can perform most meeting management tasks by right-clicking one or more people in the participant list, or by using the People Options menu 
Show or hide the participant list
-
In the conversation window, click the People Options menu, and then click Show Participant List.
It’s best to keep the participant list in view during the meeting so you can track who is there, who is speaking, and who might be having trouble with audio or sharing. However, you may need to hide the participant list to, for example, review a long instant message (IM) conversation.
Mute or unmute participants
-
To manage audio for one or more individuals, right-click the name or names in the participant list, and then click Mute or Unmute.
Important: You can mute and unmute participants who are using Lync for audio. You cannot mute or unmute participants who are connected to the meeting’s audio with a phone, that is, those who have used Lync’s Call me feature to have the Lync Meeting call a phone number or by dialing in. (People connected with a phone can press *1 on their phone key pad to access touch-tone commands for audio features, including mute and unmute.)
Change presenter or attendee privileges during the meeting
-
Do one of the following:
-
In the participant list, right-click one or more participants, and then click Make a Presenter or Make an Attendee, as appropriate.
-
Click the People Options menu, and then click Make Everyone an Attendee.
Tip: Choose this option when there are so many presenters that it is disrupting the flow of the meeting.
-
Admit or deny access to people in the lobby
The meeting lobby only works for participants that connect to the meeting using VoIP. Participants that dial into the meeting using their phone will bypass the meeting lobby.
-
To admit or deny access to people in the lobby, do one of the following:
-
In participant list, under Lobby, click Admit All or Deny All.
-
In the participant list, next to each person’s name, click Admit or Deny as appropriate.
-
Start a separate conversation with one or more participants
-
In the participant list, select one or more people, right-click the selected names, and then click the contact option you want.
Invite others to the meeting
To invite others by using Lync Online, do the following.
-
(Optional) To change access or presenter options for the people you want to invite, do the following:
-
In the Lync Online meeting or group conversation window, click Join Information and Meeting Options.
-
In the Join Information and Meeting Options dialog box, click the Meeting Options button.
-
Change the meeting options as required. For details, see Change meeting options during the meeting.
-
-
Click the People Options menu, and then click Invite by Name or Phone Number.
To invite others by sending an email message, do the following:
-
Click the People Options menu, and then click Invite by Email.
-
(Optional) To change access or presenter options for the people you want to invite, in the meeting invitation, click Meeting Options. For details, see Set online meeting options.
Work with meeting content
In Lync Online, meeting content is displayed to the right of the participant list in an area called the stage. If you’re the active presenter, you work with Microsoft PowerPoint presentations, whiteboards, and meeting polls in this area. When you share a program or your desktop, everyone else in the meeting sees what you’re sharing on the stage as well.
Upload or prepare content before the meeting
Before the meeting starts, do the following:
-
In the Microsoft Office Outlook messaging and collaboration client Calendar, open the invitation for a meeting you scheduled, and then click Join Online Meeting.
-
In the conversation window, do one or both of the following:
-
Click the Share menu to share your desktop or a program, upload a PowerPoint presentation, add a whiteboard, or create a new poll.
-
Click the Add or view attachments button to upload a file.
-
For details, see the appropriate procedures later in this topic.
Show meeting content that has already been uploaded
-
In the meeting window, click Share, point to Recent Content, and then click the content that you want to display.
Share a program or your desktop
-
In the meeting window, click Share, and then click Desktop or Program. For details, see Share your desktop and programs.
Upload a PowerPoint file for presentation
-
In the meeting window, click Share, and then click PowerPoint Presentation.
-
Select the file to add, and then click Upload. For details, see Give a PowerPoint Presentation.
Upload attachments for participants to view and save
To upload a document so that participants can save a copy on their own computer, do the following:
-
In the conversation window, click the Add or view attachments button.
-
In the Attachments dialog box, click Add Attachments.
-
Select the file that you want to add, and then click Upload.
Annotate a PowerPoint presentation or whiteboard
-
In the meeting stage, on the annotation tool bar in the lower-left corner, click the annotation tool you want.
You or anyone in the meeting can annotate a whiteboard or PowerPoint slide in the following ways:
-
Use the Laser Pointer, a colored dot labeled with your name
-
Insert lines or shapes
-
Add text
-
Draw or highlight with the Pen
-
Add an Arrow Stamp, Check Stamp, or X Stamp
-
Insert a graphics file
For details about the annotation tools, see Collaborate on a whiteboard.
Note: Annotation tools are not available for shared content. If you are sharing your desktop or a program, others must request permission before making changes to the content you are sharing.
Add a whiteboard or poll to the meeting
-
In the meeting window, click Share, and then click New Whiteboard or New Poll.
For details, see Collaborate on a whiteboard and Conduct a poll.
Show or hide the stage
-
In the conversation window, click Share, and then click Show Stage.
Modify content permissions
You can change who can do what with shared content.
Change who can annotate PowerPoint presentations
-
In the conversation window, click Join Information and Meeting Options.
-
In the Join Information and Meeting Options dialog box, click the Meeting Options button.
-
In the Online Meeting Options dialog box, under Privileges, change Annotate presentations to Presenters only, Everyone, or None.
Control who can view meeting content privately
By default, other presenters can view meeting content privately without affecting what others in the meeting see. Other presenters can page through the PowerPoint slides you’re showing at their own pace, or switch to another item in the Content List.
To change private viewing options for meeting content, do the following:
-
In the conversation window, click Join Information and Meeting Options.
-
In the Join Information and Meeting Options dialog box, click the Meeting Options button.
-
In the Online Meeting Options dialog box, under Privileges, change View privately to Presenters only, Everyone, or None.
Note: Shared desktops or programs cannot be viewed privately.
Change who has access to meeting content
By default, only presenters have extended access to meeting content. To change this, do the following:
-
In the Content List, click the arrow next to the item you want to change, point to Make Available To, and then click Organizers, Presenters, or Everyone.
When you choose Presenters or Everyone, people in that category can control PowerPoint presentations, whiteboards, and polls in the following ways:
-
Save a local copy, with or without annotations
-
Change what’s being viewed in the meeting stage
-
Rename or remove content
-
Give everyone extended access to meeting content
Change who can view and save attachments
By default, everyone in the meeting can save and view meeting attachments. To change this, do the following:
-
In the conversation window, click the Add or view attachments button.
-
Click the arrow to the right of the content that you want to change, point to Make Available To, and then click Organizers, Presenters, or Everyone.
Add video to the meeting
To add video to the meeting, do the following:
-
In the conversation window, click Video.
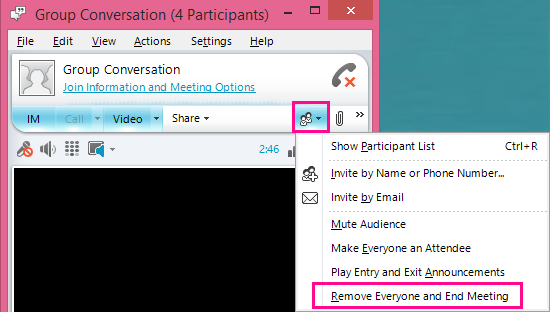
End or exit the meeting
You can either end the meeting and disconnect everyone, or just close the window and let others continue with the meeting.
Exit and end the meeting
-
In the meeting window, click the People Options and then click Remove Everyone and End Meeting. This closes the window and disconnects everyone from the meeting, including those participants who called in.
Leave the meeting but keep it going
-
Simply close the conversation or meeting window. Others can stay connected and continue with the meeting.
Important: We recommend you use the Remove Everyone and End Meeting option to avoid charges from your audio conferencing provider, in case people forget to disconnect their audio. The only exception is if you want to allow the participants to continue the Lync Meeting in your absence.


