
If you have full access permission to a shared mailbox that appears in the address book, you can use Outlook Web App or a desktop version of Outlook to open that mailbox.
|
This article is for Outlook Web App, which is used by organizations that manage email servers running Exchange Server 2013 or 2010. If you're using Microsoft 365, or Exchange Server 2016 or 2019, your email program is Outlook on the web. For help with Outlook on the web, see Get help with Outlook on the web. |
Why use shared mailboxes? A shared mailbox makes it easy for a specific group of people to monitor and send email from a public email address like info@contoso.com or contact@contoso.com. When a person in the group replies to a message sent to the shared mailbox, the reply appears to be from the shared mailbox, not from the individual person. You can also use the shared mailbox as a shared team calendar.
Important: The admin for your organization has to create the shared mailbox and add you to the group of users before you can use it. For more information, see Create a shared mailbox, which describes what the admin needs to do.
Want to open a shared mailbox using Outlook instead of Outlook Web App? See Manage another person's mail and calendar items.
|
This article is for Outlook Web App, which is used by organizations that manage email servers running Exchange Server 2013 or 2010. If you're using Microsoft 365, or Exchange Server 2016 or 2019, your email program is Outlook on the web. For help with Outlook on the web, see Get help with Outlook on the web. |
If you want to monitor the email from your primary mailbox and the shared mailbox at the same time, use this method. In addition, after you complete this task, the shared mailbox and its folders are displayed in the left navigation pane each time you open Outlook Web App.
-
Sign in to your account in Outlook Web App.
-
Right-click your primary mailbox in the left navigation pane, and then choose Add shared folder. (Your name is on your primary mailbox.)
-
In the Add shared folder dialog box, type the name or email address of someone who has shared a mailbox with you, and then select Add.
The shared mailbox displays in your Folder list in Outlook Web App. You can expand or collapse the shared mailbox folders as you can with your primary mailbox. You also can remove the shared mailbox from your Folder list. To remove it, right-click the shared mailbox, and then select Remove shared folder.
To receive notifications of new messages in the Inbox of a shared mailbox, you must open a shared mailbox in a separate browser window.
Use this method if you want to view and manage the email for the shared mailbox in its own browser window.
-
Sign in to your account in Outlook Web App.
-
On the Outlook Web App navigation bar, select your name. A list appears.
-
Select Open another mailbox.
-
Type the email address of the other mailbox that you want to open and then select Open. Or, start typing and then select Search contacts and directory to find the mailbox you want to open. Select the shared mailbox you want to open, and then select Open. Another Outlook Web App session opens in a separate window, allowing access to the other mailbox.
Tip: If you mistype the email address of the mailbox, the result is "No match was found." Try retyping the email address.
-
Select New mail above the folder list. A new message form opens in the reading pane.
-
Select More

Note: The first time you use a shared mailbox to send an email, you won't see the name of the shared mailbox account in the Show From drop-down. For your first-time use, delete your name, type the name of the shared mailbox in place of your name, and then send the message. In the future, the name of the shared mailbox will display in the drop-down next to Show From, and you can select it.
-
To add recipients, type the name of anyone who is in your contacts folder or organization’s address list, or type the email address in the To or Cc box. The first time you enter a person’s name, Outlook Web App searches for that person’s address. In the future, the name is cached so it resolves quickly.
-
Type a subject.
-
Type the message you want to send.
-
When your message is ready to go, select Send .
One of the great things about using a shared mailbox is that anyone who has access to the shared mailbox also has full access to the calendar. You can create, edit, and delete events in the calendar. Use the shared calendar just as you would use your own calendar. Here's a short list of things you can do with the shared mailbox calendar:
-
Let your team know when you're going on vacation or when you’ll be out of the office.
-
Create a team meeting.
-
Edit a calendar event that someone else created.
-
Cancel a meeting that someone else created.
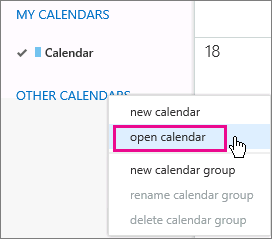
To access the shared calendar, do the following:
-
Sign in to your mailbox using Outlook Web App, and then select Calendar.
-
Right-click Other calendars, and then select Open calendar.
-
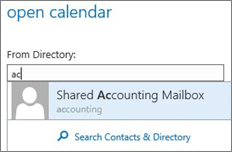
In From directory, enter all or part of the name of the calendar you want to open, then select Search contacts and directory to find the calendar you want to open. Select the shared calendar you want to open, and then select Open.
-
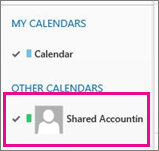
The shared calendar displays in your Calendar folder list.
For general information about how to use the calendar in Outlook Web App, see Calendar in Outlook Web App.


