
A digital signature is the electronic equivalent of your handwritten signature on a check, credit-card charge slip, or contract, but it’s even better than a written signature. When you add a digital signature to a Microsoft Office InfoPath 2007 form, the signature is invalidated if the information is changed by anyone but you.
This article describes how to add a digital signature to an Office InfoPath 2007 browser-enabled form that is designed to accept it. Because adding a digital signature to a browser-enabled form requires a Web browser that supports ActiveX, you must use Windows Internet Explorer to perform this task.
Important: If you are a form template designer looking for information about how to enable digital signatures on browser-enabled forms, refer to the following topics:
If you are filling out a form and want to know how to add your digital signature, continue reading this article. For general information about digital signatures, see the topic Introduction to digital signatures.
Add a digital signature to a form
Before you can add a digital signature to a form, you need to have a digital certificate. A digital certificate is like a secret code assigned to you. You are the only person who can assign the code to a form, so when you do, the code is your digital signature. (You don’t need to remember a complicated code. You’ll see how it works shortly.)
Digital certificates may be issued by the IT department in your organization, or you may need to obtain one from a commercial certificate authority such as VeriSign. Check with your IT department to find out how to obtain your certificate.
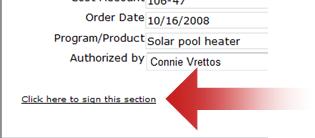
You can add a digital signature to any InfoPath form that has been designed with digital signatures enabled. To determine if digital signatures are enabled for a form, look for a link that says Click here to sign this section.
Notes:
-
Before you can sign a browser-enabled form on a computer, you must install two add-ons, which are ActiveX controls that are required to add a signature. Because this task requires a browser that supports ActiveX, you must use Windows Internet Explorer when adding a signature to a browser-enabled form.
-
This article talks about forms you open in a Web browser. You can also add a digital signature to a form that you open in InfoPath, but the steps are different than those described here.
-
Open the form and add the requested information.
Note: The first time you attempt to sign a signature-enabled form on a computer, you will be prompted to install two add-ons, which are ActiveX controls. These add-ons are required to add a signature. Follow the instructions in the dialog box that appears to install the controls. When the control has been installed, the form will open. To be able to sign this form, you need to activate two Windows Internet Explorer add-ons. Click the Information Bar in the dialog box, and then click Run ActiveX control to activate each add-on.
-
When you are ready to sign the form, click Click here to sign this section.
Note: Your digital signature applies to only one section of the form, not the entire form. There may be additional links for signing other sections.
-
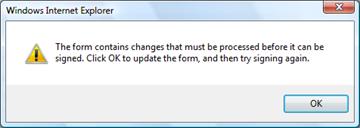
If you see a message that says The form contains changes that must be processed before it can be signed, click OK to dismiss it.
-
The dialog box that appears displays a picture of the form. Review the information to ensure that the form is correct. If the information is not correct, click Cancel, correct the form, and then start over at step 2.
Note: If this dialog box does not appear automatically, click Click here to sign this section again.
-
When the information is correct, click Select certificate.
-
In the list that appears, select the certificate you want to use to sign the form, and then click OK.
-
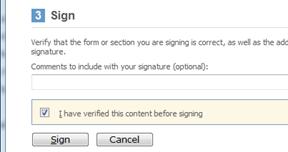
Scroll to the bottom of the Signing – Web Page dialog box and select the I have verified this content before signing check box.
-
Click the Sign button.
-
When you have successfully signed the form, you will see a section at the bottom of the form that says: Valid signature - Signed by Your Name, followed by the date and time information for when you signed the form.
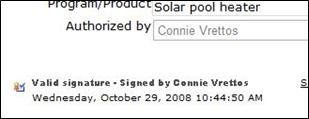
The information in the signed section is now read-only. Neither you nor anyone else can change it as long as the digital signature is attached.
If you need to make a change, you can remove your digital signature, make the change, and then sign the section again. No one else can remove your digital signature.


