
Adding a submit data connection enables a user to submit the information that they entered into the form to the specified data source after they are done. This enables you to design forms as simple as an inter-office poll that asks co-workers what their lunch preferences are for an upcoming celebration, and emails you the results, or as complex as a form that collects information for a loan application, and submits that data to a SharePoint server.
In this article
About submit data connections
When a user submits a form, that means that the user is done filling out the form. At that time, the data is submitted through a submit data connection that saves the information in an external data source, such as a SharePoint form library. This is different from the act of saving a form. For example, as the form designer, when you save a form, your progress developing the form is saved so that you can continue to work on it later, just like when saving a Word document. Likewise, when a user is filling out a form, they can save the form in order to save their progress filling out the form in order to be able to return to the form later. Even if a user has saved a form, when they are done filling it out they will still need to submit it.
When you design a new form that is based on a Web service or SharePoint list, that initial data connection becomes the default primary submit data connection for the form. InfoPath mirrors the structure the primary data connection’s data fields so that you can set the values that they contain when you submit the form. You can also start a form from scratch and add a submit data connection to a form template that is not based on a data connection, or even add an additional data connection when there is already a submit data connection in place.
While most forms are configured to have one submit data connection and submit all of the data in the form to it, having multiple submit data connections enables you to control which fields are submitted to which data source by using rules or custom code. For example, you can configure your form to allow your users to submit their completed forms to a Web service as well as through an e-mail message.
Forms are submitted based on rules that you specify. You can add the submit rule to a button, so that a form is submitted when the user clicks submit, or you can base it on some other event that occurs while the user fills out the form:
For more information regarding action rules and the submit data action, see Add rules for performing other actions.
Submit data connection types
You can create the following types of submit data connections:
Note: To add a submit data connection that submits data to a remote source of data, you will need the location of the data source and access rights to it from the administrator.
-
Web service (SOAP) The Web service submit data connection submits to a SOAP (Simple Object Access Protocol) web service. SOAP is a communication protocol that defines the XML messages that are used to communicate with a Web service. When you submit data via a Web service connection, InfoPath determines what data is required by the Web service and, based on that information, you can specify what fields in the form should submit their data to the Web service.
-
SharePoint library connection This option enables an InfoPath form to submit data as a document to a SharePoint document library.
-
Email message This enables InfoPath to submit form responses in an e-mail message. This is useful for small-scale form deployments, where a large response will not overwhelm the user responsible for receiving the form responses.
-
Hosting environment, such as ASP.NET page or hosting application This is an advanced submit option that does not actually submit data, but raises an event in the application or ASP .NET page that is hosting the form. This is used when building a Windows application in Visual Studio that uses the FormControl class to host forms, or when creating an ASP .NET page that that hosts the form using the XMLFormView class. This submit type is also used when creating a form tool for SharePoint Workspace.
-
Web server (HTTP) The Web server (HTTP) option can be accessed on the Data tab, in the Submit Form group, by clicking Submit Options. This enables you to create a data connection that sends the entire form as the body of an HTTP POST to the indicated URL. The destination URL can be an application on a Web server, such as an ASP.NET application, a CGI script, or an application that uses ISAPI.
Note: A form can have only one data connection that submits data to an application on a Web server.
Add a connection to submit external data
There are two ways to add a submit data connection, as follows:
-
On the Data tab, in the Submit form group, click the corresponding button to the type of data source that you wish to add.
-
On the Data tab, in the Get External Data group, click Data Connections, and then do the following:
-
Click Add.
-
Click Submit data.
-
Click Next.
-
Click the desired data source, and then click Next again.
Regardless of which method you use to begin adding a submit data connection, afterward, proceed with the appropriate option, as follows.
When configuring a submit data connection, you can often use functions and formulas. For more information regarding functions and formulas in InfoPath, see Add Formulas and Functions in InfoPath 2010.
-
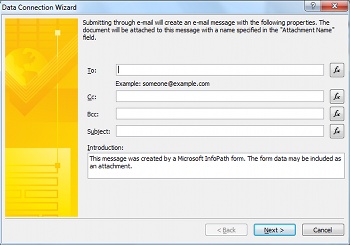
Enter the email address or addresses that the form will be sent to in the To box.
-
If the form will be carbon copied or blind carbon copied to anyone else, enter the desired email addresses in the Cc and Bcc boxes.
-
Enter the subject for the form response in the Subject box.
-
Enter the introduction that the form recipient will see in the Introduction box.
-
Click Next.
-
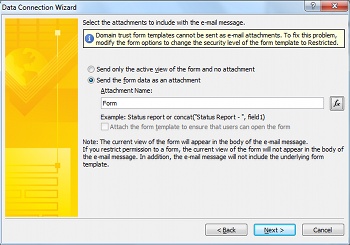
Select how you want the form to be sent after the user is done filling it out:
-
If you want to send only a snapshot of the current view of the form in the body of the email, click Send only the active view of the form and no attachment.
Note: The form cannot be filled out or interacted with by the recipient(s), it is just a snapshot of the current form view at the time of submission.
-
If you want to send the entire form as an attachment, including both the current view and any additional views, so that recipients can fill out the form, select Send the form as an attachment, and enter a name for the attachment in the Attachment Name box.
-
-
Click Next.
-
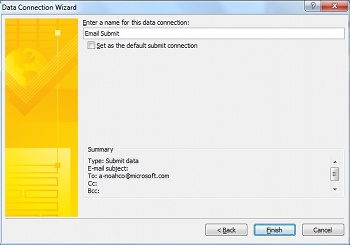
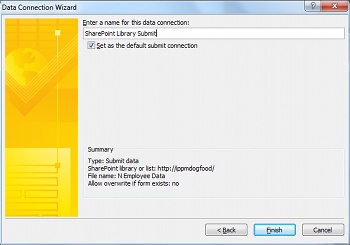
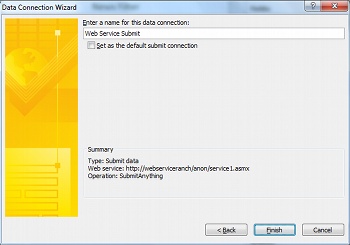
Enter a name for the data connection and indicate whether or not this should be the default submit connection.
SharePoint Library
Note: You cannot add a connection to submit data to a SharePoint list to an existing form. To create such a connection, you have to start from within SharePoint by customizing a SharePoint list, or by creating a new form using the SharePoint List template. For information regarding customizing a SharePoint list form, see Customize a SharePoint list form.
-
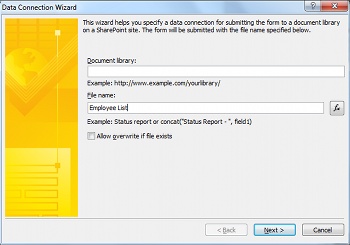
Enter the location of the SharePoint server in the Document library box.
-
Enter a name for the form in the File name box, indicate if InfoPath should overwrite the form if one with the same name already exists, and then click Next.
For information regarding how to use functions and formulas in the name of the form, see Add Formulas and Functions in InfoPath 2010.
-
Enter a name for the data connection in the box, and then select the Set as the default submit connection check box if this will be the default submit data connection.
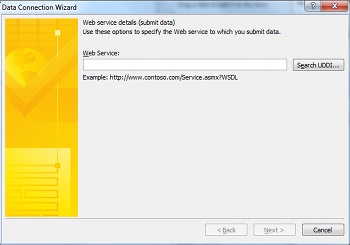
Web service (SOAP)
-
Enter the URL of the web server that is hosting the SOAP connection, or click Search UDDI to search for the server connection, and then click Next.
-
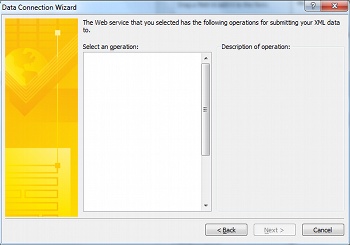
Select the web service that you wish to submit data to.
-
Click Next.
-
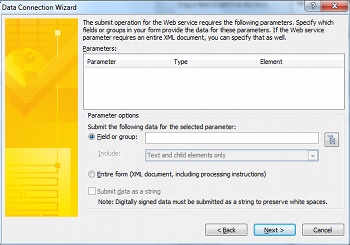
For each of the parameters, select the fields or groups that will be associated with it by clicking Field or group, and then Modify, or click Entire form to include all of the data in the form.
-
Click Next.
-
Enter a name for the data connection in the box, and then select the Set as the default submit connection check box if this will be the default submit data connection.
Hosting environment, such as an ASP.NET page or a hosting application
This is an advanced programming option that requires the use of custom code and, as a result, is not covered here. Refer to the following links for information regarding some of the related classes and commands.
-
For information regarding the SubmitToHostConnection class, see SubmitToHostConnection Class.
-
For information regarding the FormControl class, see FormControl Class.
-
For information regarding the XMLFormView class, see XmlFormView Class.
SharePoint connection library
A SharePoint data connection library is a library that can contain data connection files that store the settings used to connect to external sources of data. The data connection files that are contained in a SharePoint connection library can describe either a Web service connection or a SharePoint library connection, and can be used in both Filler and browser-compatible form templates. The following are some of the benefits to using a SharePoint data connection library:
-
Multiple forms can use the same data connection file, so there is no need to create the same data connection from scratch for each form.
-
If the location or connection settings for an external data source change, you need to update only the data connection file, not each form.
-
The data connection file can contain alternative authentication information that can be used by the server when a user fills out a form by using a browser.
-
Forms that are filled out in a browser without a full trust security level can connect to a computer in another domain if all of the data connections in the form use data connection files.
For more information about universal data connections, see Universal Data Connection v2.0 Reference and Schema.
Create and submit data to a connection defined in a SharePoint data connection library
Do the following to create a data connection file on the server, if one does not already exist:
Note: InfoPath cannot create a data connection file for an e-mail or hosting environment connection.
-
Follow the steps outlined in Add a connection to receive external data to add the type of data connection that you want to create a data connection file for.
-
On the Data tab, in the Get External Data group, click Data Connections.
-
Select the desired data connection, and then click Convert to Connection File.
-
Enter the URL of the data connection library and append the file name to the end of it in the text box, or click Browse to browse to the desired location and enter a file name, and then click Save.
Note: You need to enter the full URL to the data connection library, as well as the file. For example, http://department/site/dataconnectionlibrary/file.udcx, where http://department/site/dataconnectionlibrary is the URL of the data connection library, and file.udcx is the file name of the new data connection file that is to be created. If this file already exists on the server then creating another one with the same name will overwrite the copy on the server.
-
Click OK.
-
Click Close.
-
Browse to the SharePoint data connection library and, if necessary, Check In and Approve the UDC file created.
Do the following to add a data connection via a SharePoint data connection file:
-
On the Data tab, in the Submit Form group, click To Other Locations, and then click To SharePoint Server Connection.
-
Select the desired server from the Site drop-down.
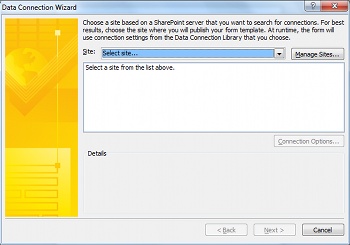
-
Select the desired data connection file.
-
Click Next.
-
Follow the steps for the selected option, as shown in Add a connection to receive external data.
If the SharePoint site you want is not in the list, do the following to add it to the list:
-
Click Manage Sites.
-
Click Add.
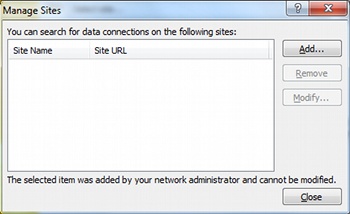
-
Enter the URL of the SharePoint site in the URL box and a name in the Display name box.

Configure submit options
When you add a submit data connection, InfoPath will configure the form to be submitted through the default data connection. You can configure these options on the Submit Options dialog box. To open the Submit Options dialog box, on the Data tab, in the Submit Form group, click Submit Options.
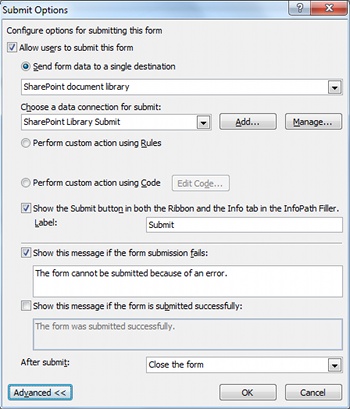
From the Submit Options screen, you can configure the submit options of the form in the following ways:
-
Enable or disable users ability to submit the form.
-
Select the way in which the form is submitted, either to a single destination, through rules, or by using custom code.
By using rules or custom code, you can configure the form to submit data via multiple data connections when users click Submit. For example, if you are designing an expense report form, you could submit the form to one SharePoint document library if the amount is under $1,000, or have it submitted to a different SharePoint document library for forms that require greater scrutiny if the amount is $1,000 or more, and flag it by e-mailing it to the user’s manager.
-
Add or remove a Submit button from the Ribbon and Info tab in InfoPath Filler.
-
Create custom messages to display to your users when they submit their forms.
-
Specify whether to leave the form open, close the form, or open another blank form after the form is submitted.
Do the following, as desired, to configure the submit options:
-
To allow users to submit the form, make sure the Allow users to submit this form box is selected.
-
To indicate how the form will be submitted, do the following:
-
If there is only one submit data connection that the form will use to submit data, and no advanced features are necessary, click Send form data to a single destination, and configure it as follows:
-
Select the type of connection that will be used from the top drop-down list.
-
Select the individual data connection from the Choose a data connection for submit list.
If the data connection does not exist, click Add and refer to Add a connection to receive external data for instructions to setup the connection.
-
-
If there are multiple submit data connections, or you want to add rules to control the submit action, click Perform custom action using Rules. For more information regarding how to setup action rules, see Add rules for performing other actions.
-
If there is a need for complex code, multiple data connections, or partial submissions that cannot be achieved by rules, click Perform custom action using Code.
-
-
To change the label that appears on the Submit button on the ribbon, enter the desired text in the Label box. Or, to disable the Submit button entirely, uncheck the preceding checkbox.
-
To set a submission failure message, click Advanced, select the Show this message if the form submission fails box, and then enter the desired message in the following text box.
-
To set a submission success message, click Advanced, select the Show this message if the form is submitted successfully box, and then enter the desired message in the following text box.
-
To control the action that is performed after submitting the form, select the desired action from the After submit list.


