Add and request read receipts and delivery notifications in Outlook
A delivery receipt confirms delivery of your email message to the recipient's mailbox, but not that the recipient has seen it or read it. A read receipt confirms that your message was opened.
In Outlook, the message recipient can decline to send read receipts. There are other scenarios where read receipts are not sent, such as if the recipient's email program doesn’t support read receipts. There is no way to force a recipient to send a read receipt.
Select a tab option below for the version of Outlook you're using. What version of Outlook do I have?
Note: If the steps under this New Outlook tab don't work, you may not be using new Outlook for Windows yet. Select the Classic Outlook tab and follow those steps instead.
How to request a read receipt and/or delivery receipt
-
In a message you're composing, go to the Options tab on the ribbon.
-
In Tracking on the ribbon, select the Request a Delivery Receipt box and/or the Request a Read Receipt box.
If you don't see these choices under Options, select More Options at the right end of the ribbon, then select the option you want.
Choose how to respond to requests for read receipts
To choose how new Outlook responds to read receipt requests:
-
Select Settings

-
Under Read receipts, choose how to respond to requests for read receipts.
-
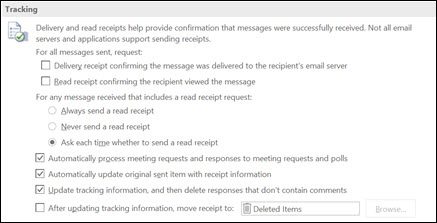
On the File menu, select Options > Mail.
-
Under Tracking, select the Delivery receipt confirming the message was delivered to the recipient's e-mail server or Read receipt confirming the recipient viewed the message check box.

Tip: As a best practice, consider tracking only single messages of importance instead of all messages. Recipients who occasionally receive a notification that a read receipt is requested on your message are more likely to send a read receipt than if they are prompted every time that they receive a message from you.
-
Click OK to apply your changes.
Track a single message
-
In a new email message, on the Options menu, in the Tracking group, select the Request a Delivery Receipt check box or the Request a Read Receipt check box:

-
Compose your email and click Send.
If you're using the Reading pane
To request a receipt when you're writing email in the Reading pane, do the following.
-
On the ribbon, select the Message tab.
-
In the Tags, group, select

-
In the Properties dialog box, under Voting and Tracking options, select the kind of receipt you want for this message.
Track receipt responses
-
Open the original message that you sent with a request for a delivery or read receipt. This message is usually located in the Sent Items folder.
-
On the Message tab, in the Show group, choose Tracking.
Note: Tracking doesn’t appear until at least one receipt has been received. After you receive the first receipt in your Inbox, it might take several minutes before the Tracking button is available.
Note: Outlook on the web is the web version of Outlook for business users with a work or school account.
How to request a read receipt and/or delivery receipt
-
In a message you're composing, go to the Options tab on the ribbon.
-
In Tracking on the ribbon, select the Request a Delivery Receipt box and/or the Request a Read Receipt box.
If you don't see these choices under Options, select More Options at the right end of the ribbon, then select the option you want.
Choose how to respond to requests for read receipts
To choose how Outlook on the web responds to read receipt requests:
-
Select Settings

-
Under Read receipts, choose how to respond to requests for read receipts.
Note: Outlook.com is the web version of Outlook for users signing in with a personal Microsoft account such as an Outlook.com or Hotmail.com account.
How to request a read and/or delivery receipt
You can't request a read receipt in Outlook.com, but you can request read receipts for Outlook.com messages sent using Outlook for Windows. To learn how, select the New Outlook tab or the Classic Outlook tab.
Choose how to respond to requests for read receipts
-
Select Settings

-
Under Read receipts, choose how to respond to requests for read receipts.
Still need help?
|
|
To get support in Outlook.com, click here or select Help on the menu bar and enter your query. If the self-help doesn't solve your problem, scroll down to Still need help? and select Yes. To contact us in Outlook.com, you'll need to sign in. If you can't sign in, click here. |
|
|
|
For other help with your Microsoft account and subscriptions, visit Account & Billing Help. |
|
|
|
To get help and troubleshoot other Microsoft products and services, enter your problem here. |
|
|
|
Post questions, follow discussions and share your knowledge in the Outlook.com Community. |
Related articles
Request a read receipt or delivery notification in Outlook for Mac


