
A .gif file can be either a still image or an animated image. If you have animated GIF, this article describes how to insert it on a slide.
If you have a GIF that is a still image, it can't be turned into an animated GIF.
You can add an animated GIF (or meme) to a PowerPoint slide as you would with any other picture file.
You can insert a GIF file that is stored on your computer hard disk or in OneDrive.
-
Select the slide that you want to add the animated GIF to.
-
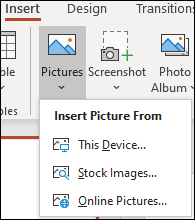
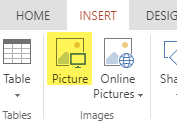
In the Insert tab of the ribbon, click Pictures.
-
In the Insert Picture From dialog box, navigate to the location of the animated GIF you want to add.
-
Select the file, and then click Insert.
-
To play the animation, select the Slide Show tab on the ribbon, and then, in the Start Slide Show group, select From Current Slide

Find animated GIFs on the web
You can also search the web for GIFs by using Insert Online Pictures or Insert Clip Art, depending on your version of PowerPoint. On the Insert tab of the ribbon, choose Insert Online Pictures or Insert Clip Art. Type "animated gif" in the search box.
Determine how many times the animation loops
Animated GIFs often loop repeatedly without end. But you can change that by editing the GIF before you add it to your PowerPoint slide.
Once you have the GIF file saved to your computer, a relatively easy way to edit the GIF is with the online editor called ezgif.com.
-
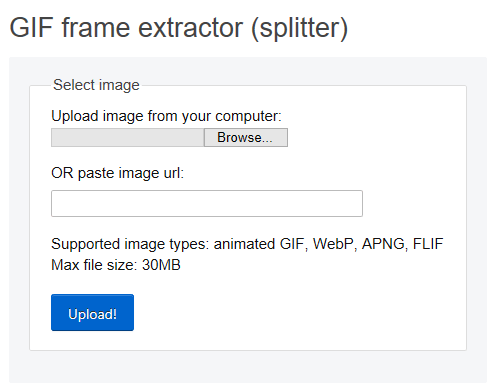
Go to the GIF frame extractor (or "Splitter") on ezgif.com.
-
Under Upload image from your computer, click the Browse button to locate the GIF file on your computer. Select the file and then select the Open button.
-
Click Upload!
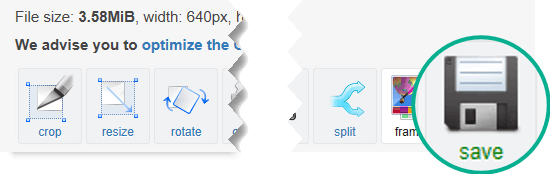
The animated GIF appears on the web page, followed by facts about the file size and dimensions, similar to this picture:
-
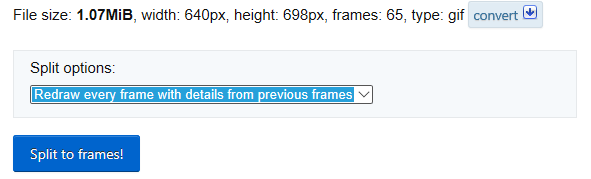
Click the Split to frames button below the animated GIF.
After a moment, a frame-by-frame breakdown is shown on the web page.
Below the many frames (scroll downward on the page as needed), there's a blue Edit animation button.
-
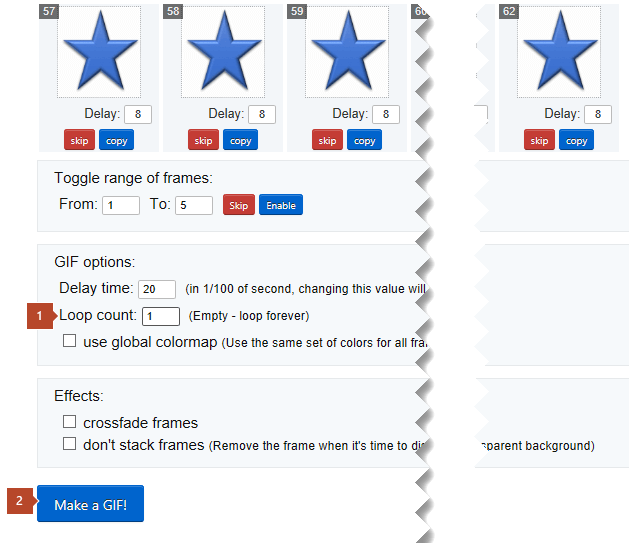
Click Edit animation.

The set of frames appears again, with a Skip, Copy, and Delay option for each frame. Below the frames are more options, including one for Loop Count.
-
Under GIF options, in the Loop Count box, type a numeral representing the number of times you want the GIF to play.
-
Click Make a GIF!
-
After a few moments, the revised GIF is shown below the Make a GIF! button. Below the revised GIF is a row of buttons, and the far right one is named save.
-
Click save to copy the revised GIF back to your computer.
Depending on your browser, the file will be saved to your Downloads folder or you'll be allowed to specify where you want the GIF file to be copied to on your computer.

With the revised GIF on your computer, you're ready to insert it on a slide in PowerPoint.
See Also
You can add an animated GIF to a PowerPoint slide as you would with any other picture file. You can insert a GIF file that is stored on your computer hard disk or in cloud storage (such as OneDrive).
-
Select the slide that you want to add the animated GIF to.
-
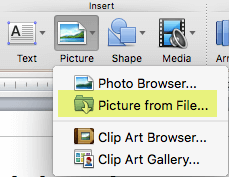
On Home tab of the ribbon, under Insert, click Picture > Picture from File.
-
Navigate to the location of the animated GIF you want to add, make sure the file name ends with a .gif extension, select the file, and then click Insert.
-
To play the animation, select the Slide Show menu and then select Play from Current Slide.
Determine how many times the animation loops
Animated GIFs often loop repeatedly without end. But you can change that by editing the GIF before you add it to your PowerPoint slide.
Once you have the GIF file saved to your computer, a relatively easy way to edit the GIF is with the online editor called ezgif.com.
-
Go to the GIF frame extractor (or "Splitter") on ezgif.com.
-
Under Upload image from your computer, click the Browse button to locate the GIF file on your computer. Select the file and then select the Open button.
-
Click Upload!
The animated GIF appears on the web page, followed by facts about the file size and dimensions, similar to this picture:
-
Click the Split to frames button below the animated GIF.
After a moment, a frame-by-frame breakdown is shown on the web page.
Below the many frames (scroll downward on the page as needed), there's a blue Edit animation button.
-
Click Edit animation.
The set of frames appears again, with a Skip, Copy, and Delay option for each frame. Below the frames are more options, including one for Loop Count.
-
Under GIF options, in the Loop Count box, type a numeral representing the number of times you want the GIF to play.
-
Click Make a GIF!
-
After a few moments, the revised GIF is shown below the Make a GIF! button. Below the revised GIF is a row of buttons, and the far right one is named save.
-
Click save to copy the revised GIF back to your computer.
Depending on your browser, the file will be saved to your Downloads folder or you'll be allowed to specify where you want the GIF file to be copied to on your computer.
With the revised GIF on your computer, you're ready to insert it on a slide in PowerPoint.
See Also
You can add an animated GIF to a slide by using PowerPoint for the web, just as you would with any other picture file, but the GIF won't play when the presentation is viewed in Slide Show. PowerPoint for the web can't play animated GIFs.
If playing GIFs is a feature you'd like to see in PowerPoint for the web, we encourage you to suggest features by clicking Help > Feedback > I have a suggestion.
Insert a picture from your computer on a slide
-
Select the slide where you want to insert an image.
-
On the Insert tab, select Picture.
-
Browse to the picture you want to insert, select it, and then click Open.
After the picture is on your slide, you can resize it and move it wherever you want.


