
With Microsoft SharePoint Designer 2010, you can connect to a variety of databases, including Microsoft SQL Server, Oracle, and other databases that are accessible by using the OLE DB protocol. By default, your Microsoft SharePoint site does not contain any database connections. To access a database, someone who has sufficient permissions must create the connection.
This article shows you how to create a connection to a database. It also shows you how to create custom Structured Query Language (SQL) commands and how to modify the data source properties of an existing database connection in the Data Sources list.
Important: The Single-Sign On option is a discontinued feature in SharePoint Designer 2010 and therefore should not be used to connect to a database. For more information, see the See Also section.
In this article
Before you begin
There are a few things that you need to know before you can connect to a database. You need to know whether the site you are working on is a Microsoft SharePoint Foundation site or a Microsoft SharePoint Server 2010 site, the name of the server where your database is located, the data provider that you use to access your database, and the kind of authentication that you want to use. If you are using a custom connection string to connect to your database, you also need to know that connection string. For assistance, contact your server administrator.
What kind of database do I have?
With SharePoint Designer 2010, you can quickly connect to any database that resides on Microsoft SQL Server 2000 and later versions (SQL Server 2005 and SQL Server 2008), or to any data source that uses the OLE DB protocol. If you know the connection string, you can also quickly connect to an Oracle database.
What data provider do I want to use?
With SharePoint Designer 2010, you can connect to a database by using any of three different data providers. These data providers are not mutually exclusive. For example, Microsoft SQL Server 2000 and the later versions are OLE DB compliant and can be accessed by using the Microsoft .NET Framework Data Provider for OLE DB. However, the Microsoft .NET Framework Data Provider for SQL Server is specifically designed to work with Microsoft SQL Server 2000 and the later versions and may be the best choice if your database resides on either of these two server products.
Data providers are the software components that allow the client — in this case SharePoint Designer 2010 — to communicate with the database. Originally, each database management system was unique, and each had its own programming language for accessing and updating data. ODBC was one of the first attempts to standardize access to a variety of diverse database management systems. Data Views do not support ODBC providers. OLE DB was introduced after ODBC to provide more flexible access to databases. Many ODBC-compliant databases are also OLE DB compliant.
For more information about which data provider to use, see the following chart.
|
If you are connecting to a database that is… |
Use… |
|
Microsoft SQL Server 2000, Microsoft SQL Server 2005, or Microsoft SQL Server 2008 |
Microsoft .NET Framework Data Provider for SQL Server |
|
OLE DB-compatible |
Microsoft .NET Framework Data Provider for OLE DB |
|
Oracle |
Microsoft .NET Framework Data Provider for Oracle |
|
ODBC-compatible |
Microsoft .NET Framework Data Provider for ODBC Note Data Views do not support ODBC providers for database connections to any type of database, including MySQL. In the Configure Database Connection dialog box, you should disregard the option for using an ODBC provider. |
What authentication method do I want to use?
You can either connect to a database with a user name and password or by using a custom connection string.
The authentication method that you want will be defined in part by the type of server that you are using and the data provider that you are using. For more information about which authentication method to use, see the following chart.
|
If your site is located on a server running ... |
And your data provider is ... |
See the section ... |
|
Microsoft SharePoint Foundation 2010
Office SharePoint Server 2010 |
Microsoft .NET Framework Data Provider for SQL Server |
|
|
Microsoft SharePoint Foundation 2010
Office SharePoint Server 2010 |
Microsoft .NET Framework Data Provider for Oracle |
Connect to a database by saving the user name and password
When you connect to a database by saving the user name and password, SharePoint Designer 2010 generates a SQL-based connection string that stores the user name and password in the data source connection (a process known as SQL authentication). If your site is located on a server running Microsoft SharePoint Foundation 2010, this is the preferred option for generating a connection string.
You can also create a database connection by using a custom connection string. For more information, see the later section Connect to a database by using a custom connection string.
-
Click Data Sources in the Navigation Pane.
-
On the Data Sources tab in the ribbon, in the New group, click Database Connection.
-
In the Data Source Properties dialog box, on the Source tab, click Configure Database Connection.
-
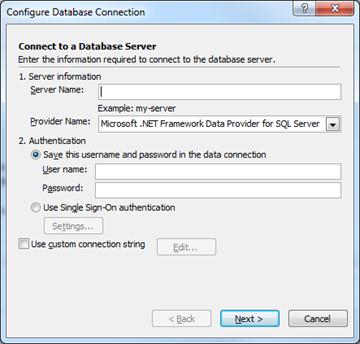
In the Configure Database Connection dialog box, under Server Information, in the Server Name box, type the name of the server where your database resides.
-
In the Provider Name box, do one of the following:
-
If you are connecting to an external Microsoft SQL Server database, click Microsoft .NET Framework Data Provider for SQL Server.
-
If you are connecting to an external database that is OLE DB compatible, including versions of SQL other than Microsoft SQL such as MySQL, click Microsoft .NET Framework Data Provider for OLE DB.
-
-
Under Authentication, click Save this username and password in the data connection.
-
In the User name box, type your user name.
-
In the Password box, type your password.
-
Click Next.
Important: Because SQL authentication saves the user name and password as text in the data connection, any user with permission to open the site in SharePoint Designer 2010 can view these credentials. A security warning informs you that the user name and password are saved as text in the data connection and that other site members can access this data source. If you want other site members to access the database by using the same user name and password, click OK. If you do not want other site members to access the database by using the same user name and password, click Cancel.
-
In the Database list, click the database that you want to use as a data source, and then do one of the following:
-
In Select a table or view, click the table or saved view that you want from the list, and then click Finish.
By using this option, you create a default query that selects all records in the table or view. However, after you click Finish, you can modify the default query by clicking Fields, Filter, and Sort in the Data Source Properties dialog box.
-
Click Specify custom Select, Update, Insert, and Delete commands using SQL or stored procedures, and then click Finish.
Note: This option is available only if your administrator has turned on the Enable Update Query Support option in SharePoint Central Administration.
By using this option, you can create custom SQL commands. When you click Finish, the Edit Custom SQL Commands dialog box opens. In this dialog box, you can create commands and add parameters. After you create a custom SQL command, you can edit the query by clicking Edit Custom Query in the Data Source Properties dialog box. For more information, see Create custom SQL commands later in this article.
-
-
In the Data Source Properties dialog box, click the General tab, type a name for the data source, and then click OK.
The new database connection now appears in the Data Sources list.
Note: If you are trying to connect to an external server running SQL Server, make sure that SQL Server authentication is enabled on that server.
Connect to a database by using a custom connection string
A connection string provides the information that an application or provider requires to communicate with a data source. A connection string usually supplies the location of the database server, the particular database to use, and the authentication information. With a custom connection string, you can specify the connection string that is used to connect to the database.
-
Click Data Sources in the Navigation Pane.
-
On the Data Connections tab, in the New group, click Database Connection.
-
In the Data Source Properties dialog box, on the Source tab, click Configure Database Connection.
-
In the Configure Database Connection dialog box, select the Use Custom connection string check box, and then click Edit.
-
In the Edit Connection String dialog box, in the Provider Name list, click the data provider that you want to use.
-
In the Connection String text box, type your connection string.
An example of an OLE DB connection string:
Provider=myProvider;Data Source=myPath;Initial Catalog=catalogName;
User Id=username;Password=password;
An example of an Oracle connection string:
Data Source=myDatabase;User Id=username;
Password=password;Integrated Security=no;
An example of a SQL Server connection string:
Data Source=myServerAddress;Initial Catalog=myDataBase;User Id=username;Password=password;
-
Click OK.
-
Click Next.
-
In the Database list, click the database that you want to use as a data source, and then do one of the following:
-
Click Select a table or view, then click the table or saved view that you want from the list, and then click Finish.
By using this option, you create a default connection to the table or view. However, after you click Finish, you can specify a query by clicking Fields, Filter, and Sort in the Data Source Properties dialog box.
-
Click Specify custom Select, Update, Insert, and Delete commands using SQL or stored procedures, and then click Finish.
Note: This option is available only if your server administrator has turned on the Enable Update Query Support option in SharePoint Central Administration.
By using this option, you can create or edit custom SQL commands. When you click Finish, the Edit Custom SQL Commands dialog box opens. In this dialog box, you can create commands and add parameters. After you create a custom SQL command, you can edit the query by clicking Edit Custom Query in the Data Source Properties dialog box. For more information, see Create custom SQL commands later in this article.
-
-
In the Data Source Properties dialog box, click the General tab, type a name for the data source, and then click OK.
The new database connection now appears in the Data Sources list.
Notes:
-
If you are trying to connect to an external server running SQL Server, make sure that SQL Server authentication is enabled on that server.
-
If you cannot use SQL Server authentication on the server that is running SQL Server, make sure that Single Sign-On authentication is enabled for the server where your SharePoint site resides.
-
Create custom SQL commands
When you click the or specify custom Select, Update, Insert, and Delete commands using SQL or stored procedures option and then click Finish in the Configure Database Connection dialog box, the Edit Custom SQL Commands dialog box opens. In this dialog box, you can create custom SQL statements to retrieve or modify the data in a database.
There are four tabs in the Edit Custom SQL Commands dialog box, each corresponding to a common SQL command. They are:
-
Select The SELECT command is used to retrieve data from a table.
-
Update The UPDATE command is used to modify data in a table.
-
Insert The INSERT INTO command is used to insert new rows into a table.
-
Delete The DELETE command is used to delete rows from a table.
The Stored Procedure list displays all of the stored procedures that are available in the database that you are connecting to.
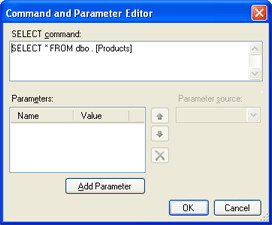
When the Edit Custom SQL Commands dialog box opens, any statement already applied to the data appears in the SQL Statement box. For example, if you create a database connection by clicking Select a table or view to select a table, and later you decide to edit the SELECT statement, you see the following statement in the SQL Statement box on the Select tab:
SELECT * FROM dbo.[your_table_name]
The asterisk in this statement is a wild-card character that means all. This SQL statement means select all of the fields for all of the records from this specific table. To edit the statement, click Edit Command to open the Command and Parameter Editor.
Edit the SQL query by typing directly in the SELECT command box.
Add SQL parameters
You can also create parameters for your SQL queries by clicking Add Parameter.
SQL parameters should be used anywhere that you might use a query string, meaning text enclosed in single quotation marks. Because using query strings in SQL statements creates a security vulnerability, SQL parameters are required in SharePoint Designer 2010 whenever you create an SQL statement that retrieves filtered data from a data source.
For example, Northwind Traders is a gourmet food distribution company. They store all of their business data in an SQL-based database. When they retrieve their entire product list from the products table, the resulting SQL query looks like this:
SELECT * FROM dbo.[Products]
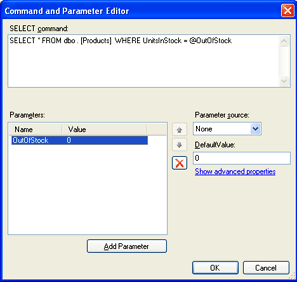
This SQL statement retrieves all of the records in the product table. Northwind wants to retrieve a filtered list that includes only the items that are out of stock. The table includes a UnitsInStock field. Using traditional SQL, the statement that would retrieve this list looks like this:
SELECT * FROM dbo.[Products] WHERE UnitsInStock = '0'
The
'0'
in this statement is a query string. This query string should be replaced by a variable. For this example, you want to create a variable called OutOfStock. The new SQL statement looks like this:
SELECT * FROM dbo.[Products] WHERE UnitsInStock = @OutOfStock
To create the SQL statement by using the OutOfStock variable in this example, perform the following procedure:
-
In the Command and Parameter Editor dialog box, in the SELECT command box, type the following string:
SELECT * FROM dbo.[Products] WHERE UnitsInStock = @OutOfStock
-
Under Parameters, click Add Parameter.
-
The variable that you want to define is OutOfStock, so in the Name column, type OutOfStock.
-
In the Parameter Source list, click None.
-
Because the value that you want to match is 0, in the DefaultValue box, type 0.
-
Click OK.
You can now see the new SQL statement in the Edit Custom SQL Commands dialog box.
-
Click OK again.
In the Data Source Properties dialog box, the Edit Custom Query button appears on the Source tab.
Modify the data source properties of an existing database connection
After you configure a database connection, you can later modify the connection at any time. For example, you might want to create a new query, modify an existing one, or create a custom SQL statement.
-
Click Data Sources in the Navigation Pane.
A list of all data source connections appears below the Navigation Pane.
-
Click a data source from the list.
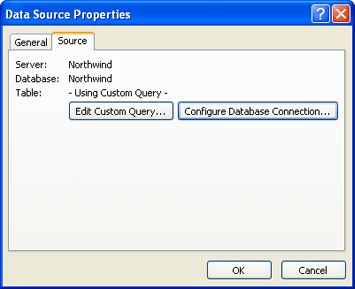
If the database connection uses a custom SQL query, the Data Source Properties dialog box looks like the one in the following illustration.
-
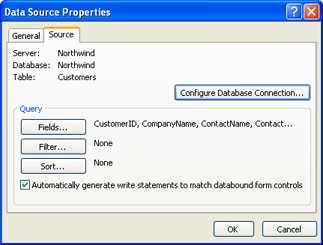
If the database connection does not use a custom SQL query, the Data Source Properties dialog box looks like the one in the following illustration.
-
In the Data Source Properties dialog box, do any of the following:
-
If there is a Query area with buttons, click those buttons to add or remove fields or to create or modify a filter or sort order.
-
If there is a Query area with buttons, click Configure Database Connection to apply a custom SQL query to the connection. After you click Configure Database Connection, click Next.
Important: Because SQL authentication saves the user name and password as text in the data connection, any user with permission to open the site in SharePoint Designer 2010 can view these credentials. A security warning informs you that the user name and password are saved as text in the data connection and that other site members can access this data source. If you want other site members to access the database by using the same user name and password, click OK. If you do not want other site members to access the database by using the same user name and password, click Cancel.
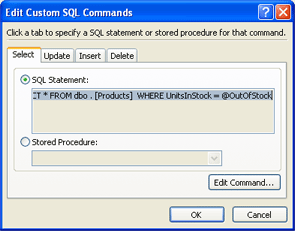
In the Configure Database Connection dialog box, click Specify custom Select, Update, Insert, and Delete commands using SQL or stored procedures, and then click Finish.
The Edit Custom SQL Commands dialog box opens. In this dialog box, you can create your custom SQL statement. For more information, see Create custom SQL commands earlier in this article.
-
If there is an Edit Custom Query button, click it to open the Edit Custom SQL Commands dialog box, where you can add, modify, or delete custom SQL statements.
-


