
In Access, a Yes/No field stores only two values: Yes or No. If you use a text box to display a Yes/No field, the value displays as -1 for Yes and 0 for No. These values are not very meaningful for most users, so Access provides check boxes, option buttons, and toggle buttons that you can use to display and enter Yes/No values. These controls provide a graphic representation of the Yes/No value that is both easy to use and easy to read.
This article describes the applications for each of these controls, and tells you how to add them to your forms and reports.
What do you want to do?
Decide which control to use
For most situations, a check box is the best control for representing a Yes/No value. This is the default type of control that is created when you add a Yes/No field to a form or report. By contrast, option buttons and toggle buttons are most often used as part of an option group. For more information about option groups, see the section Understand option groups.
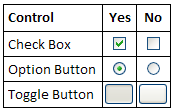
The following illustration shows the three controls and how they represent Yes and No values. The Yes column shows the control as it appears when selected, and the No column shows the control as it appears when cleared.
Create a bound check box, option button, or toggle button
You can quickly create a check box by dragging a Yes/No field from the Field List pane to the form or report.
-
Open the form or report in Layout view or Design view by right-clicking it in the Navigation Pane, and then clicking the view you want on the shortcut menu.
-
If the Field List pane is not already displayed, press ALT+F8 to display it.
-
Expand the table lists, if needed by clicking the plus signs (+) next to the table names.
-
Drag the Yes/No field from the Field List pane to the form or report.
Depending on the setting of the field's Display Control property, a check box, a text box, or a combo box is created and bound to the field. When you create a new Yes/No field in a table, the default setting of the field's Display Control property is Check Box.
If you want, you can change the check box control to an option button or a toggle button. To do this, right-click the check box, point to Change To on the shortcut menu, and then click Toggle Button 

Create an unbound check box, option button, or toggle button
You can use an unbound check box, option button, or toggle button in a custom dialog box to accept user input and then carry out an action based on that input.
-
Open the form or report in Design view by right-clicking it in the Navigation Pane, and then clicking Design View on the shortcut menu.
-
On the Design tab, in the Controls group, click the tool for the control you want (Check Box

-
Click on the form or report where you want to place the control.
Access places the control on the form or report.
Although it is not required, you might want to rename the control so that it has a more meaningful name. Doing so does not change the label displayed next to the control, but it can make it easier to refer to it in expressions or macros.
Rename the control
-
Ensure that the control is selected.
-
If the property sheet is not already displayed, press F4 to display it.
-
Type a new name in the Name property box of the control.
If you want, you can change the check box to an option button or a toggle button. To do this, right-click the check box, point to Change To on the shortcut menu, and then click Toggle Button
Understand option groups
An individual check box, option button or toggle button can be bound or unbound, or it can be part of an option group. An option group displays a limited set of alternatives, and only one option in an option group can be selected at a time. An option group consists of a group frame and a set of check boxes, toggle buttons, or option buttons.
If an option group is bound to a field, only the group frame itself is bound to the field, not the controls contained inside the frame. Instead of setting the Control Source property for each control in the option group, you set the Option Value property of each control to a number that is meaningful for the field to which the group frame is bound. When you select an option in an option group, Access sets the value of the field to which the option group is bound to the value of the selected option's Option Value property.
The value of an option group can only be a number, not text. Access stores this number in the underlying table. An option group can also be set to an expression, or it can be unbound. You can use an unbound option group in a custom dialog box to accept user input and then carry out an action based on that input.
It is a standard practice to use check boxes for Yes/No fields and option buttons or toggle buttons for option groups. However, this is only a suggestion, and you can use any of the three controls for either purpose.
Create an option group
You can quickly create an option group by using the Option Group Wizard. Before you begin, decide whether you want the option value to be stored in a table. If so, you must have a field of the Number data type designated for this purpose.
For more information about adding a field to a table, see the article Create a table and add fields.
-
Open the form in Design view by right-clicking it in the Navigation Pane, and then clicking Design View

-
On the Design tab, in the Controls group, ensure that Use Control Wizards


-
In the same group, click Option Group

-
Click on the form where you want to place the option group.
-
Follow the instructions in the wizard. On the last page, click Finish.
Access places the option group on the form.
Rename the option group Although it is not required, you might want to rename the option group so that it has a more meaningful name. Doing so does not change the label displayed next to the option group, but it can make it easier to refer to the control in expressions or macros.
-
Ensure that the option group is selected by clicking the frame of the group.
-
If the property sheet is not already displayed, press F4 to display it.
-
Type a new name in the Name property box of the option group.
Add a new option to an existing option group
You can add new option controls to an option group as your needs change. You can either create a new control in the group, or you can cut an existing control from elsewhere on the form and paste it into the group.
-
Open the form in Design view by right-clicking it in the Navigation Pane, and then clicking Design View
-
Click on the frame of the option group to select it, and then drag the frame's sizing handles to make room for the new option control.
-
Do one of the following:
-
Create a new control in the group
-
On the Design tab, in the Controls group, click the tool for the type of control you want to add (Check Box
-
Move the pointer so that it is positioned inside the frame of the option group. The frame changes color to indicate that the new control will become part of the option group.
-
Click to place the control in the group.
-
-
Move an existing control to the group
Simply dragging a control to an option group does not make it part of the group. You must cut and paste the control into the group for it to become an option.
-
Select the control that you want to move into the option group.
-
On the Home tab, in the Clipboard group, click Cut.

-
Select the option group by clicking the frame that surrounds the group.
-
On the Home tab, in the Clipboard group, click Paste.

Access adds the control to the group.
-
-
-
You will probably need to move the control and its label so that they line up with the existing controls and labels.
-
Select the newly-added control, and then press F4 to open the property sheet for the control.
-
Note the value of the Option Value property of the newly-added control. Depending on your needs, you can leave it at the value Access suggests, or you can change it to a different value.


