
Skype for Business helps you stay connected to the people who are important to you via instant messaging, email, audio and video calls, persistent chat rooms, and online meetings and presentations. This article takes you through some basic Skype for Business tasks to get you started.
Find and add a contact
-
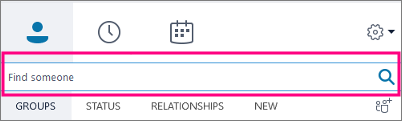
In the search box on the Contacts view of the Skype for Business main window, type a name, IM address, or desk phone number (if they are in your organization). As you type, search results will start appearing below the search box and the tabs will change from Groups, Status, Relationships, and New:
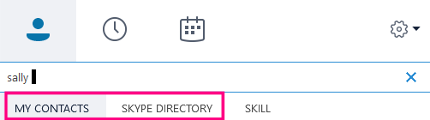
to My Contacts and Skype Directory:
-
If the person you are searching for is in your organization, keep the My Contacts tab selected (that's the default). When My Contacts is selected, Skype for Business searches in your organization's address book.
If the person you are searching for is not in your organization but you know they have a Skype account, click the Skype Directory tab to search for them among the millions of Skype users out there. Knowing their Skype user name and location helps narrow the search quickly.
-
When you see the listing for the person you want to add, point at their picture (or picture display area).
If they are in your organization (My Contacts), and you want to add them to one of your groups, click the More Options button, and then choose either Add to Contacts List (then select one of your groups) or Add to Favorites.
If they are a Skype user, and you want to add them to one of your groups, click the Add to contacts button, then choose one of your groups or the favorites group to add them.
Note: Some people might have an organization account and a Skype account. So if you work with someone and are also friends with them, you may want to add both of their identities to your contacts.
Send an instant message (IM)
-
Find the person you want to send an instant message to. Do one of the following:
-
Hover over their picture in the Contacts list and click the IM button.

-
Double-click anywhere on their contact listing.
-
Right-click their listing and select Send an IM.
-
-
Type your message at bottom of the conversation window.
-
(Optional) To send a file or image, do one of the following:
-
Drag-and-drop a saved file into the text input area.
-
Copy and paste a saved file or any image from an Office program into the text input area.
-
Press PrtScn on your keyboard to capture an image directly from your screen, and then paste it into the text input area.
-
-
Press Enter on your keyboard to send the message.
-
(Optional) Add other people to the conversation by dragging their contact listing from your Contacts list into the conversation window.
Check your audio device
-
In the Skype for Business main window, go to Tools > Options > Audio Device, and then choose the device you want.
-
Click the green arrow next to Speaker to hear a sample tone, and drag the slider if you need to adjust the volume.
-
To test your mic volume, speak for a few seconds. The volume is optimal when the progress bar reaches the middle of the test area. Drag the slider next to Microphone to adjust the mic volume.
-
Click the green arrow button next to Ringer to hear a sample ring when you get a call, and drag the slider to adjust the ringer volume.
-
Click Check Call Quality and follow the prompts to record a short message and play it back. Adjust audio as needed. Note that this option may not be available for your account.
-
If you have more than one audio device, you can choose to set both to ring when you get a call. Under Secondary Ringer, select Also ring, and then select an additional device.
You can also select Unmute when my phone rings, which will automatically unmute your speakers when you receive a Skype for Business call.
-
Select Allow stereo audio playback when available to make sure that the best audio quality is available during a meeting.
-
Click OK when you’re done.
Tip: You can select different devices for microphone and speakers under each section. But to avoid echoing, it's better to use the same device for both. If you have to use separate devices, minimize echoing by lowering your speaker's volume.
If you don’t see your device in the list, make sure it’s connected directly to your computer and follow the instructions that came with the device to install it.
Make a call
-
Pause on the contact listing for the person you want to call.
-
Click the Phone icon to call the contact.
–or–
Click the arrow next to the Phone icon and select another number.
Call someone using the dial pad
-
In the Skype for Business main window, click the Phone tab.
-
Click the numbers on the dial pad or type the number in the search box.
-
Click Call.
Answer a call
When someone calls you, an alert pops up on your screen.
Do one of the following:
-
To answer the call, click anywhere on the photo area.
-
Click Ignore to reject the call and send to Voice Mail.
-
Click Options to take other actions:
-
Send the call to Voice Mail.
-
To redirect the call click Mobile or Home.
-
Reply by IM instead of audio or video
-
Set to Do not Disturb to reject the call and avoid other calls.
-
If you get a video call, but want to answer with audio only, click Answer With Audio Only.
-
Share your desktop or a program
Skype for Business lets you share information on your computer in several ways:
-
Click the Share Content button

-
Share your Desktop to share the content on your desktop.
-
Share a Window, and then select the specific window or document you want to share.
-
Share PowerPoint Files to share a PowerPoint file.
-
-
Your Skype for Business status changes to Presenting, and you won’t receive instant messages or calls.
-
Use the sharing toolbar at the top of the screen to stop sharing, or give control to participants.


