
A publishing approval workflow is similar to other SharePoint workflows in that it automates the routing of content to subject matter experts and stakeholders for review and approval. What makes the publishing approval workflow unique is that it’s designed specifically for publishing sites where the publishing of new and updated web pages is tightly controlled. In these kinds of sites, no new content can be published until it has been approved by every approver in the workflow.
This article assumes you already have a publishing site in place. That site should be based on the Publishing Site with Workflow site template. If you need more information about building publishing sites, see Build a SharePoint publishing site.
Note: This article only applies to the SharePoint 2010 workflow platform. For more information on the two SharePoint workflow platforms, see The two SharePoint workflow platforms.
In this article
Use a publishing approval workflow
The publishing approval workflow is enabled by default when you create a publishing site. The workflow automatically routes web pages, assigns review tasks and tracks their progress, and sends reminders and notifications to approvers when necessary. You can monitor and adjust workflow activity from a central status page where the history of workflow events is maintained for 60 days after completion.
If you’ve used other approval workflows for lists, libraries or content types, you might be familiar with the association and initiation forms that enable you to assign approvers and determine how to handle content changes and rejections within the workflow. In a publishing approval workflow, these options are not available. The approvers are controlled by the Approvers group, and only members of that group will be able to participate in the approval process. You can edit the Approvers group to add or remove members but must have Site Owner permissions in order to do so.
Submit a page for approval
-
Navigate to the page on your publishing site that you want to submit for approval.
-
On the Publish tab, click Submit.
-
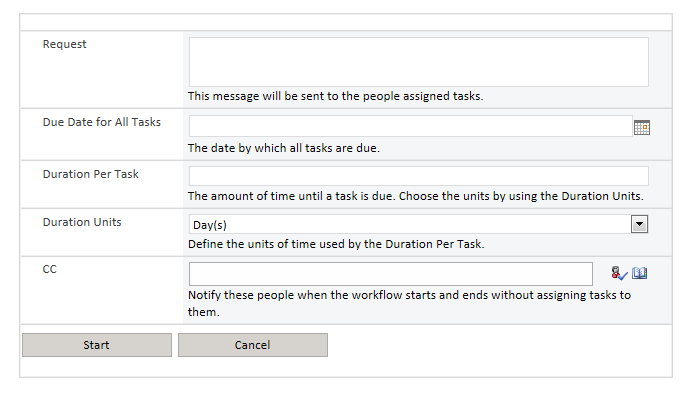
In Request, type the text of the email that each approver will receive. (Email must be enabled for your site in order for the workflow to send email notifications and reminders. If you’re not sure whether email has been enabled, check with your SharePoint administrator.)
-
In Due Date for All Tasks, use the date picker to choose the date on which all approvals must be complete.
-
In Duration Per Task, specify the number of days, weeks, or months should be allotted for each task in the approval workflow. For example, if you have three weeks until the deadline specified in step 5 and three approvers in the workflow, you might want to assign one week to each approver.
-
In Duration Units specify whether duration should be measured in days, weeks, or months.
-
In CC, type the email addresses of each person who should be notified when the workflow begins and ends. The people listed here will not be assigned tasks as part of the workflow.
-
Click Start.
Cancel approval
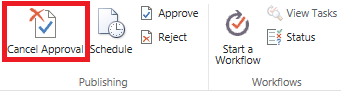
Once the approval workflow has started, you’ll notice that the Submit button has changed to Cancel Approval. When you cancel an approval workflow, the page remains in draft status and is not visible to site visitors. People on the approvers list, and those identified by CC, are notified by email of the cancellation. To cancel an approval workflow:
-
Click the Publish tab.
-
In the Publishing group, click Cancel Approval.
Check the approval status
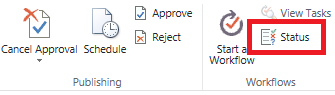
You can check the status of pages going through the approval workflow at any time, even after approval has been cancelled or completed. To check the status:
-
Click the Publish tab.
-
In the Workflows group, click Status.
Add a publishing approval workflow to the site collection
You may have noticed that the built-in publishing approval workflow is not available for publishing site collections; it’s only supported on publishing sites. We recommend that you use a custom workflow for publishing approval on your publishing site collection. To get started, see Getting started with SharePoint 2013 workflow.
Customize or create a publishing approval workflow
If you find that the SharePoint publishing approval workflow doesn’t quite meet your needs, you can customize it or create your own. For instructions, see Getting started with SharePoint 2013 workflow.


